Thursday, October 31, 2024
Quick and Easy Cutting Board Projects to Make and Sell

Quick and Easy Cutting Board Projects to Make and Sell
Cutting boards are a staple in any kitchen, and they can be both functional and beautiful. If you're looking for a quick and easy woodworking project that you can sell, making cutting boards is a great option. They're relatively inexpensive to make, and you can get creative with the designs and materials. This guide will explore various cutting board project ideas, techniques, and tips for crafting and selling your creations.
Choosing the Right Wood for Your Cutting Board
The type of wood you choose for your cutting board will affect its durability, appearance, and price. Here are some popular choices:
Hardwoods for Durability
- Maple: A popular choice for cutting boards, maple is durable, resistant to scratches and stains, and has a beautiful grain pattern. It's also relatively affordable.
- Cherry: Another excellent choice for cutting boards, cherry has a warm reddish-brown color that deepens with age. It's also durable and easy to work with.
- Walnut: Walnut is known for its rich, dark brown color and beautiful grain pattern. It's also very hard and durable, making it ideal for cutting boards.
- Hard Maple: The hardest of the maples, Hard Maple is known for its strength and durability. It's a great choice for heavy-duty cutting boards that will withstand years of use.
Softwoods for Budget-Friendly Options
- Pine: Pine is a softwood, but it's still a good choice for cutting boards if you're looking for a budget-friendly option. It's easy to work with and has a warm, yellow color.
- Redwood: This wood is known for its reddish-brown color and its natural resistance to decay and insects. It's a good choice for outdoor cutting boards.
Consider the following factors when choosing your wood:
- Your budget: Hardwoods tend to be more expensive than softwoods.
- The intended use of the cutting board: If you're making a cutting board for everyday use, you'll want to choose a durable hardwood. If you're making a cutting board for display, you can choose a softer wood with a more interesting grain pattern.
- The desired look: Different woods have different colors and grain patterns. Choose a wood that will complement the overall aesthetic of your cutting board.
Basic Cutting Board Construction Techniques
Once you've chosen your wood, you'll need to cut it to size and assemble it into a cutting board. Here's a general process:
- Cut your wood to size. Use a table saw, circular saw, or handsaw to cut your wood to the desired dimensions. Remember to account for the thickness of the wood when cutting.
- Sand the wood. Use a sander or sandpaper to smooth out any rough edges and create a smooth surface. Start with a coarse grit sandpaper and gradually work your way to a finer grit.
- Apply a finish. Apply a food-safe finish to your cutting board, such as mineral oil, beeswax, or butcher block oil. This will help to protect the wood from moisture and stains.
Simple and Profitable Cutting Board Projects
Here are some quick and easy cutting board projects that you can make and sell:
The Classic Rectangular Cutting Board
This is the most basic cutting board design and a great place to start. Simply cut a rectangular piece of wood to your desired size, sand it smooth, and apply a finish. You can add a simple design, such as a groove for catching juices, or keep it plain. You can also offer different size options for variation.
The Cheese Board
Cheese boards are a popular item to sell, and they're relatively easy to make. You can create a cheese board by cutting a piece of wood into a rectangular or oval shape, and then adding a handle on one side. To create a more decorative look, you can use different types of wood for the board and the handle, or you can add a groove around the edge of the board.
The Serving Tray Cutting Board
Combine functionality and style by creating a cutting board that doubles as a serving tray. Start with a large rectangular board and add a handle on each side. You can also create a groove around the perimeter of the board to hold food items.
The End Grain Cutting Board
End grain cutting boards are known for their durability and beautiful appearance. They are made by gluing together small pieces of wood that have been cut across the grain. This creates a surface that's harder and less likely to dull knives. While more challenging to make, end grain boards can fetch a higher price due to their craftsmanship and durability.
Adding Value and Charm: Creative Touches for Your Cutting Boards
To make your cutting boards stand out, consider adding these creative touches:
Inlay Designs
Inlay designs add a touch of elegance and complexity. Use contrasting wood species, such as ebony or maple, to create intricate patterns and geometric shapes. This technique elevates the visual appeal and allows for unique customizations.
Engraving
Personalized engravings enhance the value and sentimentality of your creations. Offer customers the option to personalize their cutting boards with names, dates, or special messages. You can use a handheld engraving tool or a laser engraver for professional-looking results.
Handles and Hand-Carving
Add functional and aesthetically pleasing handles. Use wood that complements the board, and consider carving a design into the handle for extra flair. This adds character and makes your cutting board more comfortable to use and display.
Epoxy Resin Art
Incorporate epoxy resin to create stunning and eye-catching designs. Experiment with different colors and textures to add depth and dimension. Epoxy resin can be used to create abstract patterns, encapsulate dried flowers or leaves, or even embed metallic flakes for a glamorous look. This technique is popular for modern and contemporary designs.
Selling Your Handmade Cutting Boards
Once you've made your cutting boards, it's time to start selling them. Here are a few ideas:
- Online marketplaces: Etsy, Amazon Handmade, and other online marketplaces are great places to sell your handmade cutting boards.
- Local craft fairs and farmers markets: This is a great way to connect with customers in your community and show off your work in person.
- Social media: Use social media to promote your cutting boards and build a following. Post photos of your work, share behind-the-scenes glimpses of your process, and offer discounts and promotions.
- Word of mouth: Let your friends and family know about your cutting boards. Encourage them to spread the word to their networks.
Tips for Success
Here are some tips for making and selling successful cutting boards:
- Start with simple designs. Don't try to do too much too soon. Start with basic designs and gradually work your way up to more complex projects.
- Pay attention to detail. A well-made cutting board is all about the details. Make sure your edges are smooth, your finish is even, and your design is executed perfectly.
- Price your boards appropriately. Consider the cost of your materials, your time, and the market value of similar cutting boards when setting your prices.
- Market your boards effectively. Take high-quality photos of your boards, write compelling product descriptions, and use social media to promote your business.
- Provide excellent customer service. Respond to inquiries promptly, pack your boards carefully, and stand behind your work.
Making and selling cutting boards can be a fun and rewarding hobby, and it can also be a lucrative business. By following these tips, you can create beautiful, functional cutting boards that your customers will love.
Floating Shelf Designs: DIY Wood Projects for Every Room

Floating Shelf Designs: DIY Wood Projects for Every Room
Hey there, DIY enthusiasts! Are you ready to add some stylish storage and personality to your home? Floating shelves are a fantastic way to do just that, and the best part? They're super easy to make! We're going to dive into some seriously cool floating shelf designs, all with a DIY touch, that will transform your living space into a haven of functionality and style.
Why Floating Shelves?
Before we get into the nitty-gritty, let's talk about why floating shelves are such a win. They’re not just for books anymore! These versatile shelves can be used to display your favorite artwork, plants, collectibles, or even your ever-growing collection of spices.
- Space-Saving Saviors: They make your room feel larger by eliminating the bulkiness of traditional shelves.
- Aesthetically Pleasing: They offer a clean, modern look that complements any style.
- Easy to Install: You don’t need any fancy tools or construction skills. You’ll be amazed at how quickly you can whip these up.
- Versatile Design: You can customize them to fit any space and create a unique look.
Floating Shelf Designs to Spark Your Creativity
Get ready to be inspired! Here are some floating shelf designs that are perfect for any room in your home:
The Classic Minimalist
This design is all about clean lines and functionality. Use simple, straight pieces of wood and a few sturdy brackets. You can choose a wood finish that complements your room’s décor. Think warm oak for a rustic vibe or sleek walnut for a modern touch.
The Industrial Chic
Embrace the raw beauty of reclaimed wood for a touch of industrial charm. Use exposed metal brackets or pipes to create a bold statement. The contrasting textures of wood and metal will add an edgy element to your space.
The Rustic Farmhouse
Embrace the warmth of natural wood with this design. Use reclaimed barn wood or knotty pine boards for a rustic feel. Add a touch of country charm with simple wrought iron brackets or distressed wooden corbels.
The Modern Geometric
This design is all about playing with angles and shapes. Use plywood to create shelves with unique angles or even incorporate circular elements. Pair these with sleek metal brackets or hidden supports for a modern, minimalist look.
The Bold and Colorful
Who says floating shelves have to be plain? Add some personality with bold colors or unique patterns. Paint the shelves in a bright shade or use patterned wallpaper to add visual interest. Get creative with your choices!
DIY Floating Shelf Instructions: Let's Get Building!
Okay, you're probably thinking, "I'm ready to get started!" Here’s a general guide for creating your DIY floating shelves:
- Choose your wood: Decide on the type of wood that fits your design and budget. Common choices include pine, oak, maple, or plywood.
- Measure and cut: Measure the space where you want to install your shelves, then cut your wood to size. Be sure to use a saw that’s appropriate for the type of wood you’re using.
- Sand and finish: Smooth out any rough edges with sandpaper. Then, apply a finish of your choice, such as paint, stain, or clear sealant.
- Choose your brackets: There are various types of brackets available, including metal, wood, or hidden support systems. Select ones that complement your design and can securely support the weight of your shelves.
- Install the brackets: Carefully attach the brackets to the wall using the appropriate hardware. Be sure to use anchors if necessary to ensure secure installation.
- Attach the shelves: Once the brackets are installed, carefully attach the shelves to the brackets, ensuring they are level and secure.
- Decorate your shelves: Now comes the fun part! Arrange your favorite items on your new floating shelves.
Tips for Successful DIY Floating Shelves
- Plan Ahead: Before you start, carefully plan your design and measure your space to ensure you have the right dimensions.
- Use the Right Tools: Invest in high-quality tools, such as a saw, drill, and level, to ensure precision and ease of installation.
- Safety First: Wear safety glasses and gloves when using power tools and handle sharp objects carefully.
- Don’t Overcrowd: Leave some breathing room between your shelves and items to avoid an overwhelming look.
- Play with Depth: Use shelves of varying depths to add visual interest and create a sense of movement.
- Embrace Imperfections: Remember, DIY projects don't have to be perfect. Embrace any imperfections or variations as part of the unique charm of handmade creations.
Commonly Asked Questions
Let's address some of your burning questions about floating shelves:
What Can I Use for Brackets?
The possibilities are endless! You can use metal L-brackets, decorative corbels, industrial pipes, or even create your own unique brackets using wood or other materials. Consider what complements your design and provides adequate support.
How Much Weight Can a Floating Shelf Hold?
This depends on the size of your shelf, the type of wood used, and the strength of your brackets. Make sure to choose brackets that can support the weight you plan to put on the shelf.
Can I Install Floating Shelves on Drywall?
Yes, you can! Just make sure to use appropriate anchors designed for drywall to provide secure installation. Refer to the instructions of the anchors for specific recommendations.
What Are Some Creative Ideas for Floating Shelves?
Get inspired! Here are a few ideas to get your creative juices flowing:
- Create a floating desk by extending a shelf to provide a workspace.
- Install a series of floating shelves to form a unique bookshelf that showcases your favorite reads.
- Build a floating spice rack to keep your kitchen organized.
- Use floating shelves to create a stunning gallery wall for your artwork.
- Turn a floating shelf into a cozy window seat by adding cushions and throw pillows.
There you have it! Now that you're armed with these DIY floating shelf ideas and tips, you're ready to transform your home into a stylish and functional haven. Don’t be afraid to experiment and let your creativity shine. Have fun building!
Wednesday, October 30, 2024
How to Build Custom Wall Shelves for Extra Income

Building Custom Wall Shelves for Extra Income: A Comprehensive Guide
In today's economy, many people are seeking ways to supplement their income. One promising avenue is to tap into the burgeoning DIY market by building and selling custom wall shelves. This guide provides a comprehensive overview of the process, from initial planning to marketing and sales, enabling you to embark on a rewarding journey of handcrafted excellence.
I. Planning and Preparation
1. Market Research and Niche Identification
Before diving into production, it's crucial to understand your target market and identify a niche. Analyze existing shelf offerings in your area to identify gaps or unmet needs. Consider factors like:
- Design trends: Are minimalist shelves or rustic farmhouse styles in demand?
- Material preferences: Do consumers favor wood, metal, or a combination?
- Functionality: Are there specialized needs for bookcases, display shelves, or floating units?
- Price point: What is the acceptable price range for your target audience?
By pinpointing your target market and their preferences, you can tailor your designs to meet specific needs and stand out from the competition.
2. Defining Your Brand and Style
Your brand identity will influence your marketing and customer perception. Consider:
- Brand name: Choose a name that reflects your aesthetic and resonates with your target audience.
- Logo: Develop a visual identity that is memorable and reflects your brand's personality.
- Style: Define your signature design style, whether it's contemporary, rustic, industrial, or a blend of elements.
Consistency in branding will help build recognition and establish your unique presence in the marketplace.
3. Gathering Tools and Materials
Your chosen shelf designs will dictate the necessary tools and materials. Ensure you have a well-equipped workspace with the following:
- Hand tools: Measuring tape, level, saw, drill, screwdriver, sander, clamps, hammer, chisel.
- Power tools: Circular saw, jigsaw, drill press (optional), router (optional), sander (optional).
- Materials: Wood (various types and sizes), metal brackets, screws, nails, glue, stain, paint, finish (varnish, lacquer).
Invest in quality tools and materials that will produce durable and aesthetically pleasing shelves.
II. Designing and Building
1. Sketching and Planning
Start by sketching your shelf designs on paper. Consider:
- Dimensions: Determine the desired width, depth, and height of the shelves.
- Number of shelves: How many shelves will your unit have, and how will they be arranged?
- Shelving style: Will the shelves be open, enclosed, or a combination?
- Bracketing: Choose the type of brackets that best suit your design and provide adequate support.
- Finishing: Select a finish that complements the style and enhances the durability of the shelves.
Once you have a clear vision, create detailed drawings or digital models to guide your construction process.
2. Cutting and Assembling
Carefully cut your materials according to your plans, ensuring precision and accuracy. Use a combination of hand tools and power tools as needed. When assembling the shelves, follow these tips:
- Pre-drill holes: This prevents wood splitting and ensures accurate screw placement.
- Use wood glue: Glue provides additional strength and stability to the joints.
- Securely fasten brackets: Ensure that the brackets are firmly attached to the wall for optimal support.
- Inspect for stability: Before installing the shelves, test their stability and strength.
3. Finishing Touches
After assembling the shelves, add the finishing touches to enhance their appearance and durability:
- Sanding: Smooth any rough edges and imperfections with a sander.
- Staining or painting: Apply stain or paint according to your design and desired color scheme.
- Sealing: Apply a clear finish, such as varnish or lacquer, to protect the shelves from moisture and scratches.
Pay attention to detail and ensure a professional finish that reflects your craftsmanship.
III. Marketing and Sales
1. Building an Online Presence
Establish an online presence to showcase your work and reach a broader audience:
- Website or online store: Create a professional website or use an online platform like Etsy or Shopify to sell your shelves.
- Social media: Utilize platforms like Instagram, Pinterest, and Facebook to promote your products and connect with potential customers.
- Online marketplaces: List your shelves on platforms like Craigslist, Facebook Marketplace, or local online communities.
High-quality product photos and compelling descriptions are crucial for attracting customers online.
2. Local Networking and Sales
Connect with local businesses and communities to expand your reach:
- Craft fairs and markets: Participate in local events to showcase your shelves and interact with potential buyers.
- Home improvement stores: Collaborate with stores to display your products or offer custom shelf installation services.
- Local businesses: Offer your shelves to local businesses for display or storage solutions.
- Materials cost: Calculate the cost of materials and labor involved in creating each shelf.
- Market value: Research the pricing of similar shelves in your area to set a competitive rate.
- Profit margin: Factor in a reasonable profit margin to cover expenses and ensure profitability.
- Responsive communication: Respond promptly to inquiries and address customer concerns professionally.
- Personalized service: Offer customized solutions and cater to individual customer preferences.
- Positive reviews: Encourage customer reviews and testimonials to build social proof and enhance your reputation.
- New designs: Experiment with new styles and materials to keep your product line fresh and appealing.
- Customer feedback: Actively solicit customer feedback to identify areas for improvement and new product ideas.
- Industry trends: Stay informed about design trends and emerging technologies in the DIY and home decor industries.
- Expanding your product line: Offer additional items, such as furniture, home decor, or custom woodworking projects.
- Outsourcing: Consider outsourcing some tasks, such as cutting or finishing, to free up your time for design and marketing.
- Hiring help: As your workload increases, hire additional personnel to assist with production, marketing, or customer service.
Networking and establishing local partnerships can lead to valuable referrals and sales opportunities.
3. Pricing and Payment
Determine competitive pricing for your shelves by considering:
Offer flexible payment options, such as online payments or cash on delivery, to enhance customer convenience.
IV. Building a Successful Business
1. Customer Service and Reviews
Excellent customer service is vital for building trust and repeat business:
Excellent customer service will lead to positive word-of-mouth marketing and foster long-term customer loyalty.
2. Continuous Improvement and Innovation
Stay ahead of the curve by continuously seeking improvement and innovation:
By embracing continuous improvement, you can adapt to evolving market demands and maintain a competitive edge.
3. Scaling Your Business
As your business grows, consider strategies to scale your operations:
Strategic scaling will enable you to manage growth efficiently and expand your business reach.
Building custom wall shelves for extra income offers a rewarding and creative opportunity. By combining meticulous craftsmanship with effective marketing strategies, you can establish a successful business that caters to the growing demand for personalized home decor solutions.
Tuesday, October 29, 2024
How to Build Custom Wooden Pencil Holders for Extra Income

Building Custom Wooden Pencil Holders for Extra Income
Looking for a creative way to earn some extra income? Why not tap into your woodworking skills and build custom wooden pencil holders? These charming and practical items are always in demand, making them a great way to turn your passion into profit. Here's a detailed guide to get you started:
Identifying Your Target Market
Before you start crafting, it's crucial to understand who you're making these pencil holders for. Do you want to cater to students, artists, or office professionals? Knowing your target market will help you decide on the design, size, and functionality of your pencil holders.
Students:
Consider colorful and whimsical designs that appeal to their youthful spirit. Functional compartments for pens, pencils, and other stationery items are essential.
Artists:
Larger holders with compartments for brushes, paint tubes, and other art supplies will be a hit. Consider using different wood finishes and textures to create unique and visually appealing pieces.
Office Professionals:
Elegant and minimalist designs will be favored. Prioritize functionality, with slots for pens, pencils, and perhaps a small drawer for paper clips or other office essentials.
Choosing the Right Wood and Tools
The type of wood you choose will significantly influence the look and feel of your pencil holders. Consider factors like durability, affordability, and aesthetic appeal. Some popular choices include:
- Pine: Affordable and easy to work with, ideal for beginners.
- Cherry: Offers a rich reddish-brown hue and a beautiful grain pattern.
- Maple: Known for its durability and pale, creamy color.
- Walnut: Provides a distinctive dark brown color and a unique grain pattern.
In terms of tools, you'll need basic woodworking essentials like:
- Saw: For cutting the wood to size.
- Drill: For creating holes and attaching components.
- Sandpaper: For smoothing the surfaces.
- Clamps: For holding pieces together securely.
- Measuring tape: For accurate measurements.
- Wood glue: For bonding wood pieces.
- Finishing supplies: Stains, paints, and varnishes for enhancing the appearance of your pencil holders.
Designing Your Pencil Holder
The design possibilities for wooden pencil holders are endless. Here are some key elements to consider:
- Shape: Simple rectangular, cylindrical, or unique shapes.
- Size: Consider the number of pencils and other items your holder should accommodate.
- Compartments: Separate sections for pencils, pens, markers, and other stationery items.
- Additional features: Drawers, lids, or decorative elements to enhance the functionality and aesthetics.
Sketch out your ideas on paper before you start building. You can also find inspiration online or in craft magazines. Don't be afraid to experiment and try new things!
Building the Pencil Holder
Now comes the fun part – building your custom pencil holder. Follow these steps:
- Cut the wood to size according to your design.
- Create compartments for pens, pencils, and other items, if necessary.
- Sand the wood to ensure a smooth finish.
- Assemble the pieces using wood glue and clamps.
- Apply a finish, such as stain, paint, or varnish, to protect and enhance the appearance of your pencil holder.
- Let the finish dry completely before handling.
Marketing and Selling Your Pencil Holders
Now that your custom pencil holders are ready, it's time to market and sell them. Consider these options:
- Online marketplaces like Etsy, eBay, and Amazon.
- Local craft fairs and markets. This provides the opportunity to interact with potential customers and showcase your work in person.
- Social media platforms like Instagram and Facebook to reach a wider audience.
- Word-of-mouth marketing. Share your work with friends and family and ask for referrals.
Remember to price your pencil holders competitively, taking into account the cost of materials, time, and labor. Offer quality products with a personalized touch to stand out in the market.
Tips for Success
To increase your chances of success in building and selling custom wooden pencil holders, keep these tips in mind:
- Focus on quality craftsmanship: Use durable wood and pay attention to detail in every step of the building process.
- Be creative and original: Stand out from the competition by offering unique designs and finishes.
- Provide excellent customer service: Respond to inquiries promptly and address any concerns with care.
- Continuously improve your skills: Take workshops, read books, and practice regularly to enhance your woodworking abilities.
Building custom wooden pencil holders can be a rewarding and profitable hobby. With passion, creativity, and hard work, you can turn your woodworking skills into a successful side hustle.
Monday, October 28, 2024
Easy-to-Build Tiered Plant Stands for Beginners
Easy-to-Build Tiered Plant Stands for Beginners: A Guide to Green Bliss
Hey there, fellow plant enthusiasts! Are you looking to add some vertical greenery to your space but don't want to break the bank? Then you're in the right place! Today, we're diving into the world of DIY tiered plant stands – projects that are as easy as they are rewarding.
Whether you're a seasoned DIYer or a complete novice, building your own tiered plant stand is a super satisfying way to showcase your plants. Plus, you get to customize it to perfectly match your style and space. Let's get started!
Choosing Your Materials
The beauty of DIY is the flexibility – you can use whatever materials you have on hand or find at your local hardware store. Here are some popular and easy-to-work-with options:
Wood
Wood is a classic choice for plant stands, offering durability and a natural look. You can find pre-cut wood planks at most hardware stores, or if you're feeling adventurous, you can try repurposing old wood pallets or crates.
Metal
Metal pipes, rods, and brackets offer a modern and sleek aesthetic. You can find a wide range of sizes and finishes at hardware stores.
PVC Pipes
PVC pipes are a budget-friendly and lightweight option, especially great for beginners. They come in various sizes and are easy to cut and join.
Design Inspiration: What Kind of Tiered Stand Are You Dreaming Of?
Before you start gathering materials, it's a good idea to have a rough idea of what kind of tiered plant stand you want to build. There are endless possibilities! Here are a few popular designs to get your creative juices flowing:
Classic Wooden Tiered Stand
This is a timeless and elegant choice. Think three or four tiers, constructed from sturdy wood planks with a natural finish or painted in a color that complements your decor.
Modern Metal Stand
For a clean and contemporary look, consider a metal stand with sleek lines and geometric shapes. You can create interesting shapes by combining different sizes of pipes or brackets.
Rustic Ladder Stand
This whimsical design is perfect for adding a touch of farmhouse charm to your space. Simply repurpose an old ladder or create your own using wooden planks and dowels.
Circular Stand
Circular stands can add a touch of whimsy and elegance. You can use wood or metal to create circular platforms that are stacked on top of each other.
Essential Tools for Building Your Stand
You don't need a whole workshop to build a tiered plant stand – just a few basic tools:
You might also find a hammer, pliers, and a pipe cutter useful depending on your chosen materials.
Simple Steps to Building a Tiered Plant Stand
Now let's get our hands dirty! Here's a breakdown of the basic steps for building a tiered plant stand.
1. Plan Your Design
Sketch out your design on paper and decide on the dimensions and number of tiers. Think about the size and weight of your plants to ensure your stand can support them.
2. Cut Your Materials
Once you have your design finalized, carefully cut your materials to the exact measurements you need. Don't forget to consider any overlap or spacing between tiers.
3. Assemble the Stand
Use screws, nails, or glue to securely attach the different pieces of your stand. Make sure to check for stability as you assemble it.
4. Add Finishing Touches
Sand any rough edges and then paint or stain your stand to match your style. You can also add decorative elements like decorative knobs or rope accents.
5. Style It Up!
The fun part! Arrange your plants on your newly built stand and enjoy your green oasis.
Tips for Beginners
Here are some tips to help you avoid common pitfalls and create a beautiful and functional tiered plant stand:
Frequently Asked Questions
Q: How do I choose the right size for my tiered plant stand?
A: Consider the space you have available and the size of your plants. Start with a smaller stand if you're unsure and gradually increase the size as you get more confident.
Q: What type of paint should I use for my plant stand?
A: Choose a paint that is water-resistant and durable. Acrylic paints are a good option for wood, while enamel paints are good for metal.
Q: What are some unique ideas for decorating my plant stand?
A: Get creative! You can add decorative knobs, paint a mural, use rope accents, or even add small LED lights for a touch of magic.
Happy crafting, and remember: your plant stand is an expression of your creativity. Embrace the journey, enjoy the process, and have fun showcasing your green treasures!
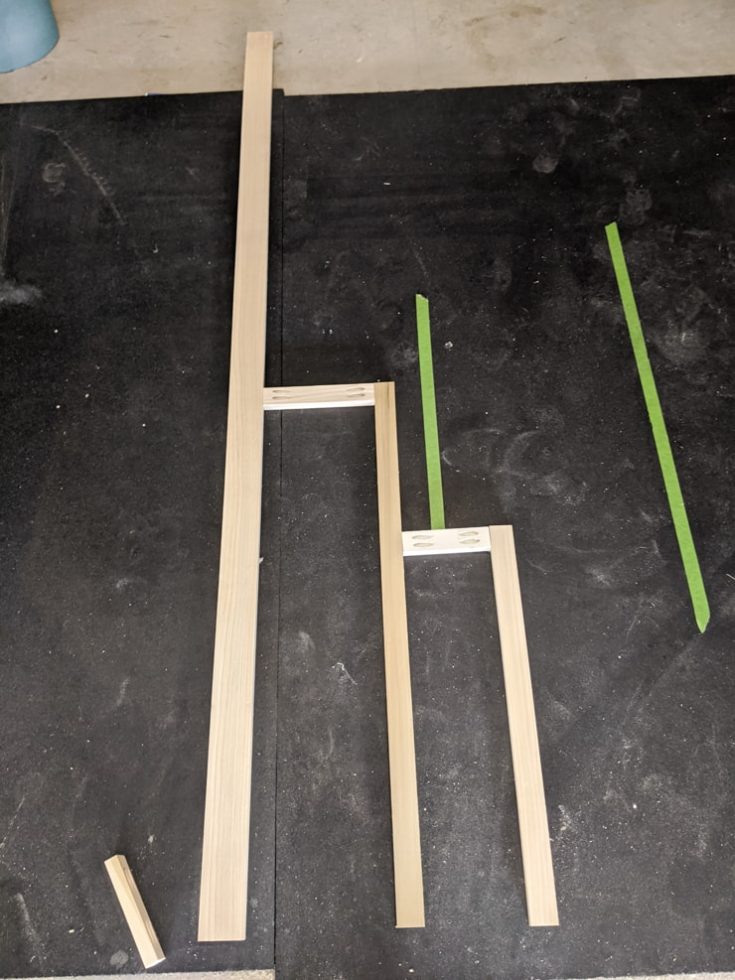
How to Build and Install Floating Shelves for Books and Decor

How to Build and Install Floating Shelves for Books and Decor
Floating shelves are a stylish and practical way to add storage and display space to any room. They create a modern, minimalist aesthetic and can be customized to fit your unique needs. Whether you're looking to showcase your book collection, display cherished trinkets, or simply add a touch of visual interest, building and installing floating shelves is a rewarding DIY project. This step-by-step guide will walk you through the process, from choosing materials to mounting your shelves, enabling you to create a beautiful and functional addition to your home.
Step 1: Planning and Design
Before you begin building, carefully plan out your floating shelf design. Consider the following factors:
1. Shelf Placement:
Choose the location for your floating shelves carefully. Consider the surrounding décor, available wall space, and the weight your shelves will need to hold. Measure the space to ensure your shelves will fit and determine the number of shelves you want to create.
2. Shelf Dimensions:
Decide on the dimensions of your shelves. Consider the items you will be storing or displaying. For books, a depth of 10-12 inches is ideal, while shallower shelves might work better for displaying decorative items.
3. Material Selection:
Wood is the most common material for floating shelves, offering a variety of options to match your style. Pine and plywood are affordable choices, while hardwoods like oak or walnut offer durability and a more sophisticated look. Consider the weight of the items you'll be storing and choose a material that can support the load.
4. Shelf Style:
Think about the aesthetic you want to achieve. Do you prefer sleek, modern shelves or a rustic, traditional style? The shape and edge details of your shelves can greatly impact the overall look. You can opt for simple straight edges or add decorative touches like rounded corners or bevelled edges.
Step 2: Cutting and Assembling the Shelves
Once you've finalized your design, you can begin cutting and assembling your shelves. This process requires precision and accurate measurements.
1. Cut the Shelf Boards:
Using a saw, carefully cut your wood to the desired dimensions for your shelves. If you are working with multiple shelves, ensure all the pieces are uniform. For precise cutting, use a measuring tape and a pencil to mark the cut lines, then make your cuts with a saw. Be sure to wear safety glasses and gloves during this step.
2. Sand the Edges:
Sand the edges of your shelf boards to smooth out any rough spots and create a polished finish. Start with a coarse-grit sandpaper and gradually transition to a finer grit for a smooth surface.
3. Finish the Wood:
Apply a wood finish to your shelves, such as a stain, paint, or sealant. This will protect the wood from moisture and enhance its appearance. Choose a finish that complements your décor and style preferences. You may need to apply multiple coats for a more even color and finish. Allow each coat to dry completely before applying the next.
Step 3: Attaching the Shelf Brackets
This step involves installing shelf brackets on the wall, which will support the shelves.
1. Determine Bracket Placement:
Using a level, mark the wall where you want to install your brackets. Ensure the brackets are placed evenly and at the correct height.
2. Drill Pilot Holes:
Drill pilot holes at the marked points on the wall. This will help prevent splitting the wall material when you install the screws. The pilot holes should be slightly smaller than the diameter of the screws you plan to use.
3. Install the Brackets:
Secure the brackets to the wall using screws. Use a drill with a Phillips head bit to drive the screws into the pilot holes. Apply pressure to the screw driver to ensure the brackets are securely attached to the wall.
Step 4: Installing the Shelves
With the brackets securely installed, you can now attach the shelves.
1. Position the Shelves:
Align the shelves with the brackets. Ensure the shelves are level before you attach them.
2. Attach the Shelves:
Secure the shelves to the brackets using screws or other appropriate fasteners. Use a drill to drive the screws into the shelves and brackets, making sure the shelves are tightly secured to the wall.
Step 5: Finishing Touches
Once your shelves are securely installed, it's time to add your finishing touches.
1. Clean the Shelves:
Wipe down your shelves with a damp cloth to remove any dust or debris.
2. Add Your Decorations:
Arrange your books, photos, plants, or other decorative items on your new floating shelves. Play around with different arrangements until you find a look that you love.
Now you have a stunning and functional floating shelf unit that adds character and storage space to your home. Remember to check the weight capacity of your brackets and shelves to ensure they can safely support the items you are displaying. Enjoy your new floating shelves and the creative freedom they offer!
Wooden Christmas Village: A DIY Holiday Project

Wooden Christmas Village: A DIY Holiday Project
The magic of the holiday season is often enhanced by the enchanting charm of a miniature Christmas village. While ready-made villages offer a quick and convenient option, creating your own wooden Christmas village provides a unique and deeply personal experience. This DIY project allows you to express your creativity, customize every detail, and build a cherished holiday tradition that will bring joy for years to come.
Planning Your Wooden Christmas Village
Before diving into the construction, it's essential to plan your village. Consider the following factors:
Theme and Style
Choose a theme that resonates with your personality and holiday spirit. Options range from classic Victorian to whimsical snow globes, from rustic mountain cabins to modern urban landscapes. The chosen theme will guide your design choices, materials, and overall aesthetic.
Size and Scale
Determine the size and scale of your village. Consider the available space where it will be displayed. A compact village can grace a mantelpiece or shelf, while a larger one can become a focal point in a room. Choose a scale that suits your preferences and the overall design.
Layout and Arrangement
Sketch out a preliminary layout on paper, outlining the arrangement of houses, trees, and other elements. Consider the flow and visual balance of the village. You can create a central square, a winding road, or a picturesque mountainside scene.
Materials and Tools
List the necessary materials and tools based on your chosen design. Common materials include:
- Wooden building blocks or craft sticks
- Cardboard or foam board
- Acrylic paint in various colors
- Brushes and sponges
- Craft glue or hot glue gun
- Glitter, sequins, and other embellishments
- LED lights or string lights
- Small artificial trees or miniature Christmas trees
Building the Village
Once you have your plan in place, it's time to start building! Here's a step-by-step guide:
Constructing Houses and Buildings
For simple houses, you can use wooden blocks as a base. Paint them with your chosen colors and add details like windows, doors, and chimneys using craft materials. For more intricate designs, cardboard or foam board can be cut and shaped to create unique buildings.
Creating a Landscape
Use cardboard or foam board to create a base for your village. You can shape it to create hills, valleys, and other landscape features. Paint it in earth tones or create a snowy scene using white paint and glitter. Consider adding details like trees, rocks, and fences to enhance the visual appeal.
Adding Details and Embellishments
Once the basic structures are in place, it's time to add details and embellishments. Paint windows and doors, add chimneys and roofs. Use miniature Christmas trees, snowmen, and other festive figures to bring your village to life. You can also add glitter, sequins, or other decorative elements to create a magical touch.
Lighting Your Village
Adding lights to your village creates a warm and inviting ambiance. Use LED lights or string lights to illuminate the houses and create a twinkling effect. Carefully position the lights to avoid overheating and ensure they are securely attached.
Tips and Ideas
Here are some tips and ideas to enhance your wooden Christmas village:
- Personalize your village: Incorporate elements that reflect your own family traditions, hobbies, or interests. Add personalized touches like family names on house plaques or a miniature version of your own home.
- Use recycled materials: Get creative with repurposing materials like cardboard boxes, toilet paper rolls, and egg cartons to build unique structures.
- Create a story: Imagine a narrative for your village. Perhaps it's a cozy mountain town with a bustling market square or a bustling city with twinkling lights. Let your creativity guide you.
- Incorporate natural elements: Use pinecones, twigs, and dried leaves to create a natural touch in your village.
- Add a touch of magic: Include elements like snowmen, reindeer, or Santa Claus to evoke the magic of the holiday season.
Enjoying Your Wooden Christmas Village
Your wooden Christmas village is a testament to your creativity and a source of holiday joy. Display it prominently in your home and share its magic with family and friends. It can become a treasured heirloom that is passed down through generations, each year bringing back cherished memories of holidays past.
Creating a wooden Christmas village is more than just a DIY project; it's an opportunity to embrace the spirit of the season, express your unique style, and create lasting memories. As you carefully build each piece, you'll find yourself drawn into the enchanting world of miniature holiday charm, a world that will warm your heart and fill your home with the magic of Christmas.
Sunday, October 27, 2024
Stylish Wooden Shoe Racks with a Modern Touch

Stylish Wooden Shoe Racks with a Modern Touch
In the realm of interior design, functionality and aesthetics go hand in hand. A well-designed shoe rack not only keeps your footwear organized but also elevates the visual appeal of your entryway, bedroom, or any other space. Wooden shoe racks, in particular, offer a timeless elegance and natural warmth that complements a wide range of décor styles. This article delves into the world of stylish wooden shoe racks with a modern touch, exploring the latest trends, materials, and design features that redefine shoe storage.
The Allure of Wood in Contemporary Interiors
Wood has always been a cherished material in furniture making, prized for its durability, versatility, and inherent beauty. In modern interiors, wood continues to hold its place as a versatile and sophisticated element, adding warmth, texture, and a touch of nature's elegance. The use of wood in shoe racks creates a harmonious balance between functionality and style, seamlessly blending into contemporary settings.
The Natural Charm of Wood
Wooden shoe racks emanate a natural charm that complements the minimalist aesthetic of modern interiors. The warm tones and rich grain patterns of various wood species, from light oak to dark walnut, create a sense of grounding and tranquility. The organic nature of wood adds a touch of warmth and authenticity to contemporary spaces that often feature clean lines and sleek surfaces.
Modern Design Principles in Wooden Shoe Racks
Modern shoe rack designs embrace clean lines, minimalist aesthetics, and functional simplicity. These principles translate into sleek and streamlined silhouettes, often incorporating geometric shapes, open shelving, and a focus on functionality. The emphasis is on creating a visually uncluttered and organized space, allowing the natural beauty of the wood to take center stage.
Types of Wooden Shoe Racks with a Modern Touch
The world of wooden shoe racks offers a diverse range of styles and configurations, catering to different needs and aesthetic preferences. From sleek and minimalist designs to more elaborate and multi-functional options, here are some popular types of wooden shoe racks with a modern touch:
1. Open Shelf Shoe Racks
Open shelf shoe racks are a popular choice for their simplicity and airy aesthetic. They typically feature a series of horizontal shelves made from wood, offering ample space to display your footwear. The open design allows for easy access and ventilation, preventing the accumulation of moisture and odors.
Benefits of Open Shelf Shoe Racks:
- Minimalist and contemporary design.
- Excellent ventilation for shoes.
- Easy access to all shoes.
- Can be used for displaying decorative items.
2. Tiered Shoe Racks
Tiered shoe racks offer a space-saving solution, stacking multiple levels of shelves to maximize storage capacity. They come in various configurations, from compact two-tier units to larger multi-tiered structures, suitable for larger shoe collections. Tiered shoe racks can add a vertical element to your space, making them ideal for smaller entryways or bedrooms.
Benefits of Tiered Shoe Racks:
- Efficient use of vertical space.
- Versatile design with multiple tiers.
- Can be stacked or mounted on walls.
3. Shoe Cabinets
Wooden shoe cabinets offer a combination of storage and visual appeal. They feature closed doors or drawers, keeping your shoes neatly concealed while adding a touch of sophistication to your space. Modern shoe cabinets often incorporate sleek handles, minimalist designs, and innovative storage features, such as adjustable shelves, pull-out drawers, and shoe organizers.
Benefits of Shoe Cabinets:
- Enclosed storage for a neat and organized look.
- Variety of styles, colors, and sizes to choose from.
- Can double as a seating bench with a cushioned top.
4. Wall-Mounted Shoe Racks
Wall-mounted shoe racks offer a space-saving solution, maximizing floor space and adding a modern touch to your décor. They come in various sizes and configurations, from compact single-tier units to larger multi-tiered structures. Wall-mounted racks are ideal for smaller spaces, entryways, or bedrooms where floor space is limited.
Benefits of Wall-Mounted Shoe Racks:
- Maximizes floor space.
- Versatile mounting options for different wall types.
- Available in various styles and materials.
Materials and Finishes for Modern Wooden Shoe Racks
The choice of wood species and finish significantly influences the overall aesthetic of a wooden shoe rack. Here are some popular options that align with modern design trends:
1. Oak
Oak is a classic wood choice for furniture, known for its durability, rich grain patterns, and warm tones. Oak shoe racks offer a timeless elegance, complementing both traditional and contemporary interiors. They can be finished in a variety of stains, from natural to darker shades, to match your existing décor.
2. Walnut
Walnut is prized for its stunning grain patterns, deep brown hues, and natural oils that create a rich and luxurious finish. Walnut shoe racks add a touch of sophistication and warmth to any space. They are often finished with a clear coat to showcase the natural beauty of the wood.
3. Maple
Maple is a versatile wood species known for its smooth, pale color and fine grain. It is often used in contemporary furniture due to its clean lines and minimalist aesthetic. Maple shoe racks can be stained in various shades to match your décor or left with a natural finish for a light and airy look.
4. Bamboo
Bamboo is a sustainable and eco-friendly material that adds a touch of natural beauty and a modern vibe to shoe racks. It is lightweight, durable, and comes in various shades, from light to dark brown. Bamboo shoe racks offer a unique and contemporary aesthetic that complements minimalist interiors.
Styling Tips for Modern Wooden Shoe Racks
To enhance the stylish appeal of your wooden shoe rack and create a cohesive look, consider these styling tips:
1. Embrace Minimalism
Keep your shoe rack organized and visually appealing by minimizing clutter. Avoid overcrowding the shelves and stick to a curated selection of footwear. Consider using shoe organizers or dividers to create a neat and organized look.
2. Play with Texture
Add a touch of texture to your shoe rack by incorporating accessories with different finishes, such as a woven storage basket, a ceramic planter, or a patterned rug. The contrast in textures will add visual interest and depth to your space.
3. Incorporate Greenery
Bring a touch of nature indoors by placing a small plant on or near your shoe rack. Greenery adds a refreshing and vibrant element, creating a welcoming and calming atmosphere in your entryway or bedroom.
4. Choose Complementary Colors
Select a wooden shoe rack that complements the color palette of your existing décor. If your space features neutral tones, opt for a natural wood finish. For a bolder statement, choose a shoe rack in a contrasting color, such as a deep blue or rich green.
Conclusion
Stylish wooden shoe racks with a modern touch offer a harmonious blend of functionality and aesthetics, enhancing the organization and visual appeal of your home. From open shelves to tiered racks and shoe cabinets, there's a wide range of options to suit your style and storage needs. By embracing the natural beauty of wood and incorporating modern design principles, you can create a stylish and functional shoe storage solution that elevates the overall ambiance of your space.
Friday, October 25, 2024
How to Make a Wooden Candle Holder with a Geometric Design

Craft a Stunning Wooden Candle Holder with a Geometric Design
Ready to unleash your inner artist and create a unique, eye-catching candle holder? Look no further! This step-by-step guide will walk you through the process of crafting a geometrically inspired wooden candle holder that's sure to impress. From choosing the right wood to adding finishing touches, we'll cover it all. So, grab your tools and let's get crafting!
Gather Your Supplies
First things first, gather all the materials you'll need. This project is perfect for beginners, so don't worry if you're not a seasoned woodworker. You'll find most of these supplies at your local hardware store or online.
- Wood: Choose a wood that's easy to work with, like pine, cedar, or plywood. Aim for a piece that's about 1/2 inch thick and large enough to accommodate your design.
- Jigsaw: A jigsaw is essential for cutting out the intricate geometric shapes. If you don't have one, you can use a scroll saw or a hand saw for a more rustic look.
- Sandpaper: Use a variety of grits (from coarse to fine) to smooth out the wood after cutting.
- Wood glue: Needed for assembling the different pieces of your candle holder.
- Clamps: Keep the pieces together while the glue dries.
- Measuring tape: For precise measurements when planning your design.
- Pencil: For marking the wood and creating your design.
- Safety goggles and dust mask: Protect yourself from dust and debris when working with wood.
- Wood stain or paint (optional): To give your candle holder a unique finish.
- Candle: Choose a candle size that fits comfortably in your holder.
Design Inspiration: Geometric Wonders
The beauty of this project lies in its customizable design. There's no "right" or "wrong" way to approach it. Let your creativity guide you.
Here are some geometric shapes that can inspire your design:
- Triangles: Create a modern look with a series of interconnected triangles, or use them to form a pyramid shape for a bold statement.
- Squares and Rectangles: Simple yet elegant, squares and rectangles offer a clean and minimalist aesthetic. Combine them with other shapes for a playful touch.
- Circles: Circles add a sense of fluidity and movement. Try incorporating them as circular cutouts within a square or rectangular base.
- Hexagons: A classic choice with a touch of whimsy, hexagons offer a unique and eye-catching design. You can even use them to create a honeycomb pattern.
Step by Step: Crafting Your Geometric Masterpiece
Now, it's time to bring your vision to life!
Step 1: Design and Sketch
On a sheet of paper, sketch out your desired geometric design. Experiment with different shapes and arrangements until you're happy with the result. Consider the size of your candle and the overall look you want to achieve. Be sure to label the dimensions of each shape so you can easily transfer them to your wood.
Step 2: Transfer the Design
Use your pencil and measuring tape to transfer your design onto the wood. Be as precise as possible. If you're working with a complex design, consider using a ruler or a protractor for accuracy. Remember, you can always erase any mistakes.
Step 3: Cut Out the Shapes
This is where your jigsaw comes in handy. Securely clamp the wood to your work surface to prevent movement. Carefully follow the lines you've drawn, making sure to keep the blade at a 90-degree angle to the wood. Take your time and make smooth cuts to avoid splintering.
Step 4: Sanding and Finishing
Once you've cut out all the shapes, it's time to smooth them out. Start with a coarse grit sandpaper to remove any rough edges. Gradually work your way to finer grits until the surface is smooth and free of blemishes. Sanding is crucial for a professional-looking finish.
Step 5: Assembling the Holder
Now it's time to put your pieces together. Apply wood glue to the edges of the shapes where you want them to join. Use clamps to hold the pieces in place while the glue dries completely. If your design calls for overlapping pieces, make sure the glue is properly applied to both surfaces for a secure bond.
Step 6: Finishing Touches
After the glue dries, your candle holder is almost ready to shine! You can add a finishing touch by staining or painting the wood. Apply the stain or paint evenly, following the instructions on the product's label. Let the finish dry completely before using your candle holder. If you choose to stain, you can use multiple coats to achieve a deeper hue.
Step 7: Enjoy Your Creation
Congratulations! You've successfully crafted a stunning wooden candle holder with a geometric design. Place your candle inside and admire your handiwork. It's a perfect piece to add a touch of warmth and style to any room in your home.
Tips for Success
Here are a few additional tips to help you along the way:
- Practice makes perfect. If you're a beginner, practice your cuts on scrap wood before tackling your main project.
- Use a template. For complex designs, create a template from cardboard or thin plywood to ensure accuracy.
- Don't be afraid to experiment. Try different stains, paints, or finishes to personalize your candle holder.
- Embrace imperfection. Remember, handmade items often have a certain charm. Don't be discouraged if your project isn't perfectly symmetrical.
Commonly Asked Questions
Still have questions? Let's tackle some common ones:
Q: What type of wood is best for candle holders?
A: Hardwoods like maple, oak, and walnut are sturdy and resistant to warping. Softer woods like pine, cedar, and basswood are easier to work with. Ultimately, it comes down to personal preference and the look you're going for.
Q: What if I don't have a jigsaw?
A: You can use a scroll saw, a hand saw, or even a utility knife for simple designs. Remember, a more rustic look can be charming.
Q: How do I prevent the wood from catching fire?
A: Always use a candle holder with a wide enough base to keep the flame away from the wood. Consider using a heat-resistant material like glass or metal for the candle's immediate surroundings. Never leave burning candles unattended.
Q: How do I add a personal touch to my candle holder?
A: Get creative! You can add decorative elements like beads, gems, or even your own artwork to personalize your design. Experiment with different finishes and colors to create a one-of-a-kind masterpiece.
So, there you have it! With a bit of patience and creativity, you can create a stunning wooden candle holder that will brighten up your space and add a touch of handmade charm to your home. Go ahead, unleash your inner artist and get crafting!
Wednesday, October 23, 2024
Wine Rack Woodworking Ideas to Start Your Small Business

Uncorking a Business: Wine Rack Woodworking Ideas
Do you have a passion for woodworking and a love for wine? Then why not combine your passions and start a rewarding small business creating custom wine racks? The demand for unique and stylish wine storage solutions is high, offering a fantastic opportunity to tap into a lucrative market. From simple to elaborate, rustic to modern, your woodworking skills can transform a hobby into a flourishing enterprise.
Finding Your Niche
The first step in starting any successful business is identifying your niche. Consider what kind of wine racks you want to build, and who your target market is. Do you envision yourself crafting elaborate, one-of-a-kind pieces for discerning collectors, or offering functional and affordable options for the average wine enthusiast?
Consider these factors:
- Wine Storage Needs: Will you focus on racks for bottles, glasses, or both? What about space limitations for small apartments versus spacious wine cellars?
- Design Styles: Are you drawn to traditional, modern, rustic, or contemporary designs?
- Materials: What types of wood appeal to you? Will you use reclaimed wood for a unique and sustainable touch?
- Price Point: What is your target price range? Will you offer customized options that cater to different budgets?
Crafting Your Brand
Once you've established your niche, you can start building your brand. This includes coming up with a memorable name, designing a logo, and creating a strong online presence. Social media platforms like Instagram and Facebook are excellent tools for showcasing your work and connecting with potential customers.
Here are some key elements for your brand:
- Name: Choose a name that reflects your style and your target market. For instance, "Rustic Wine Racks" or "Modern Cellar Creations" clearly convey your niche.
- Logo: Design a logo that is visually appealing and represents your brand identity. Consider using elements that relate to wine, wood, or your specific style.
- Online Presence: Create a website or online store to showcase your work, list prices, and provide contact information.
Building Your Skills
Wine racks can range in complexity, from simple wall-mounted shelves to intricate, multi-tiered structures. It's essential to hone your woodworking skills and be confident in your ability to construct sturdy and aesthetically pleasing pieces.
Here are some tips to improve your woodworking skills:
- Take Workshops: Enroll in woodworking classes to learn new techniques and refine your skills.
- Practice, Practice, Practice: Start with simple projects and gradually work your way up to more complex designs.
- Experiment with Different Materials: Try working with different types of wood to discover your preferences and expand your skillset.
- Seek Feedback: Get feedback from friends, family, and fellow woodworkers to improve your designs and craftsmanship.
Marketing Your Wine Rack Business
Once you've created beautiful and functional wine racks, it's time to get the word out. Effective marketing can help you reach your target audience and grow your business.
Here are some marketing strategies to consider:
- Online Presence: Utilize social media platforms, create a website, and run online ads to promote your products.
- Local Events: Participate in craft fairs, farmers markets, and wine-related events to connect with potential customers in person.
- Collaborations: Partner with local wineries, restaurants, or wine shops to showcase your work and reach a wider audience.
- Word-of-Mouth: Encourage customer referrals by offering discounts or incentives for new business.
Growing Your Wine Rack Business
As your business grows, you can consider expanding your product line to offer a wider range of wine storage solutions. You might even offer custom design services to create truly unique and personalized pieces for your clients.
Here are some ideas for expanding your business:
- Custom Orders: Offer bespoke designs to cater to the individual needs and preferences of your customers.
- Specialty Racks: Create specialized wine racks for specific purposes, such as bottle displays, countertop units, or storage for glasses.
- Collaborations: Partner with other artisans or businesses to offer complementary products or services.
- Workshops: Host woodworking workshops or classes to share your passion and teach others the art of crafting wine racks.
Starting a small woodworking business specializing in wine racks offers a fulfilling and rewarding path. With a combination of passion, skill, and a strategic marketing plan, you can transform your love for wine and woodworking into a successful and thriving enterprise. Cheers to your entrepreneurial journey!
Tuesday, October 22, 2024
How to Craft Floating Shelves with Unique Edging and Accents

Elevate Your Decor: Crafting Floating Shelves with Unique Edging and Accents
Floating shelves are a fantastic way to add storage and style to your home. They create a clean, minimalist look while maximizing space. But let's face it, sometimes the standard, plain floating shelf can feel a little blah. That's where unique edging and accents come in! With a little creativity and some simple materials, you can transform basic shelves into stunning focal points.
Ready to ditch the boring and embrace the unique? Let's dive into the world of creative floating shelves!
Materials You'll Need:
Before we get started, let's gather the essentials. Depending on your project, you might need some or all of these:
- Wooden boards: Choose your preferred wood type (pine, oak, walnut) and thickness (typically 3/4" or 1").
- Brackets or hidden shelf supports: These hold the shelf up and come in various styles.
- Sandpaper: Smoothing things out is essential!
- Wood glue: To securely bond your edging and accents.
- Wood filler (optional): For filling any gaps or imperfections.
- Stain or paint (optional): To add color and finish to your shelves.
- Decorative edging: This is where you get creative! Choose from molding, trim, rope, or even metal accents.
- Accents: Think unique knobs, rope pulls, or decorative metal pieces.
- Measuring tape and level: For precise cuts and placement.
- Saw (circular or miter saw): For cutting wood to size.
- Drill and drill bits: For attaching brackets and accents.
- Clamps: To hold pieces together while the glue dries.
Step-by-Step: Building Your Unique Floating Shelves
Okay, let's roll up our sleeves and get building! Follow these steps to craft your own unique floating shelves:
1. Plan & Measure:
This is where your vision comes to life! Decide on the size, shape, and number of shelves you want. Measure your wall space carefully and determine the optimal shelf placement.
2. Cut the Wood:
Using your saw, cut the wooden boards to your desired lengths. Double-check your measurements and be sure to wear safety glasses!
3. Sand & Smooth:
Sand down any rough edges or imperfections. Start with coarser sandpaper and finish with finer grit sandpaper for a smooth, polished surface.
4. Add Edging:
Here's where the fun begins! Choose your decorative edging and get creative.
- Molding or Trim: Add a classic and elegant touch with traditional molding or trim. Use wood glue and clamps to attach it to the shelf's edges.
- Rope: For a rustic and cozy vibe, wrap natural rope around the edges. Use wood glue to secure the rope in place.
- Metal Accents: Add a modern and industrial feel with metal strips or decorative metal trim. Secure them with wood glue or screws.
5. Install Brackets or Supports:
Attach the brackets or hidden shelf supports to the wall according to the manufacturer's instructions. Make sure they are level and secure.
6. Add Accents:
Now it's time to add your finishing touches.
- Knobs: Add charming and functional knobs to the front of the shelf for a touch of whimsy.
- Rope Pulls: For a rustic feel, attach rope pulls to the shelves for easy access to displayed items.
- Metal Plates: Add decorative metal plates to the corners or sides of the shelves for a touch of elegance or industrial style.
7. Finish & Protect (Optional):
Give your shelves a beautiful finish with a stain, paint, or sealant. This will enhance the look and protect them from wear and tear.
8. Style & Display:
The grand finale! Arrange your favorite books, plants, and decorative items on your newly created shelves. Let your creativity flow!
Commonly Asked Questions:
Q: What's the best wood to use for floating shelves?
A: It really depends on your style and budget. Pine is budget-friendly and easy to work with. Oak and walnut offer a more sophisticated look and are known for their durability.
Q: How do I make sure the shelves are level?
A: Use a level to ensure that both the shelf and the brackets are perfectly level before attaching them to the wall.
Q: How do I hide the brackets or supports?
A: There are hidden shelf supports available that discreetly hold the shelf up without being visible. You can also use brackets that blend in with the wall color or design.
Q: What if my shelves need a bit more support?
A: If you are worried about your shelves being strong enough, consider using thicker boards or adding extra brackets or supports.
Q: What if I don't have the right tools?
A: Don't fret! Many hardware stores offer tool rental services. You can also consider hiring a professional handyman to help you install your shelves.
Crafting unique floating shelves is a rewarding experience! It allows you to express your personal style while adding storage and functionality to your home. With a bit of creativity and these tips, you can transform ordinary shelves into extraordinary design elements.
Sunday, October 20, 2024
Wooden Bird Feeders with a Natural or Distressed Finish That Sell Fast

Wooden Bird Feeders with a Natural or Distressed Finish That Sell Fast
In the world of bird feeders, wooden feeders hold a special allure. Their natural beauty and rustic charm create a welcoming atmosphere for feathered friends, while their durability ensures they withstand the elements. But when it comes to selling wooden bird feeders, it's not enough to simply offer a sturdy design. To capture the attention of discerning bird lovers, you need to present feeders that exude character and sophistication. One way to achieve this is by embracing the allure of natural and distressed finishes.
The Appeal of Natural Finishes
Natural finishes allow the wood's inherent grain patterns and textures to shine through. They create a sense of authenticity and connection to nature, complementing the surrounding environment. This type of finish offers a subtle elegance that blends seamlessly with any backyard setting.
Popular Natural Wood Choices
When it comes to natural finishes, several wood species are highly sought after for their beauty and durability.
- Cedar: Known for its natural resistance to rot and insects, cedar adds a rich aroma to your feeder and lasts for years.
- Redwood: This durable wood boasts a vibrant red hue that deepens over time, creating a warm and inviting aesthetic.
- Pine: Offering a softer, more rustic look, pine is a budget-friendly option with a timeless appeal.
The Charm of Distressed Finishes
Distressed finishes take the natural beauty of wood a step further by adding a touch of vintage charm. These finishes create the illusion of age, giving your feeders a sense of history and character. Distressed finishes can range from subtle to bold, depending on the desired effect.
Achieving a Distressed Look
Distressed finishes are often achieved through techniques such as:
- Sanding: Strategic sanding removes layers of wood, revealing underlying grain and creating a textured surface.
- Paint: Applying layers of paint and then partially removing them through sanding or distressing techniques reveals the wood beneath, adding depth and dimension.
- Staining: Using stains in varying shades or washes creates a layered effect that highlights the wood's natural patterns.
Selling Wooden Bird Feeders with Natural or Distressed Finishes
To ensure your wooden bird feeders with natural or distressed finishes sell fast, focus on:
- High-Quality Craftsmanship: Invest in well-made feeders that demonstrate attention to detail and durability.
- Unique Designs: Offer a variety of shapes and sizes to cater to different bird species and aesthetic preferences.
- Compelling Photography: Showcase your feeders' beauty with professional, high-resolution images that highlight the natural and distressed finishes.
- Detailed Product Descriptions: Explain the specific wood types and finishing techniques used, emphasizing their qualities and benefits.
- Excellent Customer Service: Provide prompt and helpful responses to inquiries, ensuring a positive customer experience.
By embracing the natural beauty of wood and its timeless charm, you can create wooden bird feeders that stand out in a crowded market. Natural and distressed finishes appeal to a discerning clientele, offering a touch of elegance and sophistication that bird lovers will appreciate. With careful craftsmanship, attention to detail, and effective marketing, you can sell these feeders quickly and build a thriving business.
Wednesday, October 16, 2024
Wooden Toys That Double as Decorative Pieces for Children’s Rooms
Wooden Toys That Double as Decorative Pieces for Children’s Rooms
Transforming a child's room into a haven of imagination and style is a dream for every parent. Wooden toys offer a unique blend of durability, natural beauty, and a timeless appeal that complements any décor. But beyond their practical functionality, wooden toys can also double as stunning decorative pieces, elevating the room's aesthetics and creating a warm, inviting atmosphere.
The Timeless Appeal of Wooden Toys
Wooden toys, with their intricate carvings, vibrant colors, and natural textures, possess a charm that never fades. Their craftsmanship speaks of quality and sustainability, making them heirlooms that can be passed down through generations. This enduring appeal sets them apart from fleeting plastic toys, adding a touch of sophistication to any child's room.
Transforming Toys into Decor
Wooden toys can be integrated into the décor in countless ways, adding personality and visual interest. Consider these ideas:
Showcase the Collection
Create dedicated display shelves or open storage solutions to showcase the collection of wooden toys. Arrange them by size, color, or type, turning the toys into eye-catching focal points. A simple, rustic ladder shelf can add a touch of farmhouse charm, while a modern floating shelf can create a sleek, contemporary look.
Embrace the Artistic Flair
Wooden toys often feature intricate designs and vibrant colors that can be incorporated into the overall design scheme. Look for toys with geometric patterns, playful animal shapes, or whimsical characters that can add a splash of color and personality to the room.
Embrace the Natural Element
The natural beauty of wood itself can be a key decorative element. Choose toys with unpainted finishes or subtle stains to create a warm, inviting atmosphere. Consider incorporating wooden blocks, stacking rings, or wooden puzzle pieces as decorative accents on shelves or tables.
Ideas for Wooden Toys That Double as Decor
Here are a few specific examples of wooden toys that effortlessly transition from playtime to decorative pieces:
- Wooden Trains: Instead of keeping them confined to a track, arrange them in a scenic display along a shelf or on a tabletop. Add miniature trees, houses, and people for a charming miniature landscape.
- Wooden Dolls: Dress up dolls in handmade outfits or vintage clothing and place them on a dresser or a vanity table, creating a whimsical vignette.
- Wooden Animals: Group wooden animal figures by type, habitat, or color, creating a miniature zoo or a woodland scene. These can also be placed on shelves, bookshelves, or even above a crib.
- Wooden Puzzles: Select puzzles with beautiful artwork or interesting designs and display them on a wall or on a bookshelf. This adds visual interest and encourages learning at the same time.
- Wooden Building Blocks: Beyond their classic play value, wooden blocks can be used to create imaginative sculptures or decorative structures. Encourage children to experiment with different arrangements and color combinations.
Creating a Harmonious Look
The key to incorporating wooden toys as decorative pieces is to ensure they complement the overall design aesthetic. If your room features a minimalist aesthetic, choose toys with clean lines and natural finishes. For a more whimsical or eclectic look, consider toys with vibrant colors, playful patterns, and unique designs. The possibilities are truly endless, allowing you to create a space that is both functional and aesthetically pleasing.
By embracing the beauty and versatility of wooden toys, parents can create children's rooms that are not only safe and stimulating but also stylish and unique. These toys, far from being mere playthings, become cherished companions, transforming into cherished decorative pieces that reflect a child's personality and inspire creativity for years to come.
Tuesday, October 15, 2024
DIY Christmas Wood Craft Ideas for All Ages

DIY Christmas Wood Craft Ideas for All Ages
Christmas is a time for family, friends, and festive fun! And what better way to get into the holiday spirit than by crafting with wood? Whether you're a seasoned woodworker or a complete beginner, there's a DIY wood craft project out there for everyone. So grab your tools, gather your supplies, and let's get creative!
Easy and Fun Wood Crafts for Kids
Let's face it, kids love to craft! And wood offers a unique and durable material for their creativity to shine. Here are some simple and fun wood craft ideas that even the littlest hands can handle:
Wooden Ornament Decorations
This is a classic craft that never gets old. Simply grab some unfinished wooden ornaments, paint, glitter, and other embellishments, and let the kids go wild! They can create personalized ornaments with their names, favorite characters, or even their handprints. You can even use wood slices as ornaments and decorate them with paint, glitter, or even decoupage techniques!
DIY Wooden Advent Calendar
Make Christmas countdown even more exciting by building a DIY advent calendar. You can find pre-made wooden advent calendar kits or create your own using wooden blocks or a wooden board. Paint each section, add numbers, and fill with small treats or toys. This is a fun project that the whole family can enjoy!
Wooden Snowman Family
Create a festive snowman family with wooden dowels, paint, and a little bit of imagination. Kids can paint their own snowman faces and add details like hats, scarves, and buttons. They can even create a unique story around their snowman family for even more fun!
Intermediate Wood Crafts for Beginners
If you're looking for a slightly more challenging wood craft project, here are some great options that are still achievable for beginners:
Wooden Christmas Sign
A personalized Christmas sign is a lovely way to add a festive touch to your home décor. You can find pre-made wooden signs at craft stores or simply cut a piece of wood to the desired size. Get creative with paint, stencils, and embellishments to create a sign that reflects your personal style.
Wooden Reindeer Decorations
Reindeer are a staple of Christmas decor, and you can make your own with wood. Simply find some wooden cutouts or create your own from plywood. Paint the reindeer, add antlers, and decorate them with glitter, ribbons, or even LED lights. They make a unique and festive decoration for your home or as a gift.
Wooden Christmas Tree Decorations
Take your Christmas tree decorating to the next level with DIY wooden ornaments. You can create simple geometric shapes or intricate designs using a scroll saw. Paint, stain, or decoupage your ornaments to create a beautiful and personalized touch.
Advanced Wood Crafts for Experienced Woodworkers
If you're a seasoned woodworker, there are endless possibilities when it comes to creating stunning Christmas wood crafts. Here are some advanced ideas that will truly impress:
Intricate Wooden Nativity Scene
Challenge yourself to create a beautiful and detailed nativity scene using wood. You can carve each figure individually or use a combination of carving and woodworking techniques. Paint the figures in vibrant colors and create a beautiful backdrop to complete your masterpiece.
Custom Wooden Advent Calendar
For those with serious woodworking skills, crafting a custom wooden advent calendar can be a truly rewarding project. Use your woodworking expertise to build a unique design that reflects your personal style. You can incorporate intricate details, hidden compartments, and even a mechanism to reveal the daily surprise. This is a project that will be treasured for years to come.
Wooden Christmas Village
Bring a little Christmas magic into your home with a custom-made wooden village. Build intricate houses, shops, and landmarks using a variety of woodworking techniques. Add lights, snow, and tiny details to create a captivating and whimsical Christmas scene that will be a conversation starter for years to come.
Tips for Success
Here are some tips to make your wood crafting experience enjoyable and successful:
Commonly Asked Questions
What type of wood is best for Christmas crafts?
For beginner woodworkers, pine, basswood, or balsa wood are good choices. They're easy to work with and readily available. For more intricate projects, hardwoods like maple, cherry, or walnut are excellent options.
Where can I find unfinished wooden ornaments?
Unfinished wooden ornaments can be found at craft stores like Michaels, Hobby Lobby, and Joann Fabrics. You can also find them online through retailers like Amazon or Etsy.
What are some good paint options for wood?
Acrylic paints are a popular choice for wood crafts because they dry quickly and are easy to clean up. You can also use oil-based paints for a more durable finish.
How can I protect my finished wood crafts?
You can protect your finished wood crafts with a sealant like polyurethane or varnish. This will help to prevent scratches, water damage, and fading.
Wood crafts are a fantastic way to celebrate the Christmas season and create lasting memories. So get out there, grab your tools, and create some festive magic!
Monday, October 14, 2024
Small Toolbox Organizer Projects That Are Easy to Sell

Small Toolbox Organizer Projects That Are Easy to Sell
In the realm of woodworking and DIY, crafting practical and visually appealing projects holds immense appeal. For those seeking lucrative ventures with minimal investment and manageable complexity, creating small toolbox organizers presents an excellent opportunity. These compact creations cater to the ubiquitous need for order and efficiency within workshops, garages, and toolboxes, ensuring a ready market for your handiwork.
This article delves into the intricacies of crafting small toolbox organizers, providing insights into their design, construction, and marketing strategies. We will explore various ideas that are both functional and aesthetically pleasing, offering guidance on materials, tools, and techniques to guide your creative endeavors. Moreover, we will equip you with tips on pricing your creations effectively, showcasing them to potential buyers, and establishing a sustainable online presence to expand your reach.
Understanding the Market Demand
Before embarking on your toolbox organizer journey, it's crucial to understand the target audience and their needs. Toolbox organizers cater to a diverse clientele, including:
- Home DIY enthusiasts: These individuals often require organized storage solutions for their tools, ensuring they are readily accessible for home improvement projects.
- Professional tradespeople: Plumbers, electricians, carpenters, and other skilled professionals rely on efficient tool organization for productivity and safety.
- Hobbyists: Model builders, electronics hobbyists, and craft enthusiasts benefit from compact organizers for their specialized tools and components.
Identifying the specific needs of your target market will influence your design choices. Consider the size and type of tools they commonly use, their storage preferences, and the overall aesthetic they desire.
Conceptualizing Your Designs
The design of your toolbox organizer is paramount to its success. It should be practical, durable, and visually appealing. Here are some key considerations:
Functionality
- Compartmentation: Design compartments of varying sizes to accommodate tools of different dimensions.
- Accessibility: Ensure that all tools are easily accessible without having to rummage through multiple layers.
- Security: For valuable tools, consider incorporating locking mechanisms or secure compartments.
Materials
- Wood: Plywood, MDF, and hardwood offer durability and a natural aesthetic.
- Plastic: Lightweight and water-resistant, plastic is suitable for less demanding applications.
- Metal: Aluminum and steel provide exceptional strength and longevity.
Aesthetic Appeal
- Color: Choose colors that complement the user's workspace or personal preferences.
- Finish: Consider staining, painting, or using clear finishes to enhance the visual appeal.
- Design: Explore unique shapes, patterns, or embellishments to set your organizers apart.
Crafting Your Toolbox Organizers
Once you have finalized your designs, it's time to bring them to life. The following steps provide a general guide:
Materials and Tools
- Materials: Choose your preferred materials based on design and budget.
- Tools: Assemble a basic woodworking toolkit, including a saw, drill, sandpaper, clamps, and glue.
- Measuring tools: Precision is key for accurate cuts and assembly.
- Safety gear: Wear safety glasses, ear protection, and gloves while working.
Construction Process
- Cutting: Use a saw to accurately cut your chosen materials based on your design plans.
- Drilling: Drill holes for screws, hinges, or other hardware as required.
- Assembling: Securely fasten the various components using glue, screws, or other fasteners.
- Finishing: Sand down rough edges, apply stains or paints, and add any desired embellishments.
Marketing Your Creations
With your toolbox organizers ready, it's time to bring them to the market. Here are some effective strategies:
Online Presence
- Etsy: This popular online marketplace is ideal for selling handcrafted items.
- Amazon Handmade: Another established platform for artisans to showcase their work.
- Social Media: Create accounts on platforms like Instagram and Facebook to share photos, videos, and stories of your creations.
- Website: Consider building a website to showcase your full product line and provide more detailed information.
Offline Opportunities
- Local Craft Fairs and Markets: These events offer direct interaction with potential customers.
- Consignment Shops: Partner with local shops to sell your organizers on their premises.
- Networking: Attend industry events and connect with fellow makers and potential buyers.
Pricing and Profitability
Pricing your toolbox organizers is a delicate balance between cost and market value. Consider:
- Material Costs: Account for the cost of all materials, including wood, hardware, and finishing supplies.
- Labor Costs: Factor in the time spent designing, constructing, and finishing each organizer.
- Market Research: Analyze prices of similar products on other platforms and assess the value proposition of your unique offerings.
- Profit Margin: Aim for a reasonable profit margin to ensure financial sustainability.
Conclusion
Crafting small toolbox organizers presents a lucrative opportunity for woodworking enthusiasts and DIYers seeking to generate income from their skills. By carefully considering design, materials, construction, and marketing strategies, you can create sought-after products that cater to the widespread demand for organized storage solutions. Embrace creativity, refine your craftsmanship, and leverage online and offline channels to reach a broader audience. With dedication and perseverance, you can establish a thriving business centered around functional and visually appealing toolbox organizers.
Saturday, October 12, 2024
How to Build Sturdy Wall Shelves for Kitchen, Bathroom, and Living Room
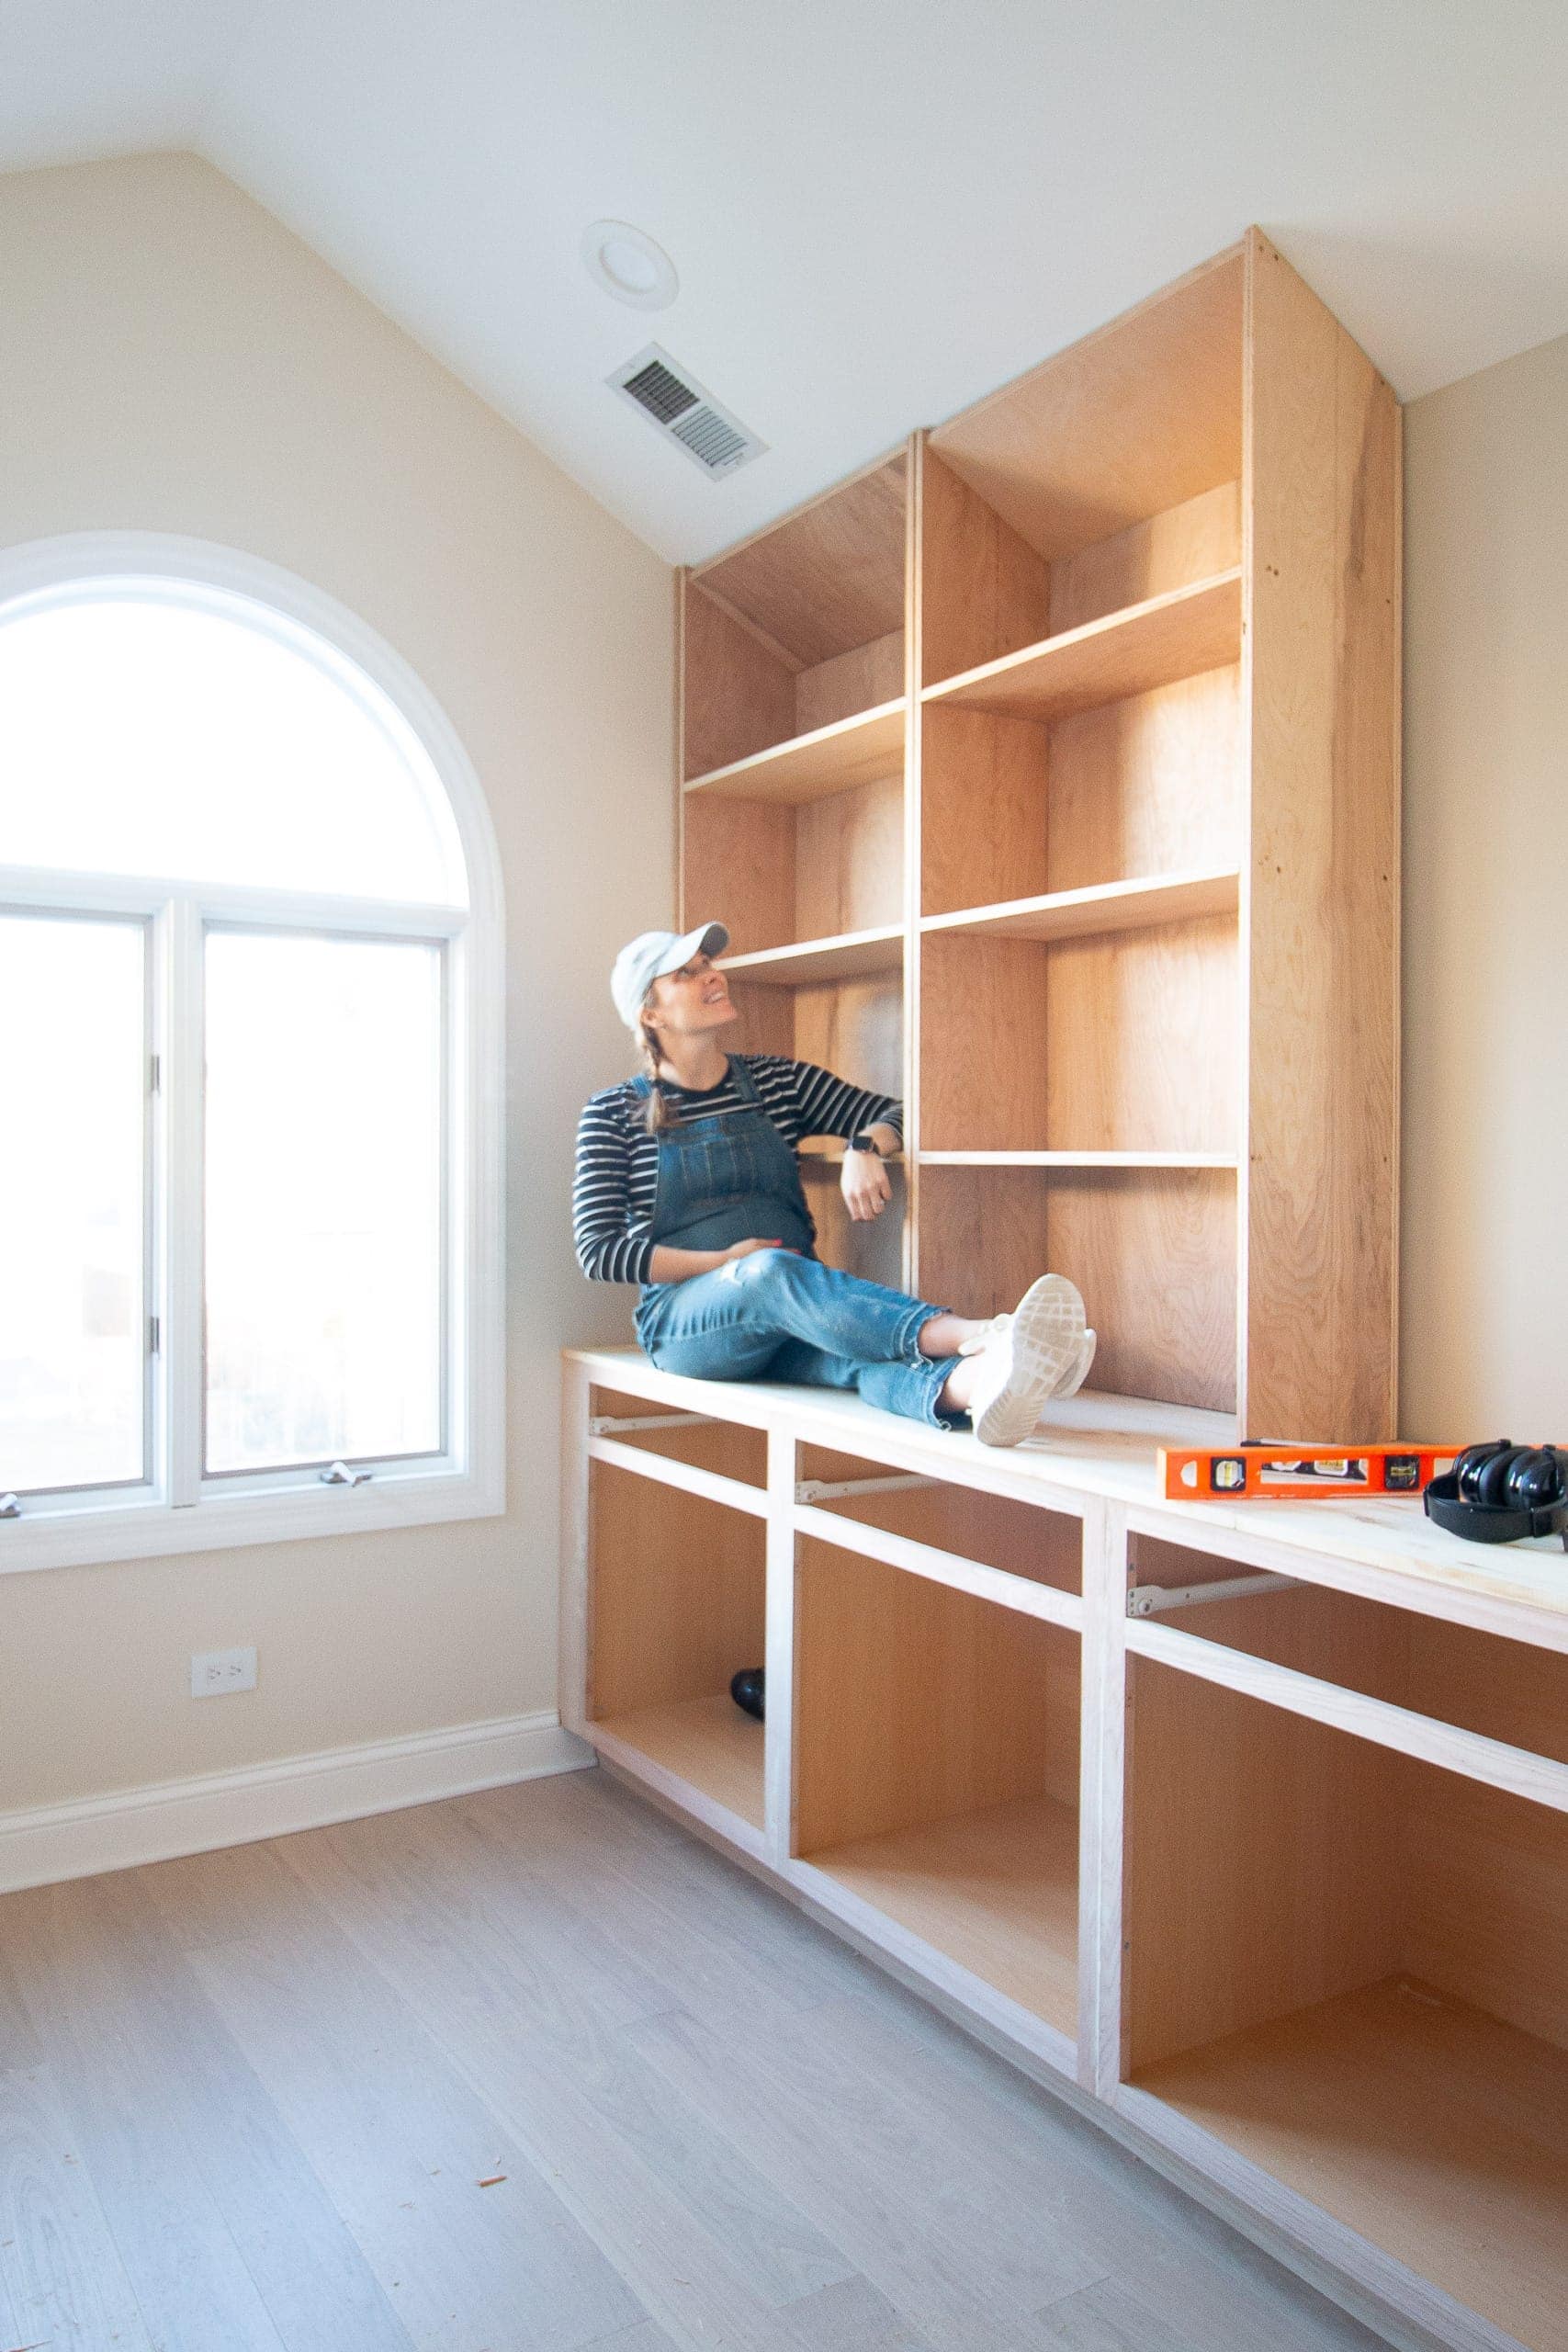
How to Build Sturdy Wall Shelves for Kitchen, Bathroom, and Living Room
Hey there, DIY enthusiasts! Are you tired of cluttered countertops and lack of storage space? Building your own wall shelves is a fantastic way to maximize your space, add a personal touch, and save some serious cash. Trust me, it's not as intimidating as it might seem. I'm going to break down the process step-by-step, making it easy peasy even for beginners. So grab your tools, let's get started!
Choosing the Right Materials and Tools
First things first, you need to gather your supplies. Don't worry, you won't need a whole arsenal of tools. Here's a basic list to get you started:
Materials:
- Wood: Pine, birch, or maple are great choices for shelves. Choose a thickness that suits your needs, typically 3/4" or 1" thick. You can even use reclaimed wood for a rustic look.
- Brackets: These come in various styles and materials like metal, wood, or iron. Consider the weight of your shelves and the aesthetic you're aiming for.
- Screws: Get screws that are long enough to securely fasten the brackets to the wall and the shelf to the brackets. You'll also need shorter screws to attach the shelf to the brackets.
- Wood stain or paint: If you want to color or protect your shelves, choose a stain or paint that complements your room decor.
- Wood filler: This is optional, but it can help you fill any gaps or holes in your wood for a smooth finish.
- Sandpaper: You'll need sandpaper in various grits to smooth out your shelves and brackets before staining or painting.
Tools:
- Tape measure: Essential for accurate measurements!
- Level: Makes sure your shelves are perfectly straight, no wobbles allowed!
- Pencil: To mark your wall and shelves for cutting and drilling.
- Saw: Choose a saw that's suitable for your wood. A circular saw or jigsaw will do the trick.
- Drill: With the right drill bits, you can drill pilot holes for your screws and create the perfect holes for installing your brackets.
- Screwdriver: If you're not using a drill-driver, a good screwdriver will do the job.
- Safety goggles and gloves: Always prioritize safety, especially when using power tools!
Planning Your Shelves
Before you grab your tools, it's crucial to have a plan. This includes determining:
1. Shelf placement:
- Decide where you want your shelves, considering what you want to store and the overall aesthetics of the room.
- Take measurements of the wall space and consider the available height for your shelves.
- Draw a simple sketch of your shelf arrangement on paper. This will help you visualize the finished product.
2. Shelf size:
- Think about the objects you want to store on your shelves and the width and depth you need.
- Consider the available wall space and avoid making shelves that are too wide, especially for smaller rooms.
- Remember, shelves can be different sizes for a unique and stylish look.
3. Shelf weight:
- Assess how heavy the items will be on the shelves.
- Choose brackets that can support the weight of the shelves and their contents. Stronger brackets like metal or heavy-duty wood are recommended for heavier items.
- Always err on the side of caution when it comes to weight capacity!
Building Your Shelves
Now, let's get our hands dirty! Here are the steps to build your DIY masterpiece:
1. Cut the shelves:
- Measure and mark your wood according to your plan. Double-check your measurements to avoid any mishaps!
- Using a saw, carefully cut the wood to your desired lengths. Take your time and make sure the cuts are precise.
2. Sand the shelves:
- Sand the edges and surfaces of your shelves to achieve a smooth finish.
- Start with coarser sandpaper and gradually move to finer grits for a polished look.
3. Stain or paint the shelves (optional):
- If you want to add color or protection to your shelves, now's the time to apply stain or paint.
- Follow the manufacturer's instructions for proper application and drying times.
4. Install the brackets:
- Use your level to mark the wall where you want to install the brackets. This ensures they're straight and level!
- Using a drill, drill pilot holes at the marked spots on the wall. This prevents the wood from splitting when you screw the brackets in.
- Screw the brackets into the wall, making sure they are securely fastened.
5. Attach the shelves to the brackets:
- Carefully place the shelves on the brackets. Make sure they are properly aligned before attaching them.
- Using the appropriate screws, attach the shelves to the brackets. You may need to predrill pilot holes in the shelves as well.
6. Add finishing touches:
- If you want to add some flair, consider adding decorative elements to your shelves, like a decorative trim or molding.
- Get creative and let your personality shine through!
Tips for Building Sturdy Wall Shelves
Here are a few extra tips to ensure your DIY shelves are rock solid:
- Choose the right wood: Hardwoods like oak or maple are more durable than softwoods like pine. If you're using softwood, consider using thicker pieces for extra strength.
- Use strong brackets: Invest in quality brackets that can support the weight of your shelves and their contents.
- Securely attach the brackets: Use appropriate screws and make sure they are fully screwed into the wall studs for maximum support.
- Predrill pilot holes: This prevents the wood from splitting when you screw in the brackets or shelves.
- Don't overload the shelves: It's always better to err on the side of caution when it comes to weight capacity. Avoid putting too much weight on your shelves, especially if you're using lighter materials.
- Regularly inspect your shelves: Over time, screws can loosen or brackets can become unstable. Regularly inspect your shelves and tighten any loose screws or brackets to ensure their stability.
Commonly Asked Questions
You might be wondering a few things before you get started. Here are some common questions and answers to help you along the way.
1. What kind of wood is best for shelves?
Pine, birch, and maple are all great choices for shelves. Pine is affordable and easy to work with, while birch and maple are more durable and resistant to scratches. Ultimately, the best wood for you will depend on your budget, desired aesthetic, and the weight of the items you'll be storing.
2. How do I choose the right brackets?
Consider the weight of your shelves and the items you'll be storing. For lighter shelves, you can use decorative metal or wooden brackets. For heavier items, heavier duty metal or wooden brackets are a better choice. Remember, it's always better to choose brackets that are rated for a higher weight capacity than what you need.
3. How do I know where to install the brackets?
It's important to attach the brackets to wall studs for maximum support. Use a stud finder to locate the studs in your wall. You can also install brackets into drywall anchors for added support, especially if you're unable to find studs.
4. Can I use reclaimed wood for my shelves?
Absolutely! Using reclaimed wood is a great way to add a unique and rustic touch to your shelves. Just make sure the wood is clean, dry, and free of any pests or rot before using it.
5. What if I'm not comfortable using power tools?
You can definitely build shelves without power tools! You can use a hand saw to cut the wood, a hand drill to drill pilot holes, and a manual screwdriver to attach the brackets and shelves.
That's it, folks! Now you're armed with the knowledge and confidence to build your own sturdy and stylish wall shelves. Remember, DIY projects are all about having fun and creating something unique. Don't be afraid to experiment and let your creativity flow. Happy building!