Monday, September 30, 2024
DIY Birdhouse Woodworking Ideas for Extra Income
DIY Birdhouse Woodworking Ideas for Extra Income
Looking to turn your woodworking skills into a side hustle? Building birdhouses can be a fun and profitable venture. Not only will you be crafting charming and functional homes for feathered friends, but you'll also be creating a product in high demand. The beauty of birdhouses lies in their versatility – you can build simple, classic designs or experiment with elaborate, intricate creations. With a little creativity and resourcefulness, you can turn your woodworking hobby into a thriving side business.
Choosing Your Niche
Before you start hammering and sawing, take a moment to consider your target audience. Do you want to focus on specific bird species, like bluebirds or chickadees? Are you drawn to a particular style, such as rustic, modern, or whimsical? Defining your niche will help you create a consistent and marketable product line. For example, if you're interested in attracting bluebirds, you'll need to build houses with specific dimensions and features.
Consider These Popular Birdhouse Styles:
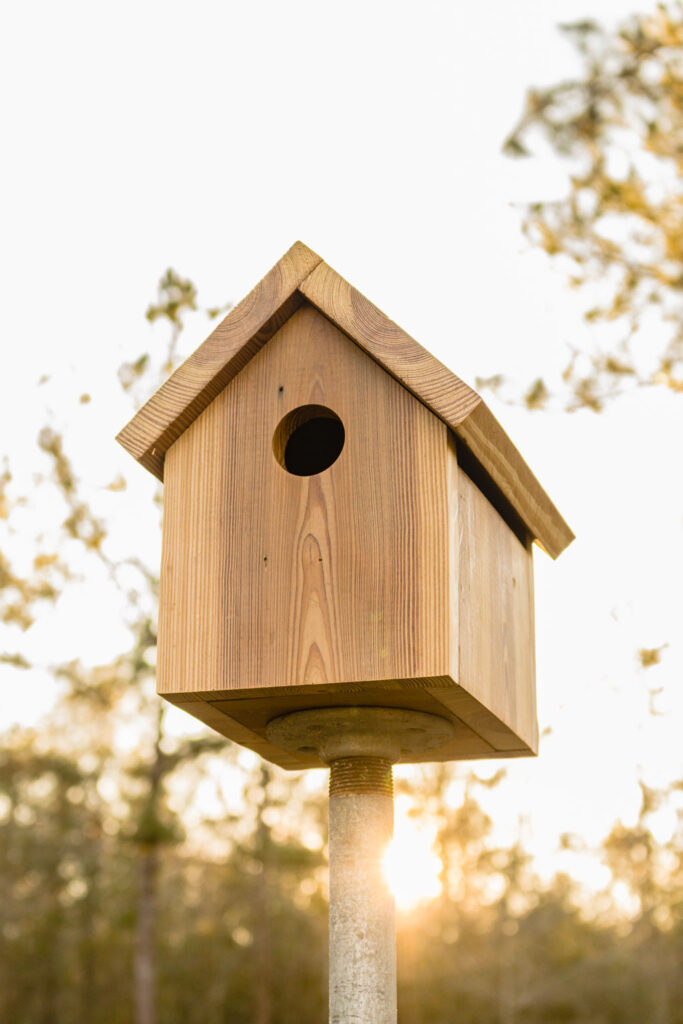
- Classic Birdhouse: This timeless design features a simple, pitched roof and a single entrance hole. It's perfect for attracting a wide variety of birds.
- Bluebird House: This type has a specific size and entrance hole to attract bluebirds. Make sure to place it in a sunny, open area.
- Squirrel-Proof Birdhouse: Protect your feathered friends from pesky squirrels by building a house with a baffle or other deterrent.
- Multi-Chamber Birdhouse: Create a multi-family dwelling with multiple compartments for various bird species.
- Gourd Birdhouse: These unique houses are made from dried gourds and add a touch of rustic charm to any garden.
Gathering Your Materials
Once you have a birdhouse design in mind, gather the necessary materials. Depending on your chosen style, you may need:
- Wood: Cedar, pine, and redwood are popular choices for birdhouses. Choose wood that is rot-resistant and durable.
- Screws: Use screws that are long enough to secure the birdhouse components securely.
- Paint or Stain: Protect your birdhouses from the elements and add a decorative touch with paint or stain.
- Hardware: You may need hinges for a removable roof, a metal plate for the entrance hole, and a perch for birds to rest on.
- Optional: Decorative accents like finials, scrolls, or cutouts can personalize your birdhouses.
Tips for Building Birdhouses
With your materials ready, you can begin building. Remember to follow these tips to ensure your birdhouses are safe and attractive:
- Start with a blueprint: Sketch out your design on paper to visualize the dimensions and structure.
- Use precision: Accurate cuts and measurements will create a sturdy and aesthetically pleasing birdhouse.
- Smooth out edges: Sand down any rough edges to prevent injury to the birds.
- Place the entrance hole correctly: Ensure the entrance hole is positioned high enough to prevent predators from entering.
- Add a drainage hole: Drill a small hole at the base of the birdhouse to allow water to drain.
- Use weather-resistant paint or stain: Protect your birdhouses from the elements with paint or stain.
- Consider the placement: Place your birdhouses in a quiet, sheltered location that offers protection from the sun and wind.
Marketing and Selling Your Birdhouses
Once you've built a few birdhouses, it's time to start marketing and selling your creations. Here are some ideas:
- Craft fairs and markets: Showcase your birdhouses at local events and connect directly with potential customers.
- Online marketplaces: List your birdhouses on platforms like Etsy, eBay, or Facebook Marketplace.
- Local businesses: Approach garden centers, hardware stores, or gift shops to see if they're interested in carrying your birdhouses.
- Social media: Promote your birdhouses on Instagram, Facebook, or Pinterest to reach a wider audience.
- Word-of-mouth: Tell your friends and family about your birdhouses and encourage them to spread the word.
Conclusion
Building birdhouses can be a rewarding and profitable side hustle. By choosing a niche, gathering the right materials, and following the tips outlined in this article, you can create stunning and functional homes for birds while earning extra income. With passion, creativity, and a little elbow grease, you can turn your woodworking hobby into a thriving business.
Sunday, September 29, 2024
Wooden Chess Tables with a Geometric or Abstract Design That Will Appeal to Modern Buyers
Wooden Chess Tables with a Geometric or Abstract Design That Will Appeal to Modern Buyers
In the realm of contemporary furniture, chess tables have transcended their traditional role as mere game boards, evolving into stylish statement pieces that seamlessly blend functionality with artistic expression. Modern buyers, seeking both aesthetic appeal and a touch of sophistication, are drawn to wooden chess tables adorned with geometric or abstract designs. These tables, crafted with meticulous attention to detail and infused with innovative design elements, elevate the game of chess to a whole new level.
The Allure of Geometry
Geometric patterns possess an inherent appeal, captivating the eye with their structured elegance and timeless allure. Wooden chess tables featuring geometric designs offer a contemporary twist on classic style, seamlessly blending functionality with artistic expression. The clean lines and precise angles of geometric patterns create a visually stimulating experience, enhancing the ambiance of any space.
Intricate Patterns and Textures
Geometric designs can range from simple and minimalist to elaborate and intricate. Tables featuring tessellations, repeating patterns that cover a surface without gaps, create a mesmerizing visual effect. Other popular options include geometric grids, stylized shapes, and abstract interpretations of geometric forms. The choice of wood species and finish can further enhance the geometric patterns, adding depth and texture to the design.
Harmonious Color Palettes
Color plays a crucial role in highlighting geometric designs. Modern chess tables often feature contrasting color palettes, accentuating the lines and angles of the patterns. Bold, vibrant colors can create a dynamic and energetic atmosphere, while neutral tones evoke a sense of tranquility and sophistication. The choice of color should complement the overall design aesthetic and the surrounding decor.
Embracing Abstraction
Abstract art, with its emphasis on non-representational forms and expressions, offers endless possibilities for creating visually captivating wooden chess tables. Abstract designs can evoke a sense of movement, emotion, and depth, adding a unique touch to the game of chess.
Organic Shapes and Flowing Lines
Abstract designs often incorporate organic shapes and flowing lines, creating a sense of fluidity and dynamism. The use of natural wood textures and grains can further enhance the abstract aesthetic, blending seamlessly with the organic forms. Tables featuring abstract designs are perfect for those who appreciate a more unconventional and artistic approach.
Evolving Interpretations
Abstract designs are highly subjective, allowing for a wide range of interpretations and expressions. Tables can feature swirling patterns, bold strokes, or intricate details that evoke a sense of mystery and intrigue. The use of mixed media, such as metal accents or glass inlays, can add further dimension and complexity to the abstract designs.
Materials and Craftsmanship
The choice of wood species and craftsmanship are essential factors in creating high-quality wooden chess tables with geometric or abstract designs. Here are some key considerations:
Premium Wood Species
Exceptional Craftsmanship
The meticulous craftsmanship involved in creating wooden chess tables with geometric or abstract designs is a testament to the skill and artistry of the makers. Each piece is meticulously crafted with precision and attention to detail, ensuring that the design is flawlessly executed.
Unique Finishes
The finish applied to the table can enhance the design and protect the wood. Options include natural oil finishes that highlight the wood's natural beauty, stains that add color and depth, and high-gloss lacquers for a sleek and modern look.
A Statement Piece for the Modern Home
Wooden chess tables with geometric or abstract designs are more than just game boards; they are statement pieces that elevate the ambiance of any space. Their aesthetic appeal, functionality, and unique designs make them perfect for modern homes, offices, or studios. Whether placed in a living room, a library, or a game room, these tables add a touch of sophistication and artistry to the environment.
For modern buyers seeking furniture that combines style and functionality, a wooden chess table with a geometric or abstract design is an excellent choice. These tables offer a unique blend of artistic expression and practical utility, transforming the game of chess into an immersive and visually captivating experience.
DIY Decorative Birdhouses That Are Perfect to Sell
DIY Decorative Birdhouses That Are Perfect to Sell
Looking for a fun and profitable craft project? Building and selling decorative birdhouses is a fantastic option! Not only is it a creative outlet, but it also allows you to tap into the growing popularity of backyard birdwatching and garden aesthetics. With a little creativity and some basic woodworking skills, you can create unique and beautiful birdhouses that will be a hit with bird enthusiasts and home décor lovers alike. Let's dive into the world of DIY birdhouse creation and discover how you can turn this hobby into a profitable venture.
Why Are Decorative Birdhouses So Popular?
The demand for decorative birdhouses is fueled by several factors:
- The Joy of Birdwatching: Birdwatching is a beloved hobby that connects people with nature and offers a sense of peace and tranquility. Decorative birdhouses add a touch of charm and functionality to any outdoor space, attracting feathered friends and encouraging a closer connection with the natural world.
- Enhanced Garden Aesthetics: Birdhouses are a visually appealing addition to gardens, patios, and balconies. They contribute to a sense of whimsy and charm, complementing various landscaping styles and adding a touch of artistry to the outdoor environment.
- Sustainable Living: Birdhouses promote biodiversity and ecosystem health by providing safe and secure shelter for birds, contributing to a sustainable and harmonious relationship between humans and wildlife.
Creative Birdhouse Designs to Inspire Your Sales
The beauty of creating decorative birdhouses is the endless possibilities for personalization and unique designs. Here are some ideas to ignite your creative spark:
Rustic Charm:
Embrace the natural beauty of wood by using reclaimed lumber, driftwood, or weathered branches. Adorn these birdhouses with simple accents like twigs, moss, or dried flowers, creating a rustic and inviting aesthetic. These designs are perfect for those seeking a more traditional and organic look.
Modern Minimalism:
For a contemporary touch, opt for clean lines and geometric shapes. Use smooth, polished wood or even painted surfaces in muted colors like gray, white, or black. Consider incorporating minimalist details like metal accents or geometric cutouts for a modern edge.
Whimsical and Fun:
Let your inner child run wild with whimsical designs. Decorate with bright colors, quirky patterns, or even paint them in the form of beloved characters. These playful designs are sure to brighten up any space and appeal to children and families.
Selling Your Birdhouses for Success
Once you've created your beautiful birdhouses, it's time to showcase them and attract buyers. Here are some strategies for successful sales:
- Local Craft Fairs and Markets: Participate in local craft fairs and markets to directly connect with potential customers and display your work. This offers an excellent opportunity to engage with shoppers, answer questions, and build relationships.
- Online Marketplaces: Utilize platforms like Etsy, Shopify, or Facebook Marketplace to reach a broader audience beyond your local area. High-quality photographs and compelling descriptions are crucial for attracting online buyers.
- Social Media Promotion: Promote your birdhouses on Instagram, Pinterest, and Facebook. Share beautiful photos, behind-the-scenes glimpses of your creative process, and engage with followers to build a community around your brand.
By following these tips and unleashing your creativity, you can turn your passion for birdhouse building into a thriving business. Remember, each birdhouse you craft is a unique piece of art that can bring joy to both birds and their human admirers. So, grab your tools, unleash your imagination, and start building beautiful and functional birdhouses that will capture the hearts of bird lovers everywhere.
Saturday, September 28, 2024
Wooden Chess Tables with a High-End Finish That Will Sell Fast

Crafting Wooden Chess Tables That Sell Like Hotcakes: Tips for High-End Finish
Let's face it, you're in the business of making beautiful, timeless chess tables. You know the market, you know the craft, and you've got the skill to create pieces that would make even a grandmaster weep with joy. But sometimes, even the best-made chess table can languish in your workshop, waiting for its moment in the spotlight. The key? A high-end finish that's not just pretty, but screams quality, durability, and elegance.
So how do you take your already awesome chess tables and transform them into pieces that sell like hotcakes?
The Foundation: Choosing the Right Wood
Think of this as your canvas. The right wood sets the stage for an incredible finish. Here's what to consider:
- Species: Oak, cherry, walnut, maple – these are all classic choices for chess tables. Each brings its unique grain patterns and color variations, influencing the final aesthetic. Experiment with different species to find your signature look.
- Grain: Consider the grain pattern. A table with bold, dramatic grain can be striking, while a table with subtle grain might lend itself to a more minimalist design.
- Sustainability: For the eco-conscious buyer, look for sustainably sourced woods. It's good for the planet and can even be a selling point!
The Art of Preparation
A high-end finish starts with careful prep. This is where you lay the groundwork for a flawless, lasting result.
- Sanding: Invest in high-quality sandpaper, moving through various grits (starting coarse and ending fine). This ensures a smooth, even surface that will receive the finish beautifully.
- Filling: Address any imperfections like knots or cracks with wood filler. Choose a filler that matches the wood color and texture for a seamless finish.
- Cleaning: Thoroughly clean the table to remove dust and debris that could interfere with the finish. Use a tack cloth for a final touch.
The Magic Touch: Finishes for a Showstopper
Now comes the fun part – choosing the right finish. This is where you can really unleash your creativity and give your chess tables that wow factor. Here are some options:
Oil Finishes
Oil finishes, like tung oil or Danish oil, are known for their natural look and enhancing the wood's grain.
- Pros: They penetrate the wood deeply, providing durability and water resistance. They also create a warm, inviting look.
- Cons: They require multiple applications and can be somewhat time-consuming. They also don't offer the same level of protection as polyurethane.
Polyurethane Finishes
Polyurethane is a durable, hard-wearing finish that offers excellent protection against scratches, spills, and water damage.
- Pros: Polyurethane is very durable and easy to apply. It comes in both gloss and satin finishes, allowing you to tailor the look.
- Cons: While it's a great protector, it can create a less natural look compared to oil finishes. Choose a high-quality polyurethane designed for furniture for the best results.
Lacquer Finishes
Lacquer is a quick-drying finish that provides a hard, protective coating.
- Pros: Lacquer dries quickly, allowing for fast turnaround times. It offers a high-gloss finish that can make the wood look almost glassy. It's also very durable.
- Cons: It can be challenging to apply without streaks or imperfections. Lacquer fumes can be harsh, so ensure proper ventilation.
Wax Finishes
Wax finishes are often used as a final step to enhance the look and provide additional protection.
- Pros: Wax creates a soft, warm sheen and enhances the wood's natural beauty. It's also easy to apply and repair.
- Cons: Wax offers less protection than polyurethane or lacquer. It requires regular maintenance to keep it looking its best.
Finishing Touches: That Extra Touch of Elegance
You've done the prep, you've chosen your finish – now it's time to elevate your chess tables to a whole new level.
- Distressing: A touch of distressing can give your table a vintage, rustic charm. You can achieve this with sandpaper or even wire brushes.
- Inlays: Intricate inlays of contrasting wood or other materials can create stunning patterns and add a touch of sophistication.
- Hardware: Choose high-quality, elegant hardware like brass hinges, handles, or corner protectors. Details matter!
- Custom Pieces: Consider offering custom-made chess pieces that complement the table's style. It's a great way to add a personalized touch.
Marketing Your Masterpieces
You've put the time and effort into creating high-end chess tables. Now, it's time to get them in front of the right audience!
- High-Quality Photography: Invest in professional photography that showcases your tables in their best light. Use natural light and highlight the wood's beauty and the intricate details.
- Target Your Audience: Think about your ideal customer. Are they collectors? Chess enthusiasts? Design lovers? Tailor your marketing message to their interests.
- Online Presence: Create a website or shop on Etsy, where you can display your pieces and connect with potential buyers. Utilize social media to showcase your work and engage with your followers.
- Word-of-Mouth: Don't underestimate the power of referrals. Offer incentives to satisfied customers who spread the word about your brand.
Commonly Asked Questions
Here are some of the common questions you might encounter about your high-end chess tables.
What is the best finish for a chess table?
The "best" finish depends on your preference and the specific wood you're using. Oil finishes offer a natural look, polyurethane provides durability, and lacquer creates a high-gloss shine. Consider the level of protection and aesthetic you want to achieve.
How much does a high-end chess table cost?
The price of a high-end chess table can vary significantly based on the wood, finish, design, and craftsmanship. Tables made from exotic woods with intricate details and custom pieces can command higher prices. It's important to be transparent about your pricing and value proposition.
How do I care for a high-end chess table?
Regular dusting with a soft cloth is essential to prevent dust buildup. Avoid using harsh cleaners or abrasives, as they can damage the finish. For oil finishes, periodic re-application of oil may be needed to maintain the wood's hydration and shine. For polyurethane and lacquer finishes, simple dusting is usually sufficient.
Remember, crafting high-end chess tables is about more than just building furniture. It's about creating pieces that evoke emotions, ignite passion, and become cherished heirlooms. By focusing on the right wood, meticulous preparation, a stunning finish, and thoughtful marketing, you'll be well on your way to creating chess tables that are not just beautiful, but also a testament to your craftsmanship and passion.
Friday, September 27, 2024
Wine Rack Projects with Reclaimed Wood That Sell Fast

Wine Rack Projects with Reclaimed Wood That Sell Fast
In the realm of woodworking, crafting functional and aesthetically pleasing pieces is an art form that captivates enthusiasts and collectors alike. Wine racks, in particular, offer a unique opportunity to combine practicality with rustic charm. The allure of reclaimed wood, with its rich history and unique character, adds an extra layer of intrigue and sustainability to these projects. This article explores several wine rack projects with reclaimed wood that are sure to sell fast, captivating both wine enthusiasts and those seeking one-of-a-kind home decor.
The Appeal of Reclaimed Wood Wine Racks
Reclaimed wood, often salvaged from old barns, warehouses, or even demolished structures, exudes a timeless elegance that sets it apart from commercially produced lumber. Its distinctive grains, knots, and imperfections tell stories of a bygone era, adding a touch of nostalgia and authenticity to any space. Beyond aesthetics, using reclaimed wood contributes to a sustainable lifestyle by reducing waste and promoting environmental conservation.
Uniqueness and Character
Each piece of reclaimed wood possesses a unique character, ensuring that every wine rack crafted from it will be one of a kind. The variations in color, texture, and grain patterns create a captivating visual experience that sets it apart from mass-produced furniture.
Sustainable Choice
Reclaimed wood is an eco-friendly choice, reducing the need to harvest new trees. It diverts waste from landfills and extends the life cycle of valuable resources, promoting a more sustainable approach to woodworking.
Rustic Charm
The inherent rusticity of reclaimed wood lends itself beautifully to wine rack designs, complementing both modern and traditional interiors. Its warm, inviting tones create a cozy ambiance, making any space feel more welcoming and inviting.
Popular Reclaimed Wood Wine Rack Projects
Here are several popular reclaimed wood wine rack projects that have proven to be both visually appealing and in high demand:
Classic Wall-Mounted Wine Rack
A classic wall-mounted wine rack is a timeless and versatile option that fits seamlessly into any space. The design can be as simple or elaborate as desired, from a basic grid system to a more intricate pattern featuring shelves and compartments for glasses. This type of rack offers a practical storage solution while adding a rustic touch to the wall.
Freestanding Wine Rack with Storage
A freestanding wine rack provides ample storage for an extensive collection while serving as a statement piece in the room. These racks can be designed with multiple shelves, drawers, or even a built-in bar area for serving drinks and entertaining guests. The combination of reclaimed wood and functional storage makes this project a desirable choice for wine enthusiasts.
Industrial Wine Rack with Metal Accents
For a contemporary and industrial aesthetic, combine reclaimed wood with metal accents, such as pipes, brackets, or wheels. The juxtaposition of rustic wood and sleek metal creates a visually striking contrast that adds a modern edge to the wine rack. This style is particularly popular in urban lofts and modern homes.
Wine Rack with Built-in Wine Glass Holders
Adding wine glass holders to a wine rack enhances its functionality and visual appeal. These holders can be integrated into the design using reclaimed wood or metal components. The convenience of having glasses readily available within reach elevates the wine rack from a mere storage solution to a stylish and practical bar setup.
Tips for Selling Reclaimed Wood Wine Racks
To ensure the success of your reclaimed wood wine rack projects, consider these tips:
Target Audience
Identify your target audience. Are you focusing on wine enthusiasts, home decorators, or those seeking sustainable furniture options? Understanding your market allows you to tailor your designs and marketing strategies accordingly.
High-Quality Craftsmanship
Use quality reclaimed wood and pay attention to detail. A well-constructed and meticulously finished piece will stand out and command a higher price. Showcase your craftsmanship through clear photographs and detailed descriptions.
Unique Designs
Offer unique and customizable designs to differentiate your projects from competitors. Allow customers to personalize their wine racks by selecting wood types, finishes, or size variations.
Online Presence
Establish a strong online presence through social media, a website, or online marketplaces. Use high-quality images, compelling descriptions, and engaging content to attract customers.
Pricing and Value
Price your projects competitively while reflecting the value of reclaimed wood and the skill involved in their creation. Consider factors such as size, complexity, and the unique character of the wood when setting prices.
Customer Service
Provide excellent customer service. Respond promptly to inquiries, address concerns, and strive to exceed customer expectations. Positive reviews and word-of-mouth referrals can go a long way in building your reputation.
Conclusion
Wine racks crafted with reclaimed wood offer a unique blend of functionality, rustic charm, and sustainability. These projects appeal to a wide range of consumers, making them a profitable and fulfilling endeavor for woodworkers. By focusing on quality craftsmanship, unique designs, and exceptional customer service, you can create reclaimed wood wine racks that sell fast and leave a lasting impression on your customers.
Birdhouses for Small Spaces: Profitable Woodworking Ideas

Birdhouses for Small Spaces: Profitable Woodworking Ideas
In the realm of woodworking, crafting birdhouses offers a rewarding fusion of artistry and functionality. For those seeking a profitable venture, focusing on birdhouses designed for small spaces presents a compelling opportunity. This article delves into the lucrative world of crafting birdhouses tailored for limited outdoor areas, providing a comprehensive guide to design, construction, and marketing strategies.
The Demand for Small Space Birdhouses
The increasing popularity of urban gardening and limited outdoor spaces has fueled a surge in demand for birdhouses that fit seamlessly into these environments. Here's why this niche market is particularly lucrative:
- Limited Outdoor Area: Many homeowners, particularly in urban areas, have limited outdoor space. Small birdhouses address this constraint, allowing individuals to enjoy the benefits of attracting birds without sacrificing precious square footage.
- Aesthetic Appeal: Birdhouses for small spaces are often designed with a focus on aesthetics, incorporating intricate details, decorative elements, and unique shapes that complement a variety of garden styles.
- Space-Saving Designs: These birdhouses are crafted to be compact and space-efficient, offering solutions for tight corners, balconies, and small patios.
- Environmental Awareness: Birdhouses are increasingly viewed as eco-friendly additions to gardens, promoting biodiversity and supporting bird populations.
Designing Birdhouses for Small Spaces
When crafting birdhouses for limited spaces, thoughtful design considerations are paramount:
Size and Shape
- Compact Dimensions: The birdhouse should be small enough to fit comfortably in the desired location without appearing cramped or overwhelming the surroundings.
- Vertical Orientation: Vertical designs conserve floor space and can be positioned against walls or fences.
- Hanging Options: Incorporate hanging mechanisms, such as hooks or ropes, to allow for flexible placement on balconies, fences, or trees.
Materials and Finishes
- Durable Wood: Opt for weather-resistant woods like cedar, redwood, or pine. These materials will withstand the elements and provide a long lifespan for the birdhouse.
- Natural Finishes: Natural stains and finishes, such as linseed oil or beeswax, enhance the wood's beauty while providing protection from moisture and UV rays. Avoid harsh chemicals that could harm birds.
- Recycled Materials: Incorporate recycled materials like reclaimed wood or salvaged metal for an eco-friendly and unique aesthetic.
Bird-Friendly Features
- Entrance Hole Size: Choose the appropriate entrance hole size based on the type of bird you intend to attract. Research common birds in your area to determine their preferred dimensions.
- Ventilation: Ensure proper ventilation to prevent moisture buildup and maintain a healthy environment for birds.
- Predator Protection: Consider adding features to discourage predators, such as predator guards around the entrance or a sloping roof to prevent raccoons from climbing.
- Cleaning Access: Incorporate a removable roof or a clean-out door for easy cleaning and maintenance.
Crafting Birdhouses for Profit
To maximize profitability, focus on creating high-quality birdhouses with unique features that appeal to customers:
Target Market
- Urban Dwellers: Tailor your designs to meet the specific needs of urban dwellers with limited outdoor space.
- Garden Enthusiasts: Cater to individuals who appreciate aesthetically pleasing birdhouses that complement their garden decor.
- Bird Lovers: Offer birdhouses designed for specific bird species, catering to enthusiasts who desire to attract particular birds to their gardens.
Product Differentiation
- Unique Designs: Explore innovative shapes, sizes, and decorative elements to create distinctive birdhouses that stand out from the competition.
- Custom Orders: Offer personalized birdhouses with customer-specified details, such as wood type, paint colors, or bird species preferences.
- Handcrafted Quality: Emphasize the handcrafted nature of your birdhouses, highlighting the quality and attention to detail in your work.
Pricing Strategy
- Value-Based Pricing: Set prices that reflect the quality, craftsmanship, and unique features of your birdhouses.
- Cost Plus Pricing: Calculate your costs, including materials, labor, and overhead, and add a reasonable markup to determine a profitable selling price.
- Competitive Analysis: Research prices of comparable birdhouses in your local market to ensure your pricing is competitive but still profitable.
Marketing and Sales Strategies
Promote your birdhouses effectively to reach your target audience:
Online Presence
- Etsy Shop: Create an Etsy shop to sell your birdhouses online, reaching a wide audience of craft and home decor enthusiasts.
- Website: Develop a website showcasing your birdhouses, including detailed product descriptions, images, and customer testimonials.
- Social Media: Utilize social media platforms like Instagram, Facebook, and Pinterest to share photos and videos of your birdhouses, engage with potential customers, and build brand awareness.
Local Markets and Events
- Craft Fairs: Participate in local craft fairs and farmer's markets to showcase your birdhouses and interact directly with customers.
- Garden Centers: Partner with local garden centers to sell your birdhouses to a relevant audience.
- Birdwatching Events: Attend birdwatching events to promote your birdhouses to bird enthusiasts.
Word-of-Mouth Marketing
- Customer Satisfaction: Focus on creating high-quality birdhouses that delight customers and encourage positive word-of-mouth referrals.
- Online Reviews: Encourage customers to leave reviews on your Etsy shop, website, and social media platforms.
- Community Engagement: Participate in local birdwatching groups and forums to connect with potential customers and build relationships.
Conclusion
Crafting birdhouses for small spaces presents a profitable woodworking venture that combines creativity, functionality, and a love for nature. By focusing on thoughtful design, meticulous construction, effective marketing, and exceptional customer service, woodworkers can tap into the growing demand for these unique and space-saving birdhouses, turning their passion into a successful business endeavor.
Wednesday, September 25, 2024
Simple Wood Gifts to Sell at Holiday Markets

Simple Wood Gifts to Sell at Holiday Markets
Hey there, fellow crafters! Are you looking for some simple and unique wood gift ideas to sell at your next holiday market? You've come to the right place! Wooden gifts have a timeless charm that never goes out of style. Plus, they're super versatile and can be customized for all sorts of tastes. We'll explore a bunch of easy-to-make wooden gift ideas that'll have your customers saying "wow!"
Wooden Ornaments
Let's start with a classic - wooden ornaments! These little gems are perfect for adding a touch of rustic charm to any Christmas tree. You can keep it simple with plain wooden shapes like stars, hearts, or snowflakes, or get creative with intricate designs and details.
DIY Tips:
To make your ornaments extra special, consider these ideas:
- Paint them! Use acrylic paints to create festive patterns, holiday scenes, or even personalize them with names or initials.
- Add embellishments. Embellish them with glitter, ribbons, buttons, or dried flowers.
- Create unique shapes. Get adventurous with shapes like reindeer, penguins, or even miniature gingerbread houses.
- Engrave them. Use a woodburning tool or laser cutter to personalize them with messages, quotes, or even simple designs.
Wooden Coasters
Coasters are another crowd-pleaser, and wood is a great material for them. They add a touch of warmth and rustic charm to any coffee table or side table. You can keep it simple with round or square coasters, or get fancy with shapes like leaves, hearts, or geometric designs.
DIY Tips:
Here are a few ideas to make your coasters stand out:
- Add a protective finish. Apply a sealant like polyurethane or varnish to protect the wood from spills and moisture.
- Incorporate epoxy resin. Pour a layer of clear epoxy resin over the wood to create a smooth and durable surface. You can even add glitter, pigments, or dried flowers to the resin for a unique look.
- Create a set. Make a set of four coasters with different designs or colors.
Wooden Wall Decor
Want to create a wow factor? Wood wall decor is a great way to bring a rustic and natural feel to any space. You can make wall art, shelves, or even clocks.
DIY Tips:
- Use wood slices. Wood slices are a popular choice for wall decor. You can use them to create a statement piece, or arrange them in a cluster for a more eclectic look.
- Create a wooden sign. Cut out a wooden sign and paint it with inspirational quotes, family names, or holiday greetings.
- Build a wooden shelf. Create a rustic shelf using reclaimed wood or salvaged materials.
Wooden Serving Trays
Wooden serving trays are a practical and beautiful gift. They're perfect for serving snacks, drinks, or even as a decorative centerpiece. You can make them in all shapes and sizes.
DIY Tips:
- Add handles. Add sturdy handles to make them easier to carry.
- Incorporate different woods. Combine different types of wood to create unique and eye-catching designs.
- Use a woodburning tool. Create intricate patterns or designs on the tray using a woodburning tool.
Wooden Kitchen Utensils
Wooden kitchen utensils are both practical and sustainable. They're perfect for stirring, serving, and even decorating! You can find all sorts of wood types, from cherry to walnut, that will give your utensils a unique and stylish look.
DIY Tips:
- Create a set. Make a set of spoons, spatulas, and serving spoons to create a cohesive look.
- Carve unique shapes. Get creative with the shapes and designs of your utensils. You can even add decorative elements like handles with wood carving.
Wooden Jewelry Holders
For your fashion-forward friends, wooden jewelry holders are a great option! They add a touch of natural beauty to any dressing table or vanity.
DIY Tips:
- Use branches or twigs. You can use branches or twigs to create a rustic and unique jewelry holder.
- Create a hanging display. Attach hooks or pegs to a wooden board or branch to create a stylish display.
- Add a mirror. Attach a small mirror to a wooden base to create a functional and decorative piece.
Tips for Selling Your Wooden Gifts
Now that you've got some awesome ideas for wooden gifts, here are a few tips to make your holiday market a success:
- Showcase your products beautifully. Use attractive displays to highlight your wooden gifts. Think about using burlap, rustic wooden crates, or even vintage-inspired accessories.
- Highlight the unique features. Tell customers about the different wood types you use, any special techniques you employ, or the personalization options you offer.
- Offer gift wrapping. Make your gifts extra special by offering gift wrapping or a gift bag option.
- Be friendly and approachable. Chat with your customers, answer their questions, and share your passion for creating wooden gifts.
- Price your products competitively. Research what similar gifts are selling for in your area and price your products accordingly.
Commonly Asked Questions
Ready to create your wooden gift empire? Here are some common questions I get about selling wood crafts:
What type of wood should I use?
There are many great woods for crafting. Some of the most popular include pine, cedar, maple, oak, and walnut. Consider your budget and the look you're going for. Pine and cedar are generally more affordable and have a rustic feel, while maple, oak, and walnut are more expensive and have a more polished look. You can also try reclaimed or salvaged wood for a unique touch.
Where can I find woodworking supplies?
You can find woodworking supplies at local lumber yards, hardware stores, and online retailers like Amazon or Etsy. Make sure to shop around to find the best deals and quality.
What tools do I need to get started?
You don't need a ton of fancy equipment to start woodworking. A basic toolkit could include a saw, hammer, drill, sandpaper, and wood glue. You can gradually add more tools as you become more experienced and explore different crafting projects.
How do I protect my wooden crafts from moisture?
Apply a sealant or varnish to your wooden crafts to protect them from moisture and spills. There are various types of sealants available, like polyurethane, varnish, and wax. Choose a sealant that is appropriate for the type of wood and the intended use of the craft.
Remember, crafting with wood is a wonderful way to express your creativity and bring joy to others. Get creative and have fun with it! I'd love to see your finished wood crafts!
Tuesday, September 24, 2024
How to Build a Stylish Wooden Magazine Rack for Luxury Interiors

Elevate Your Interior: Build a Stylish Wooden Magazine Rack
In the realm of luxury interiors, every element plays a pivotal role in creating an atmosphere of sophistication and elegance. A well-designed magazine rack can seamlessly blend function and aesthetics, adding a touch of refinement to your living space. This article will guide you through the process of building a stylish wooden magazine rack that perfectly complements your luxurious décor.
Choosing the Right Wood
The choice of wood is paramount to achieving a luxurious aesthetic. Consider these options:
- Walnut: Its rich, dark brown hues exude warmth and sophistication, making it ideal for a classic and elegant look.
- Mahogany: Known for its deep red tones and beautiful grain patterns, mahogany adds a touch of timeless elegance to any space.
- Cherry: Its warm reddish-brown tones create a welcoming and inviting atmosphere, while its elegant grain patterns enhance its visual appeal.
For a more modern feel, consider using lighter woods such as maple or ash. Ensure the wood you choose is of high quality, free from knots and imperfections, for a polished and luxurious finish.
Designing Your Magazine Rack
Before you start building, take time to design your magazine rack. Consider the following factors:
Size and Shape
Determine the appropriate size and shape to fit your available space and magazine collection. A compact design is suitable for smaller spaces, while a larger rack can accommodate more publications. Explore different shapes, from traditional rectangular designs to contemporary geometric forms.
Number of Compartments
Decide on the number of compartments you need based on your magazine collection. Consider the different sizes and thicknesses of your magazines to ensure a comfortable fit.
Style and Finish
Choose a style that complements your overall décor. A classic design with clean lines and a polished finish creates a timeless aesthetic. For a more modern look, incorporate sleek geometric shapes and a minimalist finish.
Building the Magazine Rack
Now that you have a design in mind, let's move on to the building process:
Cutting and Assembling the Pieces
Using precise measurements, cut the wood pieces according to your design. Use a table saw or a hand saw for accurate cuts. Assemble the pieces using woodworking glue and screws, ensuring all joints are tight and secure.
Finishing Touches
Sand the surface of the magazine rack with fine-grit sandpaper to achieve a smooth finish. Apply a wood stain or paint to enhance the natural beauty of the wood or to create a desired color scheme. Finish with a clear coat of varnish or polyurethane to protect the wood from scratches and spills, adding a layer of shine and elegance.
Adding a Personal Touch
To make your magazine rack truly unique, consider incorporating personal touches:
- Carved details: Add intricate carvings to the sides or base of the rack for a sophisticated touch.
- Metal accents: Use metal brackets or hardware for a modern twist.
- Personalized inscription: Engrave a quote or a name onto the rack for a personalized touch.
With careful planning and execution, you can create a stylish wooden magazine rack that perfectly complements your luxurious interiors. The process of building this piece from scratch allows you to express your creativity and personalize your space, creating a truly unique and elegant statement.
Monday, September 23, 2024
How to Make Large and Small Cutting Boards for Every Need
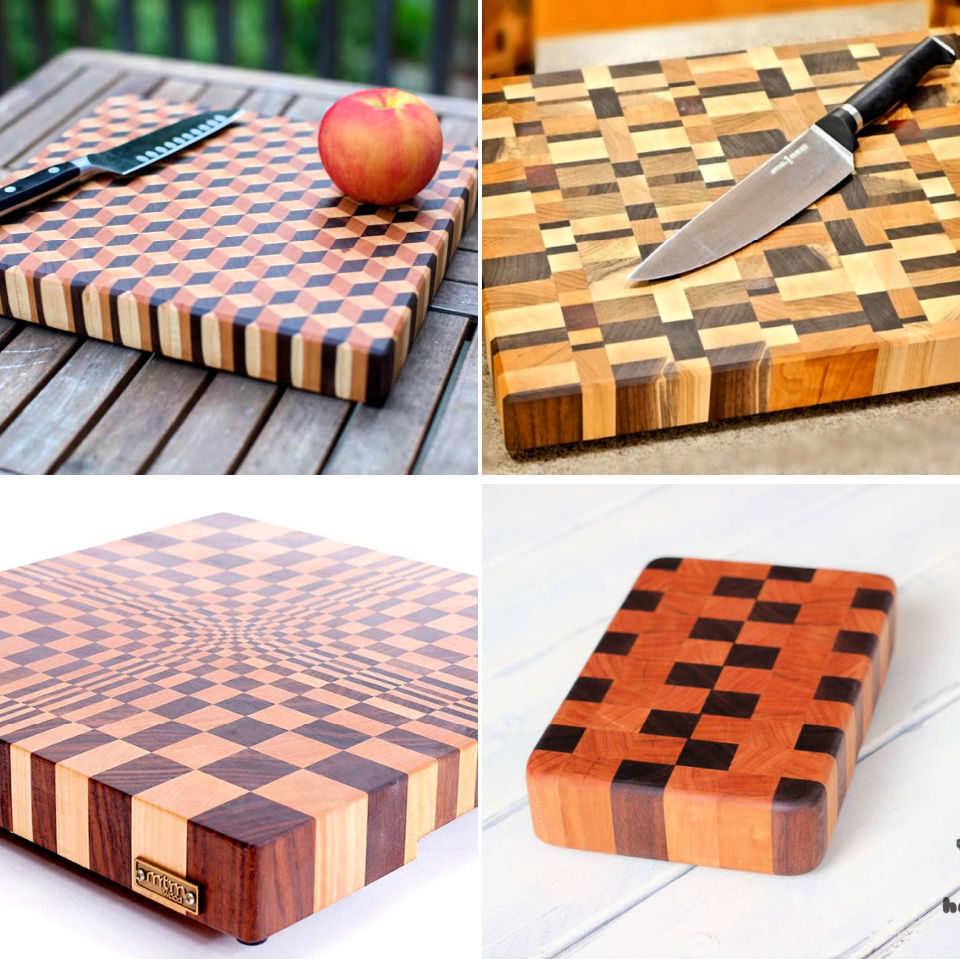
Crafting Cutting Boards for Every Culinary Need: A Comprehensive Guide
Cutting boards are indispensable tools in any kitchen, providing a dedicated surface for preparing ingredients while protecting countertops and preserving the sharpness of knives. However, not all cutting boards are created equal. The optimal size and material choice can significantly impact your culinary experience. This guide will delve into the art of crafting cutting boards, offering practical tips and techniques to create bespoke solutions for every culinary need.
Choosing the Right Material
The first step in constructing a cutting board is selecting the appropriate material. Each material possesses unique characteristics that influence its durability, hygiene, and aesthetic appeal.
Hardwood Options
- Maple: Renowned for its hardness, maple is a popular choice for cutting boards. Its tight grain structure provides excellent resistance to knife marks and warping. The natural beauty of maple also makes it aesthetically pleasing.
- Cherry: Cherrywood boasts a rich, reddish-brown hue and a moderate hardness. It is known for its durability and resistance to staining.
- Walnut: Walnut cutting boards exude a luxurious charm with their distinctive dark brown color and intricate grain patterns. While slightly softer than maple, walnut is still robust and offers excellent resistance to wear and tear.
- Oak: With its distinctive grain patterns and durability, oak is another popular option. Oak's hardness makes it highly resistant to knife damage, but it can be susceptible to staining.
Softwood Choices
- Pine: While softwood, pine offers an affordable option for beginners. Its softer nature can lead to more knife marks but is ideal for projects where budget is a primary concern.
- Cedar: Cedar boasts a natural resistance to insects and a pleasant aroma. Its softer texture makes it suitable for cutting softer ingredients, like bread.
Alternative Materials
- Bamboo: Bamboo is a fast-growing, sustainable material known for its durability and resistance to moisture. It is an excellent choice for cutting boards due to its natural antibacterial properties.
- Plastic: Plastic cutting boards are lightweight, affordable, and easy to clean. They are ideal for chopping vegetables and meat and are available in various colors and designs.
- Glass: Glass cutting boards are highly sanitary and easy to clean. However, they can be prone to cracking if dropped and can dull knives quickly.
Design Considerations: Crafting for Size and Purpose
The size and shape of your cutting board should align with its intended purpose. This section will explore designing cutting boards to accommodate specific culinary tasks.
Large Cutting Boards: The Workhorse of the Kitchen
- Dimensions: Large cutting boards typically range from 16 inches to 24 inches in length and 12 inches to 18 inches in width. These generous dimensions provide ample workspace for preparing large quantities of food, like roasts or salads.
- Features: Consider incorporating juice grooves to prevent spills and a raised edge to contain ingredients. A handle or grip on one end can enhance maneuverability.
- Purpose: Large cutting boards are ideal for tasks that require ample space, such as carving meat, chopping vegetables for a large meal, or preparing a multi-course dinner.
Small Cutting Boards: Compact and Convenient
- Dimensions: Small cutting boards can range from 8 inches to 12 inches in length and 6 inches to 8 inches in width. These compact boards are perfect for single-serving meals or tasks that don't require extensive workspace.
- Features: Small cutting boards are often designed for portability, with lightweight materials and convenient handles. Some may feature integrated containers for collecting food scraps.
- Purpose: Small cutting boards are ideal for chopping herbs, slicing bread, or preparing small portions of food.
Specialized Cutting Boards: Tailored for Specific Needs
- Cheese Boards: Cheese boards are typically crafted from hardwoods like maple or walnut and feature distinct areas for serving different types of cheese, crackers, and accompaniments.
- Charcuterie Boards: Similar to cheese boards, charcuterie boards showcase a variety of cured meats, cheeses, and accompaniments. These boards often feature a grooved area to hold small bowls or jars.
- Serving Boards: Serving boards are designed for displaying and presenting food. They often incorporate handles for easy transport and a decorative design to enhance the presentation.
Construction Techniques: Bringing Your Cutting Board to Life
Once you've selected your materials and design, it's time to bring your cutting board to life. This section outlines various construction methods.
Gluing and Clamping: A Classic Approach
- Prepare the Wood: Select planks of wood with a smooth surface and consistent thickness. Sand the planks to remove any imperfections or splinters.
- Apply Glue: Use a high-quality wood glue and spread it evenly on the surfaces of the planks.
- Clamp the Boards: Align the planks and clamp them together firmly. Ensure the clamps are distributed evenly to create a tight bond.
- Curing Time: Allow the glue to cure fully according to the manufacturer's instructions.
- Finishing Touches: Sand the edges and surfaces of the board to create a smooth finish. Apply a food-safe sealant to protect the wood and enhance its lifespan.
Edge-Joining Methods: For a Seamless Look
- Tongue and Groove: This technique involves creating a tongue-shaped projection on one plank and a groove on the other. When joined, the tongue fits perfectly into the groove, creating a seamless and strong bond.
- Biscuit Joining: Biscuit joining utilizes specialized cutters to create slots in the planks. Biscuity-shaped pieces of wood are inserted into the slots and glued together, creating a robust and stable joint.
Finishing Touches: Enhancing Durability and Aesthetics
Adding finishing touches to your cutting board can enhance its appearance, durability, and longevity.
Sealing and Finishing
- Food-Safe Sealants: Apply a food-safe sealant to protect the wood from moisture, stains, and bacteria. Popular choices include mineral oil, beeswax, and butcher block oil.
- Sanding and Polishing: Sand the board with progressively finer grits to achieve a smooth, polished finish.
Adding Handles or Grips
- Handles: Handles can enhance maneuverability, especially for larger cutting boards. Choose durable and heat-resistant materials like wood or leather.
- Grips: For smaller boards, add a grip to the underside to prevent slipping. Rubber or silicone grips offer excellent traction.
Decorative Details
- Inlays: Incorporate decorative inlays of contrasting wood species to add visual interest.
- Engraving: Customize your cutting board with a personal touch by engraving initials, dates, or designs.
Maintenance and Care: Preserving Your Investment
Proper maintenance is essential to extend the lifespan of your handmade cutting board.
Cleaning and Sanitizing
- Hand Washing: Wash cutting boards with warm, soapy water and avoid using harsh detergents or abrasive cleaners.
- Sanitizing: Sanitize your cutting board after use with a diluted bleach solution (one tablespoon of bleach per gallon of water) or a food-safe sanitizer.
- Drying Thoroughly: Always dry your cutting board completely after cleaning to prevent mold or bacteria growth.
Conditioning and Oil Treatment
- Regular Oil Treatment: Condition your cutting board with mineral oil, butcher block oil, or beeswax periodically. This helps to keep the wood hydrated and prevents cracks or warping.
- Deep Conditioning: For a deep conditioning treatment, apply a generous amount of oil and let it sit overnight before wiping off the excess.
By following these guidelines, you can craft bespoke cutting boards that elevate your culinary experience and become cherished additions to your kitchen. Whether you're a seasoned chef or a novice home cook, creating your own cutting boards allows for customization, creativity, and a connection to the art of food preparation.
Sunday, September 22, 2024
How to Craft Stylish Wooden Plant Stands for Your Home

How to Craft Stylish Wooden Plant Stands for Your Home
Elevate your home decor with the timeless elegance of wooden plant stands. These versatile pieces seamlessly blend with any aesthetic, adding a touch of natural beauty and visual interest to your living spaces. Whether you prefer a rustic farmhouse vibe or a sleek modern style, crafting your own wooden plant stands allows you to personalize your home with unique and functional decor. This comprehensive guide will walk you through the steps, from selecting the right wood to finishing touches, ensuring a rewarding and aesthetically pleasing DIY project.
Choosing the Right Wood
The heart of any woodworking project lies in the quality of the wood. For plant stands, consider factors like durability, aesthetic appeal, and ease of working with the wood. Here are some popular choices:
Hardwoods:
- Oak: Renowned for its strength, durability, and classic beauty. It's ideal for creating robust and long-lasting stands.
- Walnut: Known for its rich, dark color and beautiful grain patterns. It adds a touch of sophistication to your home.
- Maple: A durable hardwood with a light, warm tone. It's a versatile option that complements various styles.
Softwoods:
- Pine: A readily available and affordable option. Its knotty character adds a rustic charm to the stands.
- Cedar: Possesses a natural insect-repelling quality, making it ideal for outdoor plant stands. It also adds a pleasant aroma.
- Redwood: A durable and weather-resistant wood, perfect for outdoor applications. It ages beautifully with time.
Consider the size and weight of your plants when choosing the wood. For heavier plants, opt for hardwoods like oak or walnut. Lighter plants may be suitable for softer woods like pine or cedar.
Planning Your Design
Before you start cutting wood, take the time to sketch out your design. Consider the following factors:
- Style: Do you want a modern, minimalist stand or a rustic, farmhouse-inspired one?
- Shape: Round, square, hexagonal, or rectangular? Each shape offers a distinct visual appeal.
- Height: The height of your stand should complement the size of your plants.
- Number of Tiers: Single-tier stands are simple and classic, while multi-tier stands allow for a more dramatic display.
- Materials: Will you use additional materials like metal, rope, or fabric for decorative accents?
Visualize your plants on the stands and consider the overall aesthetic you want to achieve. This will guide you in creating a harmonious and cohesive look.
Essential Tools and Materials
Gather the necessary tools and materials to ensure a smooth crafting process:
- Wood: Choose your desired wood type and cut the planks according to your design.
- Saw: A circular saw or a hand saw will be needed for cutting the wood.
- Measuring Tape and Pencil: Essential for accurate marking and measuring.
- Screwdriver or Drill: For attaching pieces and securing the stand.
- Wood Glue: Provides extra strength and stability to the joints.
- Sandpaper: To smooth out rough edges and prepare the surface for finishing.
- Wood Stain or Paint: To add color and enhance the beauty of the wood.
- Finishing Oil or Varnish: For protection and durability.
- Safety Gear: Wear safety glasses, gloves, and dust masks during the crafting process.
Step-by-Step Guide to Crafting a Wooden Plant Stand
Now, let's dive into the crafting process:
Step 1: Cut the Wood
- Measure and cut the wood planks according to your design plan. Ensure all cuts are straight and accurate.
- For a single-tier stand, cut four legs and a top piece. For multi-tier stands, calculate the number of legs and platforms needed.
Step 2: Sanding and Finishing
- Sand all the cut pieces smoothly using sandpaper. Start with a coarse grit and gradually progress to a finer grit for a polished finish.
- If desired, apply wood stain or paint to the sanded pieces. Let them dry completely before moving to the next step.
Step 3: Assembling the Stand
- Glue and secure the legs to the top piece. Use clamps to hold the pieces firmly in place while the glue dries.
- For multi-tier stands, attach the platforms to the legs using glue and screws. Ensure the platforms are level and stable.
- Allow the glue to cure completely before proceeding.
Step 4: Applying Finishing Touches
- Apply a layer of wood oil or varnish to protect the stand from moisture and scratches.
- Let the finish dry completely before adding plants.
Adding Personal Touches
Enhance the elegance and personality of your plant stands with unique touches:
- Decorative Hardware: Incorporate decorative screws, nuts, or bolts to add a touch of industrial chic.
- Carved Details: Add intricate carvings to the wood for a more personalized and artistic aesthetic.
- Painted Accents: Paint the stands with contrasting colors or patterns to add visual interest.
- Natural Elements: Incorporate elements like moss, rope, or stones for a natural and rustic appeal.
Styling Your Plant Stands
Now that you have your beautiful plant stands ready, it's time to style them with your favorite greenery:
- Mix and Match Plants: Combine different plant textures, shapes, and colors to create visual interest and depth.
- Use Trays: Place plants in decorative trays or pots to enhance the overall presentation.
- Play with Heights: Use stands of varying heights to create a dynamic and balanced arrangement.
- Consider the Lighting: Place your plant stands in areas with adequate natural or artificial light to ensure your plants thrive.
Experiment with different plant combinations, colors, and arrangements to find the perfect style for your home. Embrace the creative process and enjoy the rewarding experience of crafting your own stylish wooden plant stands.
Saturday, September 21, 2024
Wooden Key Racks with a Natural or Rustic Finish That Will Sell Fast

Wooden Key Racks: Rustic Charm That Will Sell Fast
Alright, let's talk about key racks. Not just any key racks, but wooden key racks that scream "rustic charm" and will fly off your shelves. These aren't your average, boring, plastic key holders. We're talking about pieces of handcrafted goodness that add personality to any entryway.
Think about it. When someone walks into your home, the first thing they see is the entryway. It sets the tone for the whole experience, and a beautiful key rack can make a huge difference. It's like a warm hug, saying, "Welcome, you're home now."
But let's be real, you're here because you want to sell these beauties, not just gush about them. So, let's dive into the key elements (pun intended!) that will make your wooden key racks hot commodities:
The Allure of Rustic
There's something about the rustic look that just draws people in. It's like a breath of fresh air in a world filled with sterile minimalism. Rustic charm speaks to our desire for authenticity and connection to nature.
Here's how you can tap into that magic:
Embrace the Imperfections
Don't try to hide the knots, cracks, or uneven surfaces. These are the marks of a natural material and give each piece unique character. In fact, embrace them! Highlight those imperfections with a natural finish that lets the wood shine through.
Choose the Right Wood
Reclaimed wood, barnwood, or even just simple pine can create a stunning rustic look. Consider the color, texture, and grain pattern. A rustic-style key rack made from reclaimed wood tells a story, a story of the wood's past and the craftsmanship that went into creating it.
Embrace Natural Finishes
Stay away from glossy, high-sheen finishes. Opt for natural oils or waxes that enhance the wood's grain and texture. A natural finish allows the beauty of the wood to speak for itself and complements the rustic aesthetic.
Design Elements That Sell
Now, let's talk about the design. It's one thing to have a rustic piece, but you want a key rack that people actually *want* to use.
Functional and Stylish
Think about how people will use the key rack. Enough hooks? Are they placed at a comfortable height? Do they have room for additional items like mail or sunglasses?
Add Storage
Consider adding a small shelf or drawer for additional storage. It could be for mail, sunglasses, small items, or even just a place for a decorative item.
Unique Details
Think about the "wow factor." Here are some ideas:
- Carved wood details
- Metal accents for the hooks
- A distressed finish that adds vintage appeal
- Unique shapes beyond just a traditional rectangular frame
Marketing Tips
You've got a beautiful product, now let's get it in front of the right people:
Showcase the Rustic Charm
Take high-quality photos that capture the wood's natural beauty, the unique imperfections, and the overall rustic vibe. Use natural light and showcase the key rack in a warm, inviting setting. Think farmhouse, cottage, or even a cozy cabin.
Highlight the Craftsmanship
Let people know that your key racks are handcrafted. Mention the wood type, any special techniques used, and the skill involved in creating each piece. This adds value and a personal touch.
Target Your Audience
Think about who would be interested in a rustic key rack. This could include home decor enthusiasts, fans of farmhouse or cottage style, and anyone who appreciates handmade items. You can use social media and online marketplaces to reach these specific audiences.
Storytelling is Key
Tell the story behind the key racks. Where did the wood come from? What inspired the design? How are they made? A compelling story will connect with customers on a deeper level.
Commonly Asked Questions
Here are some questions you might encounter when selling rustic wooden key racks:
- "What kind of wood is used?" Be ready to describe the wood type and its unique characteristics.
- "Is it sturdy enough to hold my keys?" Assure customers that the wood is strong and the hooks are securely attached.
- "Can I customize it?" If you offer customization options, be clear about them.
- "How do I care for it?" Provide instructions on how to clean and maintain the key rack.
- "What if it arrives damaged?" Have a clear return or exchange policy.
Remember, a key rack isn't just a place to hang keys. It's a statement piece, a conversation starter, and a reflection of your style. With a little creativity, you can create wooden key racks that are both beautiful and functional, sure to win over any customer looking for a touch of rustic charm.
Floating Shelves with Unique Features That Are Perfect for Selling

Floating Shelves with Unique Features That Are Perfect for Selling
Hey there, fellow design enthusiasts! Are you looking to upgrade your home décor game with a touch of modern elegance? Well, look no further than floating shelves! They're not just a practical storage solution; they're a statement piece that can elevate any room. And when you add some unique features, they become a hot commodity, perfect for selling and adding an extra special touch to your customers' homes. Let's dive into the world of floating shelves and explore some of the most sought-after features that will make your creations stand out from the crowd.
Beyond Basic Shelves: Unique Features That Sell
Think of floating shelves like a blank canvas. You can go beyond the usual simple design and add details that create real wow factor. Here are some of the most popular features that will make your shelves truly stand out:
Hidden Lighting
Imagine this: a sleek, minimalist shelf with warm, inviting light emanating from behind. Hidden lighting creates a magical effect, transforming your shelves into a focal point and highlighting your prized possessions. It's like adding a touch of magic to your customers' spaces. You can even add a dimmer switch for the ultimate personalized ambiance.
Integrated Storage
More than just a shelf, more like a storage haven! Think about incorporating hidden compartments or drawers behind the floating surface. This adds an extra layer of functionality that buyers will absolutely love. A small drawer hidden on a shelf in the living room could hold remote controls, magazines, or even a little stash of snacks – genius!
Geometric Shapes and Designs
Goodbye, boring rectangles! Say hello to shelves that make a statement. Geometric shapes, like triangles, hexagons, and even rounded edges, add a modern and artistic touch. Think about playing with different shapes within a single unit or creating a dynamic wall display with multiple shapes in different sizes. It's all about creating visual interest and breaking the mold.
Sustainable Materials
More and more customers are looking for sustainable and eco-friendly options. Use materials like reclaimed wood, bamboo, or recycled metal to create shelves that are both stylish and environmentally conscious. Not only will your customers appreciate the sustainable choice, but it's also a great way to give these materials a new life.
Unique Finishes
Go beyond just paint! Explore a world of unique finishes, like metallics, distressed wood, or even concrete. These unexpected touches will add a touch of luxury and character to your shelves. Think about a brushed brass finish for a modern loft vibe or a rustic distressed wood for a farmhouse feel. You can even experiment with two-tone finishes for an extra dimension.
Building Your Brand: Tips for Selling Floating Shelves
So you've got the unique features – now it's time to build your brand and find your audience. Here are some tips to help you sell your floating shelves like a pro:
Know Your Target Audience
Who are you trying to reach? Modern minimalist? Rustic farmhouse? Identifying your target audience will help you design shelves that cater to their specific needs and preferences. Think about their style, budget, and lifestyle. This will help you fine-tune your designs, marketing strategies, and pricing.
Showcase Your Skills
Photos are your best friend! Showcase your shelves in real-life settings, showcasing their versatility. Think about using professional photography or even hiring a stylist to help you create eye-catching images that will capture the attention of potential buyers. Don't underestimate the power of good visuals.
Embrace Social Media
Social media is a fantastic way to connect with your audience and build a following. Use platforms like Instagram, Pinterest, and TikTok to share your creations, behind-the-scenes glimpses, and helpful DIY tips. Engage with your followers, respond to comments, and build relationships.
Build a Strong Online Presence
Create a website or online shop to showcase your work. Make sure it's easy to navigate and provides clear product descriptions, pricing, and ordering information. Consider setting up an online store through platforms like Etsy or Shopify. This allows you to reach a wider audience and streamline your sales process.
Offer Custom Orders
Add a personal touch by offering custom orders. Allow your customers to select their desired dimensions, finishes, and features. This personalization will not only appeal to buyers but also create a truly unique experience. You can even offer bespoke designs based on specific room themes or styles.
FAQ: Frequently Asked Questions about Floating Shelves
What are the best materials for floating shelves?
There are many great materials for floating shelves! The choice depends on your design aesthetic and the overall look you're going for. Here are a few popular options:
- Wood: This is a classic and versatile choice that can be stained, painted, or left natural for a rustic look.
- Metal: Metals like steel, iron, and brass offer a modern, industrial look. They can be powder coated for a variety of finishes.
- Glass: Glass shelves create a sleek, minimalist feel and are particularly well-suited for showcasing small objects or books.
- Acrylic: Acrylic offers a lightweight, transparent alternative to glass, perfect for creating a contemporary feel.
How do I install floating shelves?
Installing floating shelves is a bit more involved than traditional shelves, but it's not overly complicated. You'll need to use brackets that are hidden behind the shelf. Here's a general guide:
- Mark the wall where you want to install the shelves.
- Drill pilot holes for the brackets.
- Secure the brackets to the wall.
- Carefully attach the shelf to the brackets.
Are floating shelves sturdy?
When installed properly, floating shelves can be just as sturdy as traditional shelves. It's important to use high-quality brackets and make sure they are secured firmly to the wall. The weight capacity of a floating shelf will depend on the material used and the size and design of the bracket.
How much do floating shelves cost?
The cost of floating shelves varies depending on the materials, size, and complexity of the design. Simple, pre-made shelves can be found for a few dollars each, while custom-built shelves with unique features can cost hundreds of dollars. Make sure you factor in the cost of materials, labor, and any special features when setting your pricing.
So there you have it! Floating shelves with unique features are a fantastic way to add a touch of style and personality to any home. By embracing creativity and incorporating those special features, you'll be able to craft shelves that are not only beautiful but also highly sought-after. Happy crafting and happy selling!
Friday, September 20, 2024
DIY Beginner Woodworking Projects You Can Complete in a Day

DIY Beginner Woodworking Projects You Can Complete in a Day
Woodworking is a rewarding hobby that allows you to create beautiful and functional items for your home. It can be intimidating for beginners, but there are plenty of easy projects you can complete in a day. These projects will help you gain confidence in your woodworking skills while providing you with practical items to enjoy. Here are a few ideas to get you started:
Simple and Stylish Coasters
Coasters are a great beginner project because they're small, relatively easy to make, and require minimal tools.
Materials:
- 1/2-inch thick plywood or hardwood
- Wood glue
- Sandpaper (fine and medium grit)
- Wood stain or paint (optional)
- Polyurethane sealant (optional)
- Circular saw or jigsaw (optional)
- Measuring tape
- Pencil
- Safety glasses
Instructions:
- Cut out your coasters using a circular saw, jigsaw, or simply cut squares from a piece of wood using a ruler and pencil. Aim for 4-inch squares or circles for standard coaster size.
- Sand the edges of your coasters with medium grit sandpaper to smooth them out. Then, use fine grit sandpaper to get a polished finish.
- Apply wood stain or paint (optional) to your coasters. Allow it to dry completely before moving on.
- Apply a coat of polyurethane sealant (optional) to your coasters for a protective finish. This will also make them water-resistant.
Rustic Wooden Signs
Wooden signs are a versatile and decorative project. You can personalize them with your favorite quote, a family name, or a special message.
Materials:
- 1/2-inch thick pine board
- Wood glue
- Sandpaper (fine and medium grit)
- Wood stain or paint (optional)
- Polyurethane sealant (optional)
- Saw (for cutting the wood to size)
- Measuring tape
- Pencil
- Letter stencils or a wood burning tool
- Safety glasses
Instructions:
- Measure and cut the pine board to your desired size using a saw.
- Sand the edges and surface of the board with medium grit sandpaper, then use fine grit sandpaper for a smooth finish.
- Apply wood stain or paint (optional) to your sign and allow it to dry completely.
- Use letter stencils or a wood burning tool to create your desired message on the sign.
- If using paint, allow the paint to dry completely before applying a coat of polyurethane sealant (optional) for a protective finish.
Modern Wooden Shelves
Floating shelves are a stylish and functional addition to any room. They can be used to display books, plants, or decorative objects.
Materials:
- 1x8 inch pine board
- Wood glue
- Sandpaper (fine and medium grit)
- Wood stain or paint (optional)
- Polyurethane sealant (optional)
- Saw (for cutting the board to size)
- Measuring tape
- Pencil
- Screws (matching the board thickness)
- Drill
- Level
- Safety glasses
Instructions:
- Measure and cut the pine board to your desired shelf length using a saw.
- Sand the edges and surface of the board with medium grit sandpaper, then use fine grit sandpaper for a smooth finish.
- Apply wood stain or paint (optional) to your shelf and allow it to dry completely.
- Mark the location for the shelf brackets on the wall using a pencil and level. Drill pilot holes for the screws.
- Attach the shelf brackets to the wall using the screws.
- Place the shelf on the brackets, ensuring it is level.
- Secure the shelf to the brackets with wood glue and screws.
- Allow the glue to dry completely before adding any items to the shelf.
Charming Picture Frames
Picture frames are an easy way to showcase your favorite photos and add a personal touch to your home décor.
Materials:
- 1/2-inch thick wood (for the frame)
- Wood glue
- Sandpaper (fine and medium grit)
- Wood stain or paint (optional)
- Polyurethane sealant (optional)
- Mitre saw or hand saw
- Measuring tape
- Pencil
- Clamps
- Picture frame glass or plexiglass
- Picture frame backing board
- Safety glasses
Instructions:
- Measure the size of your photo and add an extra inch or two to each side for the frame border.
- Cut four pieces of wood to the desired length using a mitre saw or hand saw. Make sure the angles are precise for a clean frame.
- Sand the edges of each piece of wood with medium grit sandpaper, then use fine grit sandpaper for a smooth finish.
- Apply wood stain or paint (optional) to your frame pieces and allow it to dry completely.
- Use wood glue to join the four pieces of wood together at the corners, creating a rectangular frame. Secure the frame with clamps until the glue dries completely.
- Once the glue is dry, you can add your photo, glass, and backing board to create a finished picture frame.
Simple Birdhouse
A birdhouse is a fun and practical project that will attract birds to your garden.
Materials:
- 1/2-inch thick plywood or cedar wood
- Wood glue
- Sandpaper (fine and medium grit)
- Wood stain or paint (optional)
- Polyurethane sealant (optional)
- Saw (for cutting the wood)
- Measuring tape
- Pencil
- Drill
- Screws
- Safety glasses
Instructions:
- Cut out the pieces for your birdhouse according to a birdhouse pattern or design of your choosing. This will typically include the base, sides, roof, and entrance hole.
- Sand the edges of each piece of wood with medium grit sandpaper, then use fine grit sandpaper for a smooth finish.
- Apply wood stain or paint (optional) to your birdhouse pieces and allow it to dry completely.
- Assemble the birdhouse by gluing and screwing the pieces together. Make sure to use a drill to create pilot holes for the screws to prevent splitting the wood.
- If desired, you can add decorative features to your birdhouse, such as a perch or a small roof overhang.
Tips for Successful Beginner Woodworking Projects
Here are some additional tips to help ensure your woodworking projects are successful:
- Start with simple projects: Don't try to tackle complex projects until you've gained some experience and confidence.
- Use the right tools: Choose tools that are appropriate for your skill level and the project you're working on.
- Practice safety: Always wear safety glasses and use appropriate safety gear when woodworking.
- Measure twice, cut once: Accuracy is key in woodworking, so take your time and double-check your measurements before making any cuts.
- Don't be afraid to ask for help: If you're struggling with a particular step, don't hesitate to ask a more experienced woodworker for help.
- Have fun: Woodworking should be enjoyable, so don't get discouraged if you make mistakes. Just learn from them and keep practicing.
With a little patience and practice, you can create beautiful and functional woodworking projects that you'll be proud to display in your home.
Thursday, September 19, 2024
How to Perfect Dado Joints for Complex Woodworking Projects

Mastering the Art of Dado Joints for Complex Woodworking Projects
In the realm of woodworking, the dado joint stands as a testament to both precision and strength. This robust joint, characterized by its rectangular groove cut across the grain of a workpiece, serves as a foundation for countless woodworking projects, from cabinets and shelves to furniture and intricate box constructions. Achieving perfection in dado joints requires a blend of knowledge, technique, and meticulous attention to detail. This comprehensive guide delves into the intricacies of dado joint construction, equipping you with the tools and insights necessary to elevate your woodworking to new heights.
Understanding the Fundamentals of Dado Joints
At its core, a dado joint is a form of "half-lap" joint where a groove is cut into one workpiece to receive the mating edge of another. This interlocking design creates a strong, flush connection that is both visually appealing and structurally sound. The depth of the dado, typically one-half the thickness of the workpiece, determines the strength and stability of the joint. The width of the dado, on the other hand, aligns with the thickness of the mating piece, ensuring a precise fit.
Advantages of Dado Joints
Dado joints offer a multitude of benefits that make them a popular choice for woodworking projects:
- Strength and Durability: The interlocking nature of dado joints provides exceptional strength, making them ideal for applications that require robust connections.
- Flush Surface: The dado joint creates a seamless, flush surface, eliminating unsightly gaps or unevenness.
- Versatility: Dado joints can be used in a wide range of woodworking projects, from simple shelves to intricate furniture pieces.
- Ease of Assembly: Once the dadoes are cut, assembling the pieces is relatively straightforward, requiring minimal clamping.
- Aesthetic Appeal: When executed with precision, dado joints exhibit a clean, professional appearance, enhancing the overall aesthetics of a project.
Essential Tools and Materials for Cutting Dado Joints
Before embarking on the journey of crafting perfect dado joints, ensure you have the following tools and materials at your disposal:
- Table Saw: A table saw with a dado blade set is the most common and efficient tool for cutting dado joints. Dado blades, consisting of multiple stacked blades and chippers, create precise grooves with clean, parallel walls.
- Dado Blade Set: A dado blade set typically includes a pair of outer blades, chippers, and shims. The number of chippers and the thickness of the shims determine the width of the dado.
- Miter Gauge: A miter gauge ensures accurate alignment of the workpiece for precise dado cuts. Select a miter gauge with a well-constructed fence for stability and accuracy.
- Push Sticks: Push sticks are essential for safe and controlled feeding of the workpiece across the table saw blade, especially when cutting dados.
- Safety Glasses: Eye protection is paramount when working with power tools. Always wear safety glasses to shield your eyes from flying debris.
- Ear Protection: Protect your hearing by wearing earplugs or earmuffs while operating the table saw.
- Workpiece: Select high-quality, well-seasoned wood for your dado joints to minimize warping and shrinkage. Ensure the wood is free of knots or imperfections that could hinder the cutting process.
- Wood Glue: Use a high-quality wood glue for bonding the dadoed pieces. Apply a thin, even layer of glue to the mating surfaces for a strong and durable bond.
Cutting Dado Joints with Precision: Step-by-Step Guide
Mastering the art of cutting dado joints requires meticulous attention to detail. Follow these step-by-step instructions to ensure accuracy and success:
Step 1: Planning and Layout
Begin by carefully planning the dimensions and location of your dado joints. Use a pencil and ruler to mark the precise positions of the dadoes on the workpiece. Consider the thickness of the mating pieces and ensure the width of the dado matches this thickness for a snug fit. Refer to your project plans or sketches to ensure accurate placement.
Step 2: Setting Up the Table Saw
Prepare your table saw for dado cutting. Start by securing the dado blade set in the saw arbor, making sure it is securely tightened. Adjust the height of the blade to match the desired depth of the dado. Use a ruler to measure the depth and make necessary adjustments for precision. Next, set up the miter gauge to the desired angle for your project. Ensure the miter gauge is securely locked in place for stability during cutting.
Step 3: First Pass
With the table saw setup complete, make your first pass to create the dado. Align the workpiece against the miter gauge, ensuring it is securely held in place. Start the saw and carefully feed the workpiece into the blade. Maintain steady pressure and a consistent pace throughout the cut. The first pass will cut one side of the dado, creating a shallow groove.
Step 4: Adjusting for Width
After the first pass, adjust the dado blade set to increase the width of the groove. Carefully slide the outer blades closer to the center, increasing the width of the dado to match the desired thickness of the mating piece. Use a ruler to measure the width between the outer blades and make necessary adjustments until it matches the desired measurement. Refer to the manufacturer's instructions for specific adjustments.
Step 5: Second Pass
With the blade set adjusted for width, make the second pass to complete the dado. Align the workpiece against the miter gauge, ensuring the existing groove is positioned directly in line with the blade set. Start the saw and carefully feed the workpiece into the blade, creating the second side of the dado. Maintain steady pressure and consistent pace throughout the cut. The second pass will create a complete dado, ready to receive the mating piece.
Step 6: Testing and Refinement
Once the dado is cut, test the fit of the mating piece. Slide the mating piece into the dado to check for a snug fit. If necessary, make slight adjustments to the width of the dado by repositioning the dado blades. Aim for a tight, snug fit that allows for easy assembly and secure bonding.
Step 7: Assembly and Gluing
With the dadoes cut and the fit verified, apply a thin, even layer of wood glue to the mating surfaces. Carefully slide the mating piece into the dado, ensuring the joint is aligned and flush. Apply gentle pressure to secure the bond, and use clamps to hold the pieces together until the glue dries completely. Follow the glue manufacturer's instructions for drying time and clamping pressure. Once the glue is fully cured, remove the clamps and admire your precisely crafted dado joints.
Tips for Achieving Perfection in Dado Joints
Here are some additional tips to enhance the precision and quality of your dado joints:
- Use a Fine-Tooth Dado Blade Set: Opt for a dado blade set with fine teeth for cleaner cuts and smoother surfaces.
- Clean Up Chipper Debris: Regularly clean up chipper debris from the dado groove to ensure smooth cutting and prevent chipping.
- Avoid Excessively Tight Fits: Slightly undersized dados are preferable to overly tight ones, which can lead to joint stress and cracking.
- Sand the Dados: Lightly sand the bottom and sides of the dados to remove any burrs or imperfections that might hinder a snug fit.
- Practice and Patience: Cutting dado joints requires practice and patience. Start with simpler projects to refine your skills before tackling more complex woodworking projects.
Conclusion
Mastering the art of cutting dado joints is a journey of precision, technique, and meticulous attention to detail. By understanding the fundamentals, familiarizing yourself with the essential tools, and diligently following the step-by-step instructions, you can craft strong, durable, and visually appealing dado joints. Whether you're building cabinets, shelves, or intricate furniture, mastering this fundamental woodworking joint will elevate your projects to new levels of craftsmanship and ensure lasting satisfaction.
Wednesday, September 18, 2024
Quick Wooden Christmas Decorations You Can Make Today
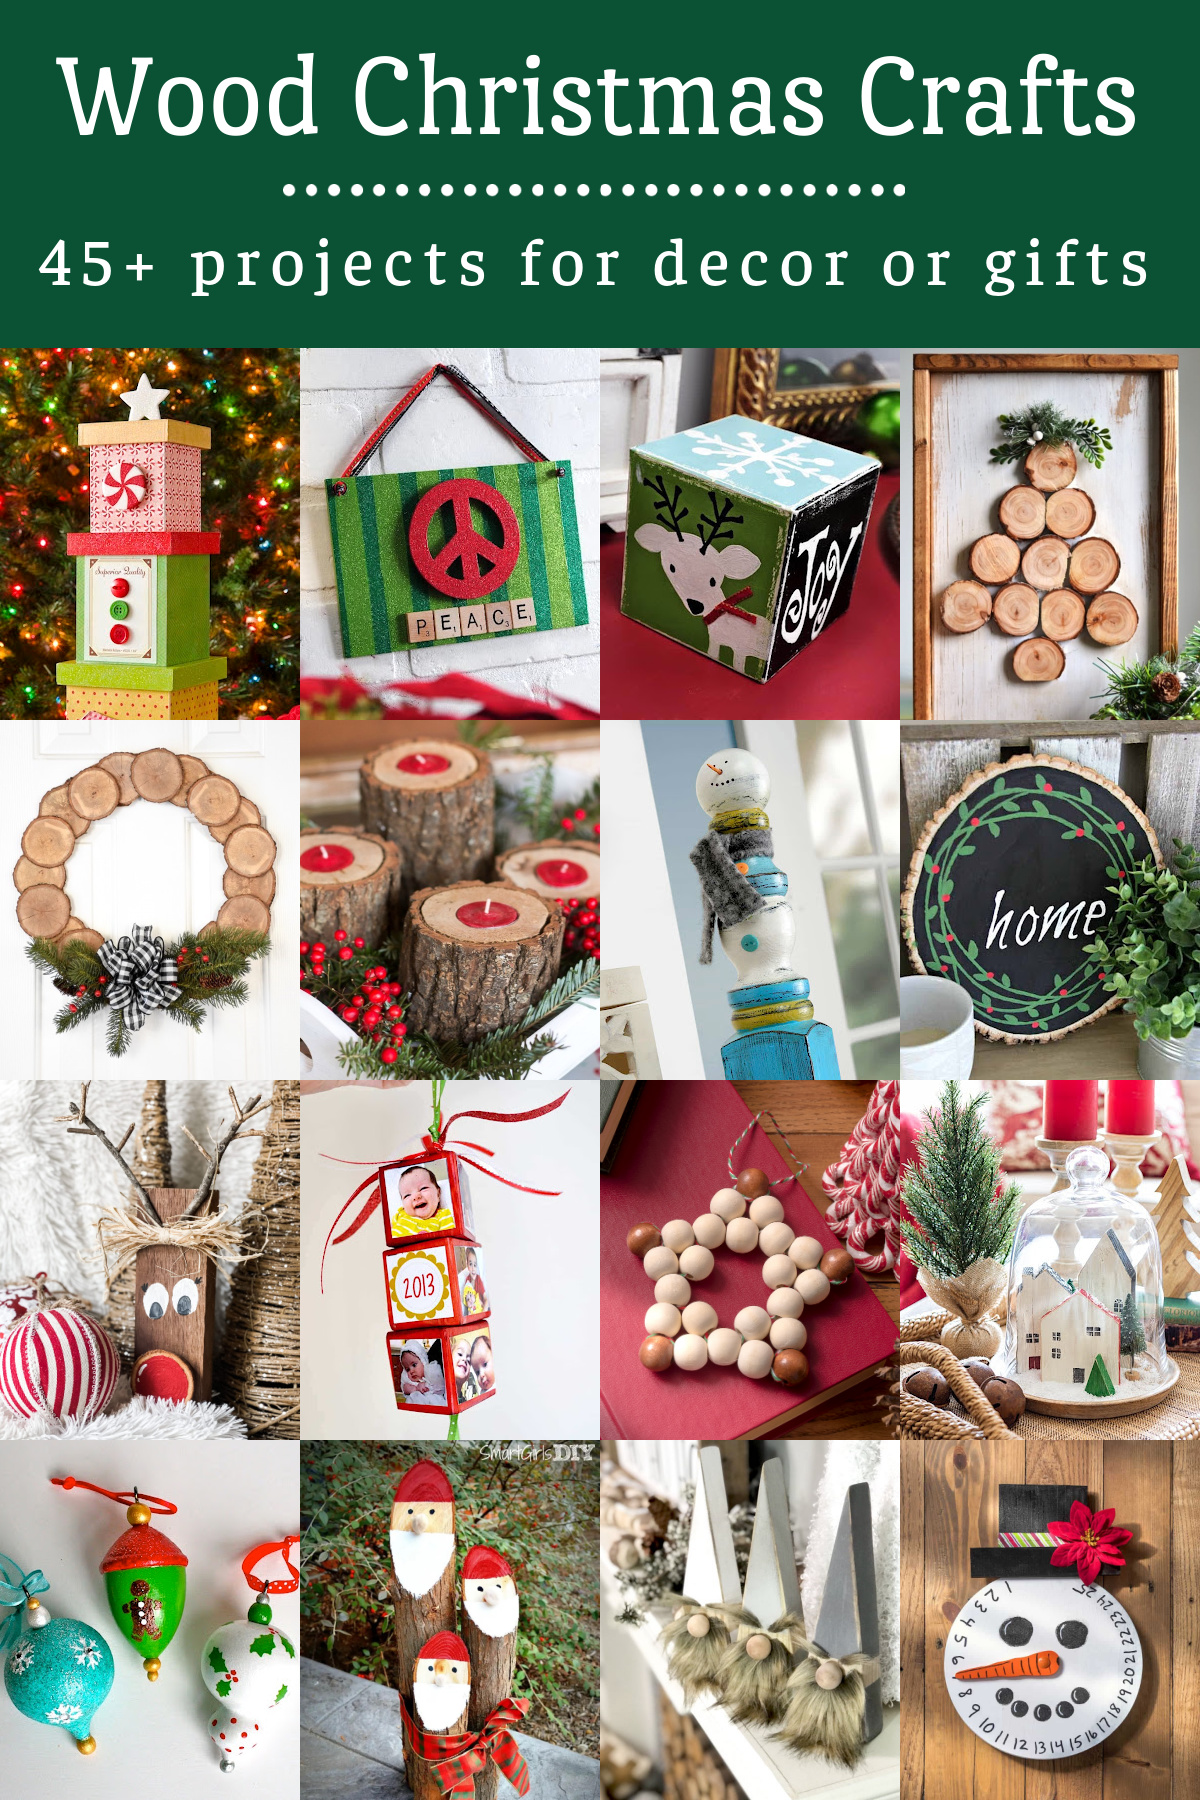
Quick Wooden Christmas Decorations You Can Make Today
Bring the warmth and charm of wood into your holiday decor with these easy-to-make Christmas decorations. With just a few basic supplies and a little creativity, you can transform simple wooden shapes into festive accents for your home. These projects are perfect for a quick DIY afternoon, and they make wonderful personalized gifts too!
Gather Your Supplies
Before you start crafting, gather your materials. Here's what you'll need for most of these projects:
- Wooden shapes: Choose from circles, stars, snowflakes, ornaments, or even simple wooden blocks. Look for unfinished wood at craft stores or online.
- Paint: Acrylic paint in festive colors like red, green, gold, and white will make your decorations pop.
- Brushes: You'll need a variety of brush sizes for painting details.
- Twine or ribbon: This is perfect for hanging your decorations.
- Optional embellishments: Consider adding glitter, sequins, felt, buttons, or other decorative elements to personalize your creations.
Simple and Festive: Wooden Ornament Decorations
Start with simple wooden ornaments. These are versatile and allow for endless creative possibilities.
Classic Painted Ornaments
Paint your ornaments in your favorite Christmas colors. For a modern touch, try using metallic paints or a single bold color. Add a simple design with a paint pen, like snowflakes, dots, or stripes.
Nature-Inspired Ornaments
Embrace the beauty of nature by incorporating natural elements into your ornaments. Glue pinecones, berries, or dried leaves to the surface. Alternatively, use a paintbrush to create woodgrain patterns that mimic the texture of a pine branch.
Beyond Ornaments: More Wooden Decoration Ideas
Don't limit yourself to ornaments! Wood can be transformed into a variety of festive decorations.
Wooden Star Garland
Cut out several wooden stars in different sizes. Paint them in a festive color scheme and tie them together with twine or ribbon. This garland can be draped across a fireplace mantle, a doorway, or even a window.
Wooden Snowflake Wall Decor
Paint wooden snowflakes in white or silver for a classic look. You can add glitter to the paint for extra sparkle. Use glue or double-sided tape to attach the snowflakes to a piece of cardboard or foam board, then hang it on your wall.
With a little creativity, you can make your own unique and charming wooden Christmas decorations that will bring a touch of warmth and personalization to your holiday decor. Remember, the most important part is to have fun and express your own style!
Tuesday, September 17, 2024
How to Sell Handmade Blanket Ladders at Craft Shows and Online

Crafting a Successful Business: Selling Handmade Blanket Ladders at Craft Shows and Online
Handmade blanket ladders are a unique and charming addition to any home, adding a touch of rustic charm and practical storage. If you're a creative soul with a passion for crafting and an eye for detail, selling these delightful creations at craft shows and online could be your ticket to a fulfilling and profitable business.
Crafting Your Brand
Before diving into the world of blanket ladder sales, establish a strong brand identity. This involves defining your target audience, choosing a catchy name, and designing a captivating logo that reflects the style and essence of your products. Crafting a cohesive brand narrative will help you stand out in the marketplace and attract customers who appreciate your unique vision.
Target Audience
Who are your ideal customers? Are they home décor enthusiasts, vintage lovers, or minimalist design aficionados? Understanding your target audience allows you to tailor your marketing efforts and craft products that resonate with their aesthetic preferences and needs.
Brand Name and Logo
Choose a name that is memorable, easy to pronounce, and reflects the essence of your blanket ladders. A well-designed logo should visually represent your brand's personality. Consider using natural elements like wood grain, yarn textures, or stylized ladders to create a visual identity that evokes warmth and charm.
Creating High-Quality Blanket Ladders
The foundation of your success lies in creating exceptional, high-quality blanket ladders. Invest in durable materials, embrace meticulous craftsmanship, and explore diverse designs to cater to a wide range of tastes. Each ladder should be a testament to your skill and dedication, showcasing the beauty and functionality of your creations.
Material Selection
Use sturdy wood like pine, oak, or reclaimed wood for the ladder rungs and frame. For added durability, consider using a wood stain or sealer to protect against moisture and scratches. Explore a variety of rope or fabric options for the ladder's back panel, considering textures, colors, and weights that compliment the chosen wood.
Design Innovation
Offer a range of designs to appeal to different aesthetics. Experiment with different ladder sizes, shapes, and finishes. Consider incorporating unique elements like decorative hardware, woven textiles, or personalized touches to create truly one-of-a-kind pieces.
Marketing Your Blanket Ladders
Marketing is the key to connecting with potential customers and showcasing the value of your handcrafted creations. Embrace a multi-faceted approach to reach a wider audience and maximize your sales potential.
Craft Shows
Participating in local craft shows provides a direct avenue to connect with customers, showcase your products in person, and foster a sense of community. Set up a visually appealing booth with clear signage and inviting displays to attract attendees. Engage with visitors, share your passion for crafting, and answer questions about your blanket ladders. Offer interactive elements like live demonstrations or "make and take" activities to engage potential customers and create a memorable experience.
Online Presence
Establish a strong online presence to reach a wider audience and connect with customers beyond your local area. Create a professional website showcasing your blanket ladders, featuring high-quality photographs and detailed descriptions of each design. Utilize social media platforms like Instagram and Pinterest to share captivating images and engage with potential customers. Consider offering online tutorials or sharing inspirational home decor ideas featuring your blanket ladders to foster a sense of community and highlight the versatility of your products.
Etsy
Etsy is a thriving online marketplace specifically for handmade and vintage goods. Create a compelling Etsy shop with high-quality product photos, detailed descriptions, and engaging shop policies. Offer competitive pricing and prioritize excellent customer service to build trust and encourage repeat business.
Pricing Your Blanket Ladders
Pricing your blanket ladders accurately is crucial for ensuring a profitable business. Consider the cost of materials, labor, and overhead expenses when setting your prices. Research competitive pricing for similar products on Etsy and at craft shows to establish a benchmark. Remember, customers value high-quality, handcrafted items, so don't undervalue your work. Offering a range of price points allows you to cater to diverse budgets while ensuring you earn a fair return on your investment.
Providing Excellent Customer Service
Building a loyal customer base requires going the extra mile. Respond promptly to inquiries, address concerns with empathy, and personalize the customer experience. Offering gift wrapping, personalized notes, or small samples of your crafting materials can create a memorable impression and enhance customer satisfaction.
Embrace the Journey
Selling handmade blanket ladders at craft shows and online is a rewarding journey filled with creative expression, business growth, and the joy of connecting with passionate customers. Embrace the challenges and celebrate the successes, remembering that your dedication to quality and customer service will pave the way for a successful and fulfilling entrepreneurial experience.