Create Masterpieces with Ted's Woodworking!

Whether you’re a seasoned craftsman or a complete beginner, Ted's Woodworking provides the ultimate resource for turning your woodworking dreams into reality.
- 16,000 Woodworking Plans: From furniture to garden projects, find the perfect plan for your next build.
- Step-by-Step Instructions: Detailed guides that make even complex projects simple and fun.
- Material Lists Included: Save time and money with precise material breakdowns for every project.
- Suitable for All Skill Levels: Whether you’re a pro or just starting out, there’s something for everyone.
- Lifetime Access: Build at your own pace with unlimited access to your plans.
Get Instant Access to 16,000 Woodworking Plans!
Friday, November 15, 2024
Custom Bath Trays to Make and Sell This Weekend

Make and Sell Custom Bath Trays This Weekend!
Hey there, DIY enthusiasts and aspiring entrepreneurs! Are you looking for a fun and profitable side hustle to tackle this weekend? Look no further than crafting and selling custom bath trays! These luxurious accessories are perfect for transforming a regular bath into a spa-like experience, and they're a hot commodity in today's market. Get ready to dive into the world of woodcraft and create something truly special that will pamper your customers.
The Allure of Bath Trays
Think about it – a warm bath, the scent of candles, a good book, and a glass of wine. What could be better? A bath tray elevates this experience to a whole new level. Imagine a beautifully crafted tray holding all your bath essentials within easy reach, keeping your book dry and your wine from spilling. That's the magic of a bath tray!
The beauty of bath trays lies in their versatility and personalizability. They come in various shapes, sizes, and styles to match any bathroom decor. From rustic farmhouse to sleek modern, there's a bath tray for every taste. This means you can offer unique and customized creations that cater to your customers' individual preferences, making each tray a truly special piece.
What You'll Need to Get Started
Don't be intimidated! Making bath trays is easier than you think. Here's a list of essential materials and tools to get you started:
Materials:
- Wood: Choose from a variety of wood types depending on your desired look and budget. Pine, cedar, and maple are popular choices for their affordability and durability.
- Stain or paint: Pick a color or finish that complements the wood and your customer's style.
- Epoxy resin: If you want to add a touch of elegance or create a unique design, epoxy resin is your friend. It allows you to create smooth, glossy finishes and embed objects like flowers or shells for a personalized touch.
- Hardware: This includes cup holders, wine glass holders, book rests, and other accessories to add functionality and personalization.
- Sandpaper: Essential for smoothing out the wood and creating a flawless finish.
- Wood glue: For securely joining the wood pieces.
- Finishing oil or wax: To protect the wood and enhance its natural beauty.
Tools:
- Saw: To cut the wood to your desired size and shape.
- Drill: For creating holes for cup holders, wine glass holders, and other hardware.
- Measuring tape and pencil: For accurate measuring and marking.
- Clamps: For securing the wood pieces while gluing.
- Brushes: For applying stain, paint, and finishing oil or wax.
Designing Your Custom Bath Trays
The fun part is designing your trays! Here are some ideas to spark your creativity:
Shape and Size:
- Classic rectangular shape: A versatile and timeless choice that fits most bathtubs.
- Curved or rounded shape: Adds a touch of sophistication and complements modern bathroom designs.
- Unique designs: Get creative with different shapes, like a crescent moon or a leaf.
- Adjustable tray size: Consider creating trays with adjustable compartments to accommodate various items.
Functionality:
- Cup holders: Essential for keeping your beverage within reach.
- Wine glass holders: A perfect addition for a relaxing bath with a glass of wine.
- Book rests: For those who love to read in the bath.
- Candle holders: Create a spa-like atmosphere with candles.
- Phone or tablet holder: Stay connected or enjoy entertainment while you soak.
Style and Personalization:
- Natural wood finish: Highlights the beauty of the grain pattern and creates a rustic look.
- Stained wood: Choose from a wide range of colors to match your customers' preferences.
- Painted wood: Add a pop of color with vibrant hues.
- Epoxy resin designs: Create unique patterns, swirls, or embed objects like flowers, shells, or even small photos.
- Engraving: Add personalized messages or designs for a special touch.
Marketing and Selling Your Bath Trays
Once you've created your beautiful bath trays, it's time to get them in front of potential customers. Here are some marketing and sales strategies:
Online Platforms:
- Etsy: A popular marketplace for handmade and vintage goods.
- Facebook Marketplace: A great way to reach local buyers.
- Instagram: Showcase your stunning bath trays with high-quality photos and videos.
- Your own website: Create a professional website to sell your products directly.
Local Events and Markets:
- Craft fairs and farmers markets: Connect with potential customers in person and show off your creations.
- Local gift shops: Approach stores that sell home decor and gifts to see if they're interested in carrying your bath trays.
Pricing and Profit:
- Research your competition: See what other bath tray sellers are charging to get an idea of pricing.
- Factor in your costs: Calculate the cost of materials, tools, and labor to ensure profitability.
- Set competitive prices: Offer attractive prices while still making a profit.
- Consider offering discounts: For example, offer a discount for bulk orders or to customers who follow your social media pages.
Frequently Asked Questions
What kind of wood is best for bath trays?
Pine, cedar, and maple are good choices for their affordability and durability. You can also use hardwoods like oak or walnut for a more luxurious look.
How do I seal a bath tray for water resistance?
Apply a water-resistant sealant like polyurethane or epoxy resin to protect the wood from water damage.
How much should I charge for my bath trays?
Pricing varies based on the materials, size, complexity, and your desired profit margin. Research your competition and factor in your costs.
How do I promote my bath trays online?
Use high-quality photos and videos to showcase your products on platforms like Etsy, Instagram, and your own website.
Where can I find ideas for designing bath trays?
Browse online platforms like Pinterest and Etsy for inspiration. Look at magazines and home decor websites for trendy designs.
Now you're equipped with the knowledge and inspiration to create and sell custom bath trays! Don't be afraid to experiment, personalize, and let your creativity shine. You'll be surprised by the joy of crafting and the potential for a successful side hustle. Happy crafting!
Thursday, November 14, 2024
How to Craft Personalized Serving Trays for Extra Income

Turn Your Creative Flair Into Extra Income: Crafting Personalized Serving Trays
Hey there, crafty folks! Are you looking for a fun and rewarding way to earn some extra cash? Well, let me tell you, crafting personalized serving trays is a fantastic option! It combines your creative skills with the ever-growing demand for unique and thoughtful gifts. Imagine creating beautiful trays that become cherished keepsakes, bringing smiles to faces and filling homes with warmth. This guide will walk you through everything you need to know, from choosing the right materials to marketing your creations. So grab your favorite crafting tools and let's dive in!Why Personalized Serving Trays Are a Hot Commodity
Personalized gifts are always a hit because they show you put thought and effort into the present. Serving trays are particularly appealing because they’re practical and versatile. They can be used for everything from serving snacks and drinks to displaying decorative items. And when you add a personal touch, you create something truly special.
Materials You'll Need
Before you get started, let's gather the essential materials. Don't worry, you don't need to spend a fortune. Most of these items can be found at your local craft store or online.
The Tray Base
- Wooden Trays: These are sturdy and come in various sizes and styles. You can even find unfinished wooden trays, giving you the flexibility to customize the look.
- Metal Trays: For a more modern vibe, try metal trays. They come in different finishes like silver, copper, or even black.
- Ceramic Tiles: Get creative by using ceramic tiles as the base. You can paint them or use decoupage techniques to add your designs.
Decorative Elements
- Paints: Choose acrylic paints, which are great for wood and ceramics. Explore different colors, textures, and finishes to suit your style.
- Stencils: Stencils allow you to easily create intricate designs. You can find them at craft stores or even make your own using adhesive paper.
- Vinyl Stickers: Want to add quotes, names, or patterns? Vinyl stickers are perfect for this and come in various sizes and colors.
- Decoupage Paper: This thin paper, often featuring beautiful patterns, is perfect for adding a decorative touch to your trays.
- Embellishments: Get creative with embellishments like buttons, beads, ribbons, or even dried flowers to add texture and personality to your trays.
Essential Tools
- Paintbrushes: Choose brushes of various sizes depending on your designs.
- Sandpaper: Sand down any rough edges on wooden trays and smooth out surfaces before painting.
- Scissors: For cutting stencils, decoupage paper, and vinyl stickers.
- Mod Podge: This multi-purpose adhesive is perfect for decoupage and sealing your designs.
- Protective Coating: A clear varnish or polyurethane will protect your tray from scratches and moisture.
Crafting Your Personalized Serving Trays
Now for the fun part! Let's get crafting! Here's a step-by-step guide to help you create your personalized serving trays:
Step 1: Choose Your Tray Base
Think about the size, style, and material that will best suit your design ideas. A rustic wooden tray might be perfect for a farmhouse aesthetic, while a sleek metal tray might fit a modern home better.
Step 2: Prepare the Tray
Clean your chosen tray base thoroughly. If you're working with wood, sand it smooth for a nice finish. For metal, use a cleaner to remove any residue.
Step 3: Brainstorm Your Design
Get your creative juices flowing! What theme or message do you want to convey with your tray? Consider the recipient's interests and personality. A food-themed tray could feature a favorite quote or recipe. A travel-themed tray could have a map or vintage luggage tags. The possibilities are endless!
Step 4: Create Your Design
- Paint: Paint the tray with your chosen base color, and then use stencils or freehand painting to add your design. Let the paint dry completely before moving on.
- Vinyl Stickers: Apply vinyl stickers carefully to your tray. Use a squeegee to smooth out any air bubbles.
- Decoupage: Cut out pieces of decoupage paper and apply them to your tray using Mod Podge. Brush on additional Mod Podge to seal the paper and create a smooth finish.
Step 5: Add Embellishments (Optional)
Embellishments can really make your tray stand out! Use buttons, beads, ribbons, or dried flowers to add texture and dimension. Be sure to secure them with glue or Mod Podge.
Step 6: Seal Your Design
Apply a protective coating like clear varnish or polyurethane to seal your design and protect it from wear and tear. This will also give your tray a beautiful shine.
Marketing Your Personalized Serving Trays
Now that you've created some stunning trays, it's time to share your work with the world! Here are some ways to market your creations:
- Online Marketplaces: Platforms like Etsy, Amazon Handmade, and Shopify allow you to sell your handmade items directly to customers.
- Social Media: Use platforms like Instagram and Facebook to showcase your trays, build a following, and engage with potential buyers.
- Local Craft Fairs: Participate in craft fairs and markets to meet customers face-to-face and sell your trays directly.
- Word-of-Mouth: Don't underestimate the power of word-of-mouth. Tell your friends, family, and neighbors about your business. You can even offer discounts for referrals.
Pricing Your Trays
Pricing your trays can be tricky. Consider your materials, time, and the uniqueness of your design. Research similar products to get an idea of what other sellers charge. Don't be afraid to charge what your work is worth!
Tips for Success
- High-Quality Materials: Use quality materials to ensure your trays are durable and long-lasting. This will also reflect well on your brand.
- Attention to Detail: Take your time with each step. A well-crafted, personalized tray is worth the extra effort.
- Offer Gift Wrapping: Make your trays even more appealing by offering gift wrapping options.
- Excellent Customer Service: Respond to inquiries promptly, be friendly, and go the extra mile to satisfy your customers. Happy customers are your best advertisement!
Commonly Asked Questions
What kind of paint is best for serving trays?
Acrylic paint is generally the best choice for serving trays. It's durable, dries quickly, and comes in a wide variety of colors.
How do I protect my designs from scratches and water?
Seal your designs with a clear varnish or polyurethane. This will create a protective barrier that will help prevent scratches and water damage.
How do I get started selling my personalized serving trays?
Start by creating a small collection of trays. Then, choose a few online marketplaces or social media platforms to promote your work. Don't be afraid to reach out to local shops or boutiques to see if they're interested in carrying your trays.
Crafting personalized serving trays can be a fun and profitable side hustle. With a little creativity, patience, and the right marketing strategy, you can turn your passion into a successful business!
Monday, November 11, 2024
Floating Shelf Woodworking Ideas: Build Functional and Beautiful Shelves

Floating Shelf Woodworking Ideas: Build Functional and Beautiful Shelves
Floating shelves offer a stylish and space-saving solution for displaying cherished belongings, organizing books, or adding visual interest to any room. Unlike traditional shelves, floating shelves appear to "float" against the wall, creating a minimalist and modern aesthetic. This guide will provide you with the necessary information and inspiration to create functional and beautiful floating shelves that enhance the beauty and practicality of your home.
Understanding the Basics of Floating Shelves
Floating shelves are typically constructed from wood, metal, or glass and are designed to be mounted directly to the wall. They feature hidden brackets or supports that hold the shelf in place, creating the illusion that the shelf is floating.
Key Components of Floating Shelves
- Shelf Board: The primary component of the shelf, made from various materials such as wood, metal, or glass.
- Brackets: Hidden supports that attach to the wall and hold the shelf board. They can be made from metal, wood, or other durable materials.
- Fasteners: Screws, anchors, or other hardware used to securely attach the brackets to the wall.
Choosing the Right Material and Design
The choice of material and design for your floating shelves is crucial in determining their style and functionality. Consider the following factors:
Materials
- Wood: A classic and versatile choice, offering a wide range of grains, colors, and finishes. Popular choices include maple, oak, walnut, and pine.
- Metal: Provides a modern and industrial look. Steel, aluminum, and iron are common options.
- Glass: Offers a sleek and contemporary aesthetic, ideal for displaying decorative objects or showcasing your collection.
Design Considerations
- Shape: Rectangular, square, rounded, or unique shapes can add visual interest and complement the room's decor.
- Size: Choose sizes that are appropriate for the space and the items you plan to display.
- Depth: Deeper shelves provide more display space, while shallower shelves create a minimalist look.
- Finish: Paint, stain, or clear sealant can enhance the appearance and protect the shelves.
Planning and Measuring
Careful planning and precise measurements are essential for a successful floating shelf installation. Follow these steps:
- Determine the location: Choose a wall that is structurally sound and capable of supporting the weight of the shelves and the items you plan to display.
- Measure the wall: Use a tape measure to determine the exact length and height of the wall area where you want to install the shelves.
- Decide on the shelf layout: Sketch a plan on paper, indicating the placement, size, and number of shelves.
- Measure for brackets: Mark the wall with a pencil to indicate the bracket placement based on your shelf layout plan.
Building the Shelves
Once you have your materials, you can begin building your floating shelves. This process typically involves cutting the shelf boards to size and assembling the brackets.
Cutting the Shelf Boards
- Measure and mark: Use a tape measure and a pencil to mark the desired length of the shelf boards on the wood, metal, or glass material.
- Cut the boards: Use a saw (circular, miter, or table saw) to accurately cut the shelf boards to the desired size. Make sure the cuts are straight and even.
- Sand the edges: Smooth out any rough edges by sanding the cut ends of the shelf boards. This creates a finished look and prevents splinters.
Assembling the Brackets
Depending on the type of brackets you choose, assembly may involve:
- Pre-assembled brackets: Simply attach these to the wall according to the manufacturer's instructions.
- DIY brackets: Follow detailed plans or instructions to construct the brackets using wood, metal, or other materials. This allows for customization and a unique design.
Installing the Shelves
Once the shelves and brackets are ready, it's time to install them on the wall. This process requires careful measurements, appropriate fasteners, and a level for ensuring a straight and secure installation.
Mounting the Brackets
- Locate the studs: Use a stud finder to determine the location of wall studs, which provide the most secure mounting points. If no studs are available, use wall anchors for added support.
- Mark and drill pilot holes: Mark the wall with a pencil where you plan to install the brackets, and drill pilot holes to prevent the screws from splitting the wood.
- Install the brackets: Securely attach the brackets to the wall using the appropriate screws or fasteners. Make sure the brackets are level before tightening them.
Attaching the Shelf Boards
- Position the shelves: Carefully place the shelf boards on the mounted brackets, ensuring they are level and centered. Make sure the shelf boards are securely resting on the brackets.
- Secure the shelves: Depending on the type of brackets, you may need to use additional fasteners to secure the shelf boards to the brackets. This step ensures a stable and secure installation.
Finishing Touches
After installing the shelves, you can personalize them with finishing touches that enhance their appearance and functionality.
Paint or Stain
- Choose a color scheme: Select paint colors or stains that complement the room's decor and your personal style.
- Prepare the shelves: Sand the shelves to ensure a smooth surface for painting or staining. If necessary, apply a primer to improve paint adhesion.
- Apply paint or stain: Apply multiple thin coats of paint or stain, allowing each coat to dry thoroughly before applying the next.
Decorative Elements
- Lighting: Add accent lighting to highlight the shelves and the displayed items. Consider LED strip lights, spotlights, or decorative lanterns.
- Plants: Introduce greenery to the shelves by placing potted plants or small terrariums. This adds a touch of nature and freshness to the space.
- Decorative Accessories: Arrange art prints, figurines, photographs, books, or other items to enhance the shelves' visual appeal and personalize the space.
Tips for Success
To ensure a successful floating shelf project, follow these helpful tips:
- Choose the right tools: Invest in quality tools, such as a level, a stud finder, a saw, and a drill, to ensure accurate measurements and installation.
- Use safety precautions: Wear safety glasses and gloves when using power tools to prevent injuries. Be careful when handling sharp tools and materials.
- Test the weight capacity: Ensure that the shelves can safely support the weight of the items you plan to display. Consider the weight capacity of both the shelf board and the brackets.
- Plan for future needs: Consider your storage needs and plan accordingly. If you anticipate needing more space in the future, leave room for additional shelves.
- Enjoy the process: Woodworking can be a rewarding experience. Take your time, be patient, and have fun creating beautiful and functional floating shelves.
By following these guidelines, you can build stunning and practical floating shelves that transform your home decor and create a more functional and visually appealing living space.
Monday, November 4, 2024
How to Create Customizable Wooden Blanket Ladders to Sell
How to Create Customizable Wooden Blanket Ladders to Sell
Have you ever been frustrated trying to find the perfect blanket in a messy pile? Or maybe you're looking for a unique and stylish way to organize your throws and blankets? If so, you've come to the right place! Building and selling customizable wooden blanket ladders is a fantastic way to combine your creative passion with a growing demand for functional home decor.
These ladders are not only functional but also visually appealing, adding a touch of rustic charm to any living room, bedroom, or even a cozy reading nook. So, let's dive into the exciting world of crafting and selling these charming home essentials.
Why Blanket Ladders Are a Hot Commodity
The popularity of blanket ladders is on the rise for good reason: they're incredibly versatile, stylish, and practical. Here's why they're such a hit:
- Organization: They neatly display and store your blankets, freeing up valuable space in your closets or drawers.
- Aesthetic Appeal: Wooden blanket ladders can complement various interior design styles, from farmhouse chic to modern minimalist.
- Customization: You can personalize them with different wood stains, paints, and finishes to match your customers' preferences.
- Gift Idea: They make thoughtful housewarming gifts or even unique wedding presents.
- Growing Demand: The popularity of DIY and handmade goods continues to grow, making blanket ladders a sought-after item.
Step-by-Step Guide: Building Your Blanket Ladder
Building a blanket ladder might seem daunting, but with the right tools and instructions, it's a surprisingly achievable project. Here's a breakdown of the steps:
1. Gather Your Materials and Tools
Before you start, ensure you have all the necessary materials. You'll need:
- Wood: Choose sturdy wood like pine, oak, or cedar. You'll need 4 pieces for the sides and 4 pieces for the rungs.
- Wood Screws: Choose screws long enough to secure the rungs to the sides.
- Wood Glue: For added strength and durability.
- Wood Stain or Paint: Choose your desired finish.
- Sandpaper: For smoothing the wood before finishing.
- Measuring Tape and Pencil: For marking cuts and measurements.
- Saw: For cutting the wood to size (a circular saw or miter saw is recommended).
- Drill and Driver: For pre-drilling holes and driving screws.
- Safety Glasses: Protect your eyes while working with wood.
- Clamps: To hold the pieces together while you glue and screw them.
2. Cut the Wood to Size
This is where your saw comes in handy. Measure carefully and cut the wood for the sides and rungs according to your desired dimensions. Here's a basic guide:
- Sides: Typically 4 feet tall and 12 inches wide (adjust to your preference).
- Rungs: The length should be the width of the sides (12 inches in our example), and the number of rungs depends on the height of the ladder (usually 4-6 rungs).
3. Assemble the Ladder
Now, you'll put the pieces together:
- Mark and Pre-Drill: Mark the positions for the rungs on the sides using your pencil. Pre-drill holes slightly smaller than your screws to avoid splitting the wood.
- Glue and Screw: Apply a thin bead of wood glue to the ends of each rung. Position the rung on the side and drive the screws through the pre-drilled holes.
- Clamps: Use clamps to hold the rungs in place while the glue dries.
- Repeat: Attach the rest of the rungs, ensuring they are spaced evenly.
4. Sand and Finish
Once the glue dries completely, you can move on to sanding and finishing:
- Sand: Use sandpaper to smooth out any rough edges or imperfections on the wood.
- Finish: Apply your chosen wood stain, paint, or other finish. Let it dry thoroughly.
Customizing Your Blanket Ladders
The beauty of building wooden blanket ladders is the opportunity to personalize them. Here are some ideas to make your ladders unique:
- Wood Types: Experiment with different woods like walnut, cherry, or maple for distinctive grains and colors.
- Stains and Paints: Create a farmhouse feel with whitewashed or distressed finishes. Add a modern touch with vibrant colors or metallic accents.
- Hardware: Use decorative screws, metal hooks, or even leather straps for a rustic look.
- Shape: Instead of the traditional straight ladder, try a curved design or a slightly angled ladder.
- Size: Offer different sizes to cater to various spaces and blanket sizes.
- Personalization: Etch customer names or initials onto the wood.
Marketing and Selling Your Blanket Ladders
Once you've perfected your craft, it's time to showcase your creations and reach customers. Here are some effective strategies:
- Online Marketplaces: Platforms like Etsy, Amazon Handmade, and Shopify offer wide reach and established customer bases.
- Social Media: Use Instagram, Facebook, and Pinterest to create visually appealing content featuring your ladders and showcase your craftsmanship.
- Local Craft Fairs and Markets: Connect with potential customers face-to-face and allow them to touch and feel your products.
- Collaborations: Partner with home decor bloggers, influencers, or local shops for cross-promotion and expanded reach.
- Website: Consider creating your own website to showcase your products and offer personalized service.
Pricing Your Blanket Ladders
Setting the right price for your ladders is crucial. Consider factors like:
- Cost of Materials: Account for the wood, hardware, and any finishing materials.
- Your Time and Labor: Factor in the time it takes to build, sand, finish, and package your ladders.
- Competition: Research what other sellers are charging for similar products.
- Value Proposition: Highlight the unique features and benefits of your ladders, such as customization options or high-quality materials.
Commonly Asked Questions
Here are some common questions you might encounter when selling blanket ladders:
- Q: What kind of wood is best for blanket ladders?
A: Sturdy hardwoods like oak, maple, and walnut are ideal for durability. Pine is a good, affordable option, but it's softer and might dent more easily.
- Q: How do I prevent the wood from warping?
A: Ensure the wood is properly dried and use wood glue to secure the joints. Avoid using too much glue, which could cause warping.
- Q: How do I clean a wooden blanket ladder?
A: Dust regularly with a soft cloth. For more significant dirt, you can use a damp cloth with mild soap and water, but avoid saturating the wood.
- Q: What's the best way to ship a blanket ladder?
A: Ship in a sturdy box with protective padding around the ladder to avoid damage during transport.
- Q: Where can I find inspiration for blanket ladder designs?
A: Pinterest, Instagram, and Etsy are great resources for finding ideas. Don't be afraid to put your unique spin on existing designs.
Remember, creating and selling wooden blanket ladders is a rewarding journey. Embrace your creativity, prioritize quality craftsmanship, and build a successful business that allows you to share your passion with others. Good luck!
Saturday, October 5, 2024
DIY Wooden Storage Bins for Seasonal and Holiday Storage

DIY Wooden Storage Bins for Seasonal and Holiday Storage
Tired of clutter and struggling to find your holiday decorations? It's time to take control and build your own sturdy and stylish wooden storage bins! These DIY projects are perfect for organizing seasonal items, holiday decorations, or any extra belongings you want to keep tucked away. Not only will you save money, but you'll also enjoy the satisfaction of creating something useful and beautiful with your own hands. Get ready to reclaim your space and embrace the joy of a well-organized home.
Planning Your Wooden Storage Bins
Before you dive into the construction, take a moment to plan out your wooden storage bins. Consider these factors:
Size and Shape
What items will you be storing? Measure the space where you want to place the bins and choose dimensions that fit comfortably. You can opt for square, rectangular, or even round bins depending on your preferences.
Wood Type
Pine is a budget-friendly choice, while hardwoods like oak or maple offer durability and a more refined look. Think about the aesthetic you want to achieve and choose a wood type that matches.
Hardware
You'll need hinges, handles, and possibly some wood screws. Decide on the style and finish of these elements to ensure they complement your chosen wood.
Finishing Touches
Will you paint, stain, or leave the wood natural? A coat of paint or stain can protect the wood and enhance the overall look of your storage bins.
Essential Materials and Tools
Gather the following supplies to make your DIY wooden storage bins:
- Wood boards (cut to desired dimensions)
- Hinges (2 per bin)
- Handles (2 per bin)
- Wood screws
- Wood glue
- Measuring tape
- Saw (circular saw or jigsaw)
- Drill with drill bits
- Screwdriver
- Clamps (optional)
- Sandpaper
- Paint or stain (optional)
Step-by-Step Construction
Now, let's build those wooden storage bins:
Cutting and Assembling the Base and Sides
- Cut the wood boards according to your dimensions. You'll need four pieces for the base and four pieces for the sides. Ensure the sides are tall enough to accommodate the items you want to store.
- Apply wood glue to the edges of the base pieces.
- Join the base pieces to form a rectangle. Secure the joints with wood screws.
- Apply glue to the bottom edge of the side pieces.
- Attach the side pieces to the base, making sure they form a square or rectangle. Secure the joints with wood screws.
Adding the Top and Hinges
- Cut another piece of wood for the top. The dimensions should match the base.
- Attach the hinges to the top piece. Position them slightly inward from the edges.
- Attach the hinges to the corresponding sides of the bin. Ensure the hinges are aligned and allow the top to open and close smoothly.
- Attach the handles to the sides of the bin. Choose a position that's comfortable for lifting and carrying the bin.
Finishing Touches
- Sand the entire bin to smooth out any rough edges. Use different grit sandpapers, starting with coarser grit and ending with finer grit.
- Apply a coat of paint or stain, if desired. Allow the finish to dry completely before using the bins.
Ideas for Customization
Here are some creative ways to personalize your DIY wooden storage bins:
- Add decorative trim or molding for a more elegant look.
- Paint the bins with seasonal colors or designs to coordinate with your decor.
- Use stencils to create patterns or add labels for easy identification.
- Create a set of bins with different sizes for a cohesive and organized storage system.
Conclusion
Building your own wooden storage bins is a rewarding project that combines practicality and aesthetics. With these step-by-step instructions, you'll have sturdy and beautiful bins to keep your belongings organized and out of sight. So, get crafting and enjoy the satisfaction of a well-organized and clutter-free home!
Thursday, October 3, 2024
Profitable Tiered Plant Stand Ideas for Beginners

Profitable Tiered Plant Stand Ideas for Beginners
In the realm of home decor and gardening, tiered plant stands have emerged as a captivating trend, adding a touch of elegance and verticality to indoor and outdoor spaces. For budding entrepreneurs, crafting and selling these alluring pieces can be a rewarding endeavor, offering a unique and in-demand product. This comprehensive guide will delve into profitable tiered plant stand ideas specifically designed for beginners, empowering you to embark on this creative journey with confidence.
The Allure of Tiered Plant Stands
Tiered plant stands possess an inherent appeal that resonates with plant enthusiasts and home decorators alike. Their ability to showcase a multitude of plants in a visually pleasing and space-saving manner has made them a sought-after addition to homes, offices, and gardens. The verticality they provide adds dimension and interest, transforming bare corners into vibrant green oases.
Identifying Profitable Niches
To ensure your tiered plant stand creations are successful, it's crucial to identify profitable niches within the market. This involves understanding the preferences and needs of your target audience. Here are a few niche ideas to consider:
Material-Specific Stands
Specialize in crafting plant stands from a specific material, catering to a discerning clientele who appreciate its unique qualities. For instance:
- Rustic Wood Stands: Embrace the natural beauty of wood, utilizing reclaimed or salvaged wood for a vintage aesthetic.
- Sleek Metal Stands: Employ metal materials like iron, copper, or aluminum to create contemporary and minimalist designs.
- Bohemian Macrame Stands: Tap into the popularity of bohemian decor with macrame-woven stands that blend warmth and artistry.
Style-Oriented Stands
Focus on crafting stands that align with specific interior design styles, attracting a targeted audience. Examples include:
- Mid-Century Modern Stands: Incorporate clean lines, geometric shapes, and a color palette of muted tones.
- Farmhouse Chic Stands: Embrace the rustic charm of farmhouse decor with distressed wood finishes and natural elements.
- Industrial-Inspired Stands: Utilize metal pipes, reclaimed wood, and exposed hardware for a rugged and industrial look.
Function-Focused Stands
Target specific functions or needs with your plant stands, catering to practical considerations and lifestyle preferences.
- Small Space Stands: Design compact and multi-tiered stands ideal for apartment living or limited areas.
- Outdoor Stands: Craft weather-resistant stands suitable for patios, balconies, or gardens.
- Hanging Stands: Create stands with hanging baskets or planters for a cascading effect and space-saving solution.
Beginner-Friendly Tiered Plant Stand Ideas
Embark on your entrepreneurial journey with confidence by exploring these beginner-friendly plant stand ideas that combine practicality and profitability:
Upcycled Pallet Stands
Transform reclaimed wooden pallets into rustic and charming tiered plant stands. This cost-effective method appeals to environmentally conscious customers and offers a unique, handcrafted aesthetic.
DIY Pipe Stands
Utilize readily available plumbing pipes and fittings to construct modern and industrial-inspired plant stands. The versatility of pipes allows for customization and creative design.
Simple Ladder Stands
Repurpose old ladders into tiered plant stands by adding shelves or planters. This idea offers a rustic farmhouse aesthetic and is perfect for smaller spaces.
Geometric Wire Stands
Create eye-catching stands using wire mesh or metal rods, forming geometric shapes and adding a modern touch to any space. This technique allows for flexibility in design and size.
Macrame Hanging Stands
Embrace the bohemian trend with macrame-woven hanging stands. This craft requires patience and a knack for knotting, but the result is a unique and highly sought-after product.
Tips for Success
As you embark on your tiered plant stand journey, follow these tips for success:
Master the Basics
- Learn Fundamental Techniques: Familiarize yourself with basic carpentry, welding, or macrame skills depending on your chosen material.
- Practice and Experiment: Don't be afraid to experiment with different designs and materials to find your style.
- Prioritize Safety: Always prioritize safety when working with tools and materials.
Stand Out from the Crowd
- Develop a Unique Style: Cultivate a signature aesthetic that sets your work apart from competitors.
- Offer Customization: Allow customers to personalize their stands with specific materials, finishes, or dimensions.
- Embrace Sustainability: Consider using recycled or reclaimed materials for an eco-conscious approach.
Marketing and Sales
- Online Presence: Establish a website or social media profiles to showcase your creations and connect with potential customers.
- Local Markets and Events: Participate in craft fairs, farmers' markets, or home decor events to reach a local audience.
- Collaborations and Partnerships: Partner with plant shops, home decor stores, or online marketplaces to expand your reach.
Conclusion
Crafting and selling tiered plant stands offers a rewarding and profitable opportunity for aspiring entrepreneurs. By identifying profitable niches, embracing beginner-friendly ideas, and adhering to our tips for success, you can embark on this creative journey with confidence. Remember, passion, dedication, and a touch of artistic flair will drive your success in the captivating world of tiered plant stands.
Monday, September 30, 2024
DIY Birdhouse Woodworking Ideas for Extra Income
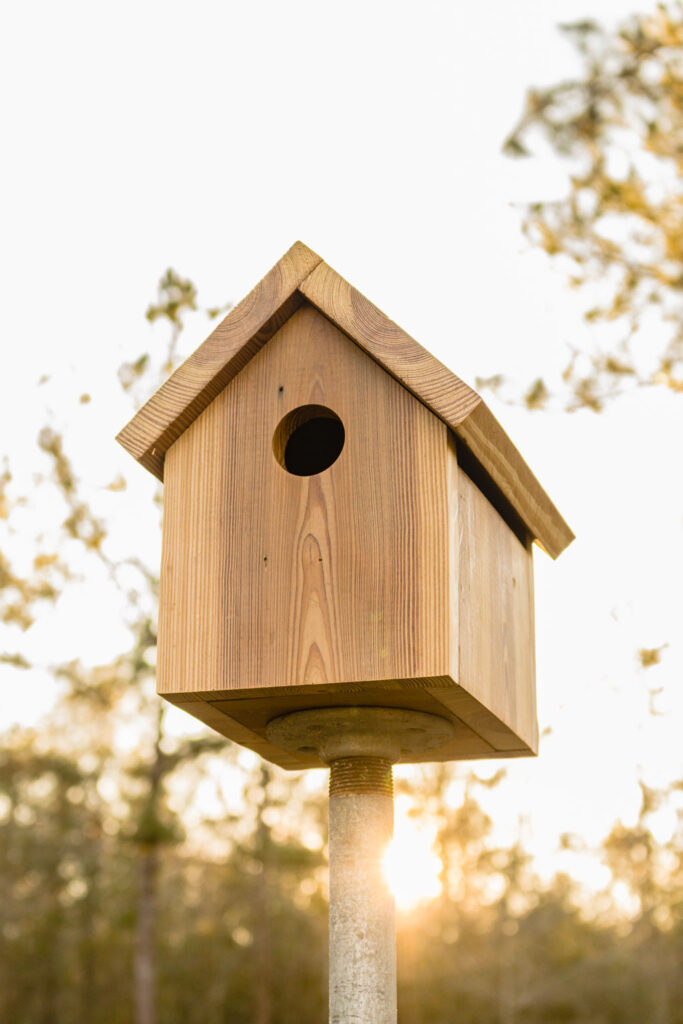
DIY Birdhouse Woodworking Ideas for Extra Income
Looking to turn your woodworking skills into a side hustle? Building birdhouses can be a fun and profitable venture. Not only will you be crafting charming and functional homes for feathered friends, but you'll also be creating a product in high demand. The beauty of birdhouses lies in their versatility – you can build simple, classic designs or experiment with elaborate, intricate creations. With a little creativity and resourcefulness, you can turn your woodworking hobby into a thriving side business.
Choosing Your Niche
Before you start hammering and sawing, take a moment to consider your target audience. Do you want to focus on specific bird species, like bluebirds or chickadees? Are you drawn to a particular style, such as rustic, modern, or whimsical? Defining your niche will help you create a consistent and marketable product line. For example, if you're interested in attracting bluebirds, you'll need to build houses with specific dimensions and features.
Consider These Popular Birdhouse Styles:
- Classic Birdhouse: This timeless design features a simple, pitched roof and a single entrance hole. It's perfect for attracting a wide variety of birds.
- Bluebird House: This type has a specific size and entrance hole to attract bluebirds. Make sure to place it in a sunny, open area.
- Squirrel-Proof Birdhouse: Protect your feathered friends from pesky squirrels by building a house with a baffle or other deterrent.
- Multi-Chamber Birdhouse: Create a multi-family dwelling with multiple compartments for various bird species.
- Gourd Birdhouse: These unique houses are made from dried gourds and add a touch of rustic charm to any garden.
Gathering Your Materials
Once you have a birdhouse design in mind, gather the necessary materials. Depending on your chosen style, you may need:
- Wood: Cedar, pine, and redwood are popular choices for birdhouses. Choose wood that is rot-resistant and durable.
- Screws: Use screws that are long enough to secure the birdhouse components securely.
- Paint or Stain: Protect your birdhouses from the elements and add a decorative touch with paint or stain.
- Hardware: You may need hinges for a removable roof, a metal plate for the entrance hole, and a perch for birds to rest on.
- Optional: Decorative accents like finials, scrolls, or cutouts can personalize your birdhouses.
Tips for Building Birdhouses
With your materials ready, you can begin building. Remember to follow these tips to ensure your birdhouses are safe and attractive:
- Start with a blueprint: Sketch out your design on paper to visualize the dimensions and structure.
- Use precision: Accurate cuts and measurements will create a sturdy and aesthetically pleasing birdhouse.
- Smooth out edges: Sand down any rough edges to prevent injury to the birds.
- Place the entrance hole correctly: Ensure the entrance hole is positioned high enough to prevent predators from entering.
- Add a drainage hole: Drill a small hole at the base of the birdhouse to allow water to drain.
- Use weather-resistant paint or stain: Protect your birdhouses from the elements with paint or stain.
- Consider the placement: Place your birdhouses in a quiet, sheltered location that offers protection from the sun and wind.
Marketing and Selling Your Birdhouses
Once you've built a few birdhouses, it's time to start marketing and selling your creations. Here are some ideas:
- Craft fairs and markets: Showcase your birdhouses at local events and connect directly with potential customers.
- Online marketplaces: List your birdhouses on platforms like Etsy, eBay, or Facebook Marketplace.
- Local businesses: Approach garden centers, hardware stores, or gift shops to see if they're interested in carrying your birdhouses.
- Social media: Promote your birdhouses on Instagram, Facebook, or Pinterest to reach a wider audience.
- Word-of-mouth: Tell your friends and family about your birdhouses and encourage them to spread the word.
Conclusion
Building birdhouses can be a rewarding and profitable side hustle. By choosing a niche, gathering the right materials, and following the tips outlined in this article, you can create stunning and functional homes for birds while earning extra income. With passion, creativity, and a little elbow grease, you can turn your woodworking hobby into a thriving business.
Sunday, September 29, 2024
Wooden Chess Tables with a Geometric or Abstract Design That Will Appeal to Modern Buyers
Wooden Chess Tables with a Geometric or Abstract Design That Will Appeal to Modern Buyers
In the realm of contemporary furniture, chess tables have transcended their traditional role as mere game boards, evolving into stylish statement pieces that seamlessly blend functionality with artistic expression. Modern buyers, seeking both aesthetic appeal and a touch of sophistication, are drawn to wooden chess tables adorned with geometric or abstract designs. These tables, crafted with meticulous attention to detail and infused with innovative design elements, elevate the game of chess to a whole new level.
The Allure of Geometry
Geometric patterns possess an inherent appeal, captivating the eye with their structured elegance and timeless allure. Wooden chess tables featuring geometric designs offer a contemporary twist on classic style, seamlessly blending functionality with artistic expression. The clean lines and precise angles of geometric patterns create a visually stimulating experience, enhancing the ambiance of any space.
Intricate Patterns and Textures
Geometric designs can range from simple and minimalist to elaborate and intricate. Tables featuring tessellations, repeating patterns that cover a surface without gaps, create a mesmerizing visual effect. Other popular options include geometric grids, stylized shapes, and abstract interpretations of geometric forms. The choice of wood species and finish can further enhance the geometric patterns, adding depth and texture to the design.
Harmonious Color Palettes
Color plays a crucial role in highlighting geometric designs. Modern chess tables often feature contrasting color palettes, accentuating the lines and angles of the patterns. Bold, vibrant colors can create a dynamic and energetic atmosphere, while neutral tones evoke a sense of tranquility and sophistication. The choice of color should complement the overall design aesthetic and the surrounding decor.
Embracing Abstraction
Abstract art, with its emphasis on non-representational forms and expressions, offers endless possibilities for creating visually captivating wooden chess tables. Abstract designs can evoke a sense of movement, emotion, and depth, adding a unique touch to the game of chess.
Organic Shapes and Flowing Lines
Abstract designs often incorporate organic shapes and flowing lines, creating a sense of fluidity and dynamism. The use of natural wood textures and grains can further enhance the abstract aesthetic, blending seamlessly with the organic forms. Tables featuring abstract designs are perfect for those who appreciate a more unconventional and artistic approach.
Evolving Interpretations
Abstract designs are highly subjective, allowing for a wide range of interpretations and expressions. Tables can feature swirling patterns, bold strokes, or intricate details that evoke a sense of mystery and intrigue. The use of mixed media, such as metal accents or glass inlays, can add further dimension and complexity to the abstract designs.
Materials and Craftsmanship
The choice of wood species and craftsmanship are essential factors in creating high-quality wooden chess tables with geometric or abstract designs. Here are some key considerations:
Premium Wood Species
Exceptional Craftsmanship
The meticulous craftsmanship involved in creating wooden chess tables with geometric or abstract designs is a testament to the skill and artistry of the makers. Each piece is meticulously crafted with precision and attention to detail, ensuring that the design is flawlessly executed.
Unique Finishes
The finish applied to the table can enhance the design and protect the wood. Options include natural oil finishes that highlight the wood's natural beauty, stains that add color and depth, and high-gloss lacquers for a sleek and modern look.
A Statement Piece for the Modern Home
Wooden chess tables with geometric or abstract designs are more than just game boards; they are statement pieces that elevate the ambiance of any space. Their aesthetic appeal, functionality, and unique designs make them perfect for modern homes, offices, or studios. Whether placed in a living room, a library, or a game room, these tables add a touch of sophistication and artistry to the environment.
For modern buyers seeking furniture that combines style and functionality, a wooden chess table with a geometric or abstract design is an excellent choice. These tables offer a unique blend of artistic expression and practical utility, transforming the game of chess into an immersive and visually captivating experience.
Friday, September 27, 2024
Wine Rack Projects with Reclaimed Wood That Sell Fast

Wine Rack Projects with Reclaimed Wood That Sell Fast
In the realm of woodworking, crafting functional and aesthetically pleasing pieces is an art form that captivates enthusiasts and collectors alike. Wine racks, in particular, offer a unique opportunity to combine practicality with rustic charm. The allure of reclaimed wood, with its rich history and unique character, adds an extra layer of intrigue and sustainability to these projects. This article explores several wine rack projects with reclaimed wood that are sure to sell fast, captivating both wine enthusiasts and those seeking one-of-a-kind home decor.
The Appeal of Reclaimed Wood Wine Racks
Reclaimed wood, often salvaged from old barns, warehouses, or even demolished structures, exudes a timeless elegance that sets it apart from commercially produced lumber. Its distinctive grains, knots, and imperfections tell stories of a bygone era, adding a touch of nostalgia and authenticity to any space. Beyond aesthetics, using reclaimed wood contributes to a sustainable lifestyle by reducing waste and promoting environmental conservation.
Uniqueness and Character
Each piece of reclaimed wood possesses a unique character, ensuring that every wine rack crafted from it will be one of a kind. The variations in color, texture, and grain patterns create a captivating visual experience that sets it apart from mass-produced furniture.
Sustainable Choice
Reclaimed wood is an eco-friendly choice, reducing the need to harvest new trees. It diverts waste from landfills and extends the life cycle of valuable resources, promoting a more sustainable approach to woodworking.
Rustic Charm
The inherent rusticity of reclaimed wood lends itself beautifully to wine rack designs, complementing both modern and traditional interiors. Its warm, inviting tones create a cozy ambiance, making any space feel more welcoming and inviting.
Popular Reclaimed Wood Wine Rack Projects
Here are several popular reclaimed wood wine rack projects that have proven to be both visually appealing and in high demand:
Classic Wall-Mounted Wine Rack
A classic wall-mounted wine rack is a timeless and versatile option that fits seamlessly into any space. The design can be as simple or elaborate as desired, from a basic grid system to a more intricate pattern featuring shelves and compartments for glasses. This type of rack offers a practical storage solution while adding a rustic touch to the wall.
Freestanding Wine Rack with Storage
A freestanding wine rack provides ample storage for an extensive collection while serving as a statement piece in the room. These racks can be designed with multiple shelves, drawers, or even a built-in bar area for serving drinks and entertaining guests. The combination of reclaimed wood and functional storage makes this project a desirable choice for wine enthusiasts.
Industrial Wine Rack with Metal Accents
For a contemporary and industrial aesthetic, combine reclaimed wood with metal accents, such as pipes, brackets, or wheels. The juxtaposition of rustic wood and sleek metal creates a visually striking contrast that adds a modern edge to the wine rack. This style is particularly popular in urban lofts and modern homes.
Wine Rack with Built-in Wine Glass Holders
Adding wine glass holders to a wine rack enhances its functionality and visual appeal. These holders can be integrated into the design using reclaimed wood or metal components. The convenience of having glasses readily available within reach elevates the wine rack from a mere storage solution to a stylish and practical bar setup.
Tips for Selling Reclaimed Wood Wine Racks
To ensure the success of your reclaimed wood wine rack projects, consider these tips:
Target Audience
Identify your target audience. Are you focusing on wine enthusiasts, home decorators, or those seeking sustainable furniture options? Understanding your market allows you to tailor your designs and marketing strategies accordingly.
High-Quality Craftsmanship
Use quality reclaimed wood and pay attention to detail. A well-constructed and meticulously finished piece will stand out and command a higher price. Showcase your craftsmanship through clear photographs and detailed descriptions.
Unique Designs
Offer unique and customizable designs to differentiate your projects from competitors. Allow customers to personalize their wine racks by selecting wood types, finishes, or size variations.
Online Presence
Establish a strong online presence through social media, a website, or online marketplaces. Use high-quality images, compelling descriptions, and engaging content to attract customers.
Pricing and Value
Price your projects competitively while reflecting the value of reclaimed wood and the skill involved in their creation. Consider factors such as size, complexity, and the unique character of the wood when setting prices.
Customer Service
Provide excellent customer service. Respond promptly to inquiries, address concerns, and strive to exceed customer expectations. Positive reviews and word-of-mouth referrals can go a long way in building your reputation.
Conclusion
Wine racks crafted with reclaimed wood offer a unique blend of functionality, rustic charm, and sustainability. These projects appeal to a wide range of consumers, making them a profitable and fulfilling endeavor for woodworkers. By focusing on quality craftsmanship, unique designs, and exceptional customer service, you can create reclaimed wood wine racks that sell fast and leave a lasting impression on your customers.
Sunday, September 22, 2024
How to Craft Stylish Wooden Plant Stands for Your Home

How to Craft Stylish Wooden Plant Stands for Your Home
Elevate your home decor with the timeless elegance of wooden plant stands. These versatile pieces seamlessly blend with any aesthetic, adding a touch of natural beauty and visual interest to your living spaces. Whether you prefer a rustic farmhouse vibe or a sleek modern style, crafting your own wooden plant stands allows you to personalize your home with unique and functional decor. This comprehensive guide will walk you through the steps, from selecting the right wood to finishing touches, ensuring a rewarding and aesthetically pleasing DIY project.
Choosing the Right Wood
The heart of any woodworking project lies in the quality of the wood. For plant stands, consider factors like durability, aesthetic appeal, and ease of working with the wood. Here are some popular choices:
Hardwoods:
- Oak: Renowned for its strength, durability, and classic beauty. It's ideal for creating robust and long-lasting stands.
- Walnut: Known for its rich, dark color and beautiful grain patterns. It adds a touch of sophistication to your home.
- Maple: A durable hardwood with a light, warm tone. It's a versatile option that complements various styles.
Softwoods:
- Pine: A readily available and affordable option. Its knotty character adds a rustic charm to the stands.
- Cedar: Possesses a natural insect-repelling quality, making it ideal for outdoor plant stands. It also adds a pleasant aroma.
- Redwood: A durable and weather-resistant wood, perfect for outdoor applications. It ages beautifully with time.
Consider the size and weight of your plants when choosing the wood. For heavier plants, opt for hardwoods like oak or walnut. Lighter plants may be suitable for softer woods like pine or cedar.
Planning Your Design
Before you start cutting wood, take the time to sketch out your design. Consider the following factors:
- Style: Do you want a modern, minimalist stand or a rustic, farmhouse-inspired one?
- Shape: Round, square, hexagonal, or rectangular? Each shape offers a distinct visual appeal.
- Height: The height of your stand should complement the size of your plants.
- Number of Tiers: Single-tier stands are simple and classic, while multi-tier stands allow for a more dramatic display.
- Materials: Will you use additional materials like metal, rope, or fabric for decorative accents?
Visualize your plants on the stands and consider the overall aesthetic you want to achieve. This will guide you in creating a harmonious and cohesive look.
Essential Tools and Materials
Gather the necessary tools and materials to ensure a smooth crafting process:
- Wood: Choose your desired wood type and cut the planks according to your design.
- Saw: A circular saw or a hand saw will be needed for cutting the wood.
- Measuring Tape and Pencil: Essential for accurate marking and measuring.
- Screwdriver or Drill: For attaching pieces and securing the stand.
- Wood Glue: Provides extra strength and stability to the joints.
- Sandpaper: To smooth out rough edges and prepare the surface for finishing.
- Wood Stain or Paint: To add color and enhance the beauty of the wood.
- Finishing Oil or Varnish: For protection and durability.
- Safety Gear: Wear safety glasses, gloves, and dust masks during the crafting process.
Step-by-Step Guide to Crafting a Wooden Plant Stand
Now, let's dive into the crafting process:
Step 1: Cut the Wood
- Measure and cut the wood planks according to your design plan. Ensure all cuts are straight and accurate.
- For a single-tier stand, cut four legs and a top piece. For multi-tier stands, calculate the number of legs and platforms needed.
Step 2: Sanding and Finishing
- Sand all the cut pieces smoothly using sandpaper. Start with a coarse grit and gradually progress to a finer grit for a polished finish.
- If desired, apply wood stain or paint to the sanded pieces. Let them dry completely before moving to the next step.
Step 3: Assembling the Stand
- Glue and secure the legs to the top piece. Use clamps to hold the pieces firmly in place while the glue dries.
- For multi-tier stands, attach the platforms to the legs using glue and screws. Ensure the platforms are level and stable.
- Allow the glue to cure completely before proceeding.
Step 4: Applying Finishing Touches
- Apply a layer of wood oil or varnish to protect the stand from moisture and scratches.
- Let the finish dry completely before adding plants.
Adding Personal Touches
Enhance the elegance and personality of your plant stands with unique touches:
- Decorative Hardware: Incorporate decorative screws, nuts, or bolts to add a touch of industrial chic.
- Carved Details: Add intricate carvings to the wood for a more personalized and artistic aesthetic.
- Painted Accents: Paint the stands with contrasting colors or patterns to add visual interest.
- Natural Elements: Incorporate elements like moss, rope, or stones for a natural and rustic appeal.
Styling Your Plant Stands
Now that you have your beautiful plant stands ready, it's time to style them with your favorite greenery:
- Mix and Match Plants: Combine different plant textures, shapes, and colors to create visual interest and depth.
- Use Trays: Place plants in decorative trays or pots to enhance the overall presentation.
- Play with Heights: Use stands of varying heights to create a dynamic and balanced arrangement.
- Consider the Lighting: Place your plant stands in areas with adequate natural or artificial light to ensure your plants thrive.
Experiment with different plant combinations, colors, and arrangements to find the perfect style for your home. Embrace the creative process and enjoy the rewarding experience of crafting your own stylish wooden plant stands.
Saturday, September 21, 2024
Wooden Key Racks with a Natural or Rustic Finish That Will Sell Fast

Wooden Key Racks: Rustic Charm That Will Sell Fast
Alright, let's talk about key racks. Not just any key racks, but wooden key racks that scream "rustic charm" and will fly off your shelves. These aren't your average, boring, plastic key holders. We're talking about pieces of handcrafted goodness that add personality to any entryway.
Think about it. When someone walks into your home, the first thing they see is the entryway. It sets the tone for the whole experience, and a beautiful key rack can make a huge difference. It's like a warm hug, saying, "Welcome, you're home now."
But let's be real, you're here because you want to sell these beauties, not just gush about them. So, let's dive into the key elements (pun intended!) that will make your wooden key racks hot commodities:
The Allure of Rustic
There's something about the rustic look that just draws people in. It's like a breath of fresh air in a world filled with sterile minimalism. Rustic charm speaks to our desire for authenticity and connection to nature.
Here's how you can tap into that magic:
Embrace the Imperfections
Don't try to hide the knots, cracks, or uneven surfaces. These are the marks of a natural material and give each piece unique character. In fact, embrace them! Highlight those imperfections with a natural finish that lets the wood shine through.
Choose the Right Wood
Reclaimed wood, barnwood, or even just simple pine can create a stunning rustic look. Consider the color, texture, and grain pattern. A rustic-style key rack made from reclaimed wood tells a story, a story of the wood's past and the craftsmanship that went into creating it.
Embrace Natural Finishes
Stay away from glossy, high-sheen finishes. Opt for natural oils or waxes that enhance the wood's grain and texture. A natural finish allows the beauty of the wood to speak for itself and complements the rustic aesthetic.
Design Elements That Sell
Now, let's talk about the design. It's one thing to have a rustic piece, but you want a key rack that people actually *want* to use.
Functional and Stylish
Think about how people will use the key rack. Enough hooks? Are they placed at a comfortable height? Do they have room for additional items like mail or sunglasses?
Add Storage
Consider adding a small shelf or drawer for additional storage. It could be for mail, sunglasses, small items, or even just a place for a decorative item.
Unique Details
Think about the "wow factor." Here are some ideas:
- Carved wood details
- Metal accents for the hooks
- A distressed finish that adds vintage appeal
- Unique shapes beyond just a traditional rectangular frame
Marketing Tips
You've got a beautiful product, now let's get it in front of the right people:
Showcase the Rustic Charm
Take high-quality photos that capture the wood's natural beauty, the unique imperfections, and the overall rustic vibe. Use natural light and showcase the key rack in a warm, inviting setting. Think farmhouse, cottage, or even a cozy cabin.
Highlight the Craftsmanship
Let people know that your key racks are handcrafted. Mention the wood type, any special techniques used, and the skill involved in creating each piece. This adds value and a personal touch.
Target Your Audience
Think about who would be interested in a rustic key rack. This could include home decor enthusiasts, fans of farmhouse or cottage style, and anyone who appreciates handmade items. You can use social media and online marketplaces to reach these specific audiences.
Storytelling is Key
Tell the story behind the key racks. Where did the wood come from? What inspired the design? How are they made? A compelling story will connect with customers on a deeper level.
Commonly Asked Questions
Here are some questions you might encounter when selling rustic wooden key racks:
- "What kind of wood is used?" Be ready to describe the wood type and its unique characteristics.
- "Is it sturdy enough to hold my keys?" Assure customers that the wood is strong and the hooks are securely attached.
- "Can I customize it?" If you offer customization options, be clear about them.
- "How do I care for it?" Provide instructions on how to clean and maintain the key rack.
- "What if it arrives damaged?" Have a clear return or exchange policy.
Remember, a key rack isn't just a place to hang keys. It's a statement piece, a conversation starter, and a reflection of your style. With a little creativity, you can create wooden key racks that are both beautiful and functional, sure to win over any customer looking for a touch of rustic charm.
Tuesday, September 10, 2024
DIY Wine Rack Woodworking Ideas for Quick Profit
/wine-rack-lan-593ef8565f9b58d58aa4b3ae.jpg)
DIY Wine Rack Woodworking Ideas for Quick Profit
In the world of woodworking, finding a niche that offers both creative expression and lucrative opportunities is key. Building DIY wine racks ticks both boxes, offering a path to quick profit with relatively simple designs and a high demand in the market. This article delves into various DIY wine rack woodworking ideas, exploring materials, construction techniques, and strategies for generating profit.
Why Wine Racks Are a Profitable Venture
Wine racks offer a compelling business proposition for woodworkers for several reasons:
- High Demand: Wine enthusiasts are always looking for elegant and functional storage solutions.
- Variety of Styles: From rustic farmhouse designs to sleek modern aesthetics, there's a wine rack for every taste, allowing you to cater to a diverse clientele.
- Profitability: Wine racks can be priced competitively, offering a good margin for profit, especially when using readily available materials and efficient construction techniques.
- Customization: The ability to customize designs based on client preferences allows you to stand out and cater to unique needs.
Materials for Building Wine Racks
The choice of materials significantly impacts the style, cost, and durability of your wine racks. Here are some popular options:
Wood
- Pine: Affordable, easy to work with, and readily available, pine is a good choice for beginner woodworkers.
- Oak: Offers durability, a rich color, and a classic look, making it suitable for high-end wine racks.
- Maple: Known for its strength and beautiful grain patterns, maple is a popular choice for more contemporary designs.
- Reclaimed Wood: Adds a unique character and a rustic charm, appealing to environmentally conscious customers.
Metal
- Steel: Offers robust construction and a modern aesthetic, often used for industrial-style wine racks.
- Wrought Iron: Adds a touch of elegance and durability, commonly used for decorative elements and accents.
Other Materials
- Acrylic: Provides a transparent and modern look, allowing the wine bottles to be displayed prominently.
- Bamboo: Sustainable and eco-friendly, bamboo offers a natural and elegant appearance.
DIY Wine Rack Ideas for Quick Profit
Here are several DIY wine rack ideas that offer quick and profitable woodworking projects:
Simple Wall-Mounted Racks
- Classic Shelf Design: A basic shelf design using horizontal planks and vertical supports can be built quickly and efficiently.
- Diagonal Slatted Rack: A more visually appealing option, this design involves angled slats that create a decorative pattern.
- Wine Bottle Holder: A compact and functional design, this option holds bottles horizontally and can be customized with various wood types and finishes.
Freestanding Wine Racks
- X-Frame Rack: This design uses an X-shaped frame for stability and a rustic appeal.
- Ladder Wine Rack: Utilizing repurposed ladders or building a ladder-style structure offers a unique and functional design.
- Wine Bar Cabinet: A more advanced project involving drawers, shelves, and a countertop for a complete wine storage and serving solution.
Unique and Specialty Wine Racks
- Wine Bottle Display Shelf: Designed for showcasing a few special bottles, these racks can be intricately crafted and adorned with decorative elements.
- Wine Bottle Wall Art: Integrating wine bottles into a wall-mounted design creates a visually striking and functional piece of art.
- Wine Glass Holder: Combining a wine rack with a built-in glass holder offers a convenient storage solution for both bottles and glasses.
Tips for Increasing Profitability
To maximize your profits from DIY wine rack woodworking, consider the following tips:
- Source Materials Wisely: Look for discounted wood at local lumberyards, or explore options like reclaimed wood for a unique and cost-effective solution.
- Efficient Construction Techniques: Master basic woodworking techniques, utilize jigs and templates for accurate cuts, and minimize waste to reduce material costs.
- Target a Niche: Identify a specific design style or target market to focus your efforts and cater to a specific audience.
- Offer Customization: Allow customers to personalize their wine racks with different wood types, finishes, sizes, and additional features.
- Market Your Products Effectively: Utilize online platforms like Etsy and social media to reach a wider audience. Consider participating in local craft fairs or farmers' markets to showcase your work directly to customers.
- Offer Competitive Pricing: Research your competitors' pricing and offer your products at competitive rates while maintaining a reasonable profit margin.
Safety Precautions
Woodworking involves tools and machinery that can be dangerous if not used properly. Always prioritize safety and adhere to the following precautions:
- Wear Eye Protection: Use safety glasses or goggles to protect your eyes from flying debris.
- Use Hearing Protection: Power tools can generate loud noises. Wear earplugs or earmuffs to prevent hearing damage.
- Proper Tool Handling: Learn how to use each tool correctly and follow manufacturer instructions.
- Keep Work Area Clean: A clean workspace reduces the risk of accidents and allows you to focus on your work.
- Don't Rush: Take your time and work carefully. Rushing can lead to mistakes and increase the risk of injury.
Conclusion
Building DIY wine racks is a rewarding and profitable woodworking venture. By exploring different design ideas, choosing appropriate materials, and implementing efficient construction techniques, woodworkers can create beautiful and functional wine storage solutions for their customers. Remember to focus on safety, market your products effectively, and cater to the diverse needs of your clientele to achieve success in this lucrative niche.
Thursday, September 5, 2024
Stylish and Functional Wall Shelves That Will Fly Off the Shelves
Stylish and Functional Wall Shelves That Will Fly Off the Shelves
Wall shelves are a versatile and practical addition to any room. They provide extra storage space, help to organize clutter, and can even enhance the aesthetic appeal of a space. But with so many different styles and designs available, it can be overwhelming to choose the right ones for your needs. In this article, we’ll explore some stylish and functional wall shelves that are sure to elevate your home décor and satisfy your organizational needs.
Open and Airy: Floating Shelves
Floating shelves are a popular choice for their minimalist aesthetic and sleek design. They appear to float on the wall, creating a sense of spaciousness and openness. Floating shelves come in various materials, including wood, metal, and glass, allowing you to choose the style that best complements your décor. These shelves are perfect for showcasing decorative items, books, or even plants, adding a touch of greenery and life to your space.
Key Benefits of Floating Shelves:
- Create a modern and minimalist look
- Save space and make a room appear larger
- Easy to install and adjust
- Offer a variety of materials to suit different styles
Rustic Charm: Ladder Shelves
Ladder shelves bring a touch of rustic charm and farmhouse style to any room. These shelves typically feature a ladder-like structure with horizontal rungs that act as shelves. They can be made from wood, metal, or a combination of both. Ladder shelves provide ample storage space and can be used to display a variety of items, from books and plants to decorative items and kitchen essentials. The open design allows for easy access to your belongings, while the rustic aesthetic adds warmth and character to your space.
Key Benefits of Ladder Shelves:
- Offer a unique and eye-catching design
- Provide ample storage space
- Add a touch of rustic charm to any room
- Versatile and adaptable to different styles
Industrial Chic: Pipe Shelves
For a touch of industrial chic, pipe shelves are the perfect solution. These shelves are constructed from metal pipes and fittings, creating a distinctive and modern look. Pipe shelves are available in various finishes, including black, copper, and galvanized steel, allowing you to choose the style that complements your existing décor. They are a great choice for displaying tools, books, or other items in a garage, workshop, or even a modern living room.
Key Benefits of Pipe Shelves:
- Offer a unique and industrial look
- Durable and long-lasting
- Easy to install and customize
- Available in a variety of finishes
Classic Elegance: Corner Shelves
Corner shelves are a practical and stylish solution for maximizing space in smaller rooms. They utilize often-overlooked corners, providing additional storage without taking up valuable floor space. Corner shelves come in various shapes and sizes, from simple triangular designs to elaborate curved shelves. They can be made from wood, metal, or glass, allowing you to choose the style that best complements your décor. Corner shelves are perfect for displaying books, plants, decorative items, or even storing small appliances or electronics.
Key Benefits of Corner Shelves:
- Maximize space in small rooms
- Offer a variety of styles and designs
- Can be used in different rooms for various purposes
- Can be customized to fit specific corner shapes
Whether you're looking to create a minimalist aesthetic, add rustic charm, embrace industrial chic, or simply maximize space, these stylish and functional wall shelves are sure to enhance your home and help you achieve your organizational goals. With a little creativity and a few well-chosen shelves, you can transform your space into a beautifully organized and functional haven.
Saturday, August 24, 2024
Quick and Easy Wood Project Ideas for Busy Crafters

Quick and Easy Wood Project Ideas for Busy Crafters
Are you looking for some fun and creative wood projects that won't take up too much of your precious time? You've come to the right place! Whether you're a seasoned woodworker or just starting out, these simple projects are perfect for busy crafters who want to unleash their creativity without spending hours in the workshop.
Simple & Stylish Coasters
Start with a basic, yet essential project: coasters! Choose your favorite wood species, cut squares or circles, sand them smooth, and apply a protective finish. Get creative with stain colors or add a personal touch with laser engraving. You'll have beautiful and functional coasters in no time.
Tips for Making Coasters
- Use a jigsaw or scroll saw to cut out intricate shapes.
- Experiment with different wood species to create unique textures and colors.
- Add a layer of cork to the bottom for extra protection and grip.
Charming Wooden Signs
Wooden signs are a versatile and delightful way to add personality to your home or give a thoughtful gift. Simply cut a piece of wood into the desired shape, sand it down, and paint or stain it. Add a personal message, a funny quote, or a beautiful design using stencils, freehand painting, or even woodburning.
Ideas for Wooden Signs
- Create a welcome sign for your front door.
- Make a motivational quote sign for your home office.
- Design a personalized sign for a friend's birthday or housewarming.
Rustic & Functional Shelves
Put your woodworking skills to use by crafting simple shelves! Choose wood boards that match your decor and cut them to the desired size. Attach them to brackets or create your own brackets from scrap wood. These shelves are ideal for displaying books, plants, or decorative items.
Enhance Your Shelves
- Use reclaimed wood for an eco-friendly and unique touch.
- Add a touch of color with paint or stain.
- Create floating shelves for a minimalist and modern look.
Personalized Photo Frames
Capture those precious memories in beautiful wooden photo frames! Cut out rectangles or squares from plywood or scrap wood, sand them smooth, and add a decorative touch with paint, stain, or woodburning. Attach a backing board and a glass or acrylic panel to complete your frames.
Make Your Frames Unique
- Use reclaimed wood for a vintage vibe.
- Incorporate contrasting wood species for visual interest.
- Add a personal touch with laser-engraved designs or family initials.
Enjoy Your Woodworking Journey
These quick and easy wood projects are just a starting point! Let your creativity flow and experiment with different techniques and designs. You'll find endless possibilities for crafting unique and functional pieces that you'll love for years to come. Happy woodworking!
Saturday, August 17, 2024
How to Make Floating Shelves with Customizable Features

How to Make Floating Shelves with Customizable Features
Hey there, DIY enthusiasts! Floating shelves are all the rage these days, and for good reason. They look sleek and modern, and they're a great way to add storage and personality to any room. But let's be honest, buying pre-made floating shelves can get expensive, and they might not always fit your exact needs. That's where the magic of DIY comes in!
In this guide, we'll walk you through the process of making your own customizable floating shelves. You'll learn how to choose the right materials, cut them to size, and assemble your masterpiece. Plus, we'll explore some fun and functional features you can incorporate to make your shelves truly unique.
Choosing the Right Materials
The first step in building any project is selecting the right materials. For floating shelves, you'll need:
Shelf Boards
- Wood: This is the most popular choice for floating shelves, offering a variety of options like pine, oak, maple, or even reclaimed wood.
- MDF (Medium-density fiberboard): A budget-friendly option that's smooth and easy to work with. However, it's not as durable as wood.
- Plywood: Strong and stable, plywood is a great choice for heavier items.
- Metal: For a modern look, consider using metal sheets like aluminum or steel.
When choosing your shelf board material, think about the style you're going for and the weight of the items you'll be storing.
Brackets
- Metal Brackets: These are the most common type of bracket used for floating shelves. They come in a wide variety of styles, colors, and finishes.
- Wooden Brackets: For a rustic or minimalist look, you can use wooden brackets.
- Invisible Brackets: If you want a truly minimalist look, you can opt for invisible brackets that are hidden behind the shelf board.
Choose brackets that are strong enough to support the weight of your shelves and the items you'll be storing.
Additional Materials
- Wood Glue: Used for attaching the brackets to the shelf board.
- Wood Screws: For securing the brackets to the wall and the shelf board to the brackets.
- Sandpaper: For smoothing out any rough edges on your shelf board.
- Wood Stain or Paint: To give your shelves a desired finish.
- Level: To ensure your shelves are straight.
- Measuring Tape: For accurately measuring your shelf board and bracket placement.
- Pencil: For marking where to cut your shelf board and where to drill pilot holes.
Designing Your Customizable Features
Now it's time to get creative! Here are some ideas for adding customizable features to your floating shelves:
Built-in Storage
- Hidden Compartments: Create secret storage areas within your shelves using a smaller piece of wood as a divider.
- Open Shelving: If you want easy access to your belongings, build a multi-tiered shelving system with multiple open shelves.
- Drawers: Add drawers to the bottom of your shelves for storing smaller items.
Unique Shapes and Sizes
- Curved Shelves: Give your shelves a more organic feel by using a template to create curved edges.
- Asymmetrical Shelves: Play with different widths and depths to create interesting visual effects.
- Geometric Shelves: For a modern look, consider using triangular or hexagonal shapes.
Lighting
- LED Strip Lights: Add a touch of ambiance by embedding LED strip lights beneath your shelves.
- Pendant Lights: For a statement piece, hang pendant lights above your shelves.
Finishing Touches
- Decorative Hardware: Use unique knobs, pulls, or brackets to add personality.
- Custom Stencils: Create personalized designs using stencils and paint.
- Wallpaper: Cover the back of your shelves with wallpaper for a fun and unexpected accent.
Building Your Floating Shelves
Let's get down to the nitty-gritty of building your shelves. Here's a step-by-step guide:
1. Measure and Cut
- Decide on the dimensions of your shelves: Consider the space you have available and the size of the items you'll be storing.
- Measure your shelf board: Use a measuring tape to determine the length and width of your shelves.
- Mark your cuts: Use a pencil to mark where you'll need to cut your shelf board.
- Cut your shelf board: Use a saw to carefully cut your shelf board according to your measurements.
- Sand the edges: Use sandpaper to smooth out any rough edges on your shelf board.
2. Attach the Brackets
- Determine the placement of your brackets: Consider the weight of the items you'll be storing and how far apart you want your shelves to be.
- Mark the bracket positions: Use a pencil to mark where you'll attach your brackets to the shelf board.
- Apply wood glue: Apply a thin layer of wood glue to the back of the brackets.
- Secure the brackets: Use screws to attach the brackets to the shelf board.
3. Mount the Shelves
- Find studs: Locate the studs in your wall using a stud finder.
- Mark the bracket positions: Use a pencil to mark where you'll attach the brackets to the wall.
- Pre-drill pilot holes: Use a drill bit to pre-drill pilot holes in the wall where you'll be attaching the brackets. This will help prevent the wood from splitting.
- Secure the brackets: Use screws to attach the brackets to the wall. Make sure the brackets are level.
- Attach the shelves: Carefully lift your shelves and hang them on the brackets.
4. Finishing Touches
- Apply a finish: Stain or paint your shelves to your desired color.
- Add decorative hardware: Attach any knobs, pulls, or brackets to complete the look.
- Decorate your shelves: Arrange your belongings and add any decorative elements to personalize your shelves.
Commonly Asked Questions
How much weight can floating shelves hold?
The weight capacity of your floating shelves depends on the materials you use, the type of brackets you choose, and how they are installed. It's always best to err on the side of caution and choose brackets and materials that are rated for the weight you'll be putting on them. Consult the manufacturer's specifications for specific weight capacities.
What if my walls aren't studs?
If you don't have studs in the area where you want to install your shelves, you can use drywall anchors. These anchors expand inside the drywall, providing a secure hold for your screws. Make sure to choose anchors that are appropriate for the weight of your shelves.
How can I make sure my shelves are level?
A level is an essential tool for ensuring that your shelves are straight. Use a level to check the horizontal and vertical alignment of the brackets before you attach them to the wall. If you're attaching multiple shelves, make sure they are all level with each other.
What if I want to add lights to my shelves?
There are a few ways to add lights to your shelves. One popular option is to use LED strip lights. These lights are flexible and can be easily adhered to the underside of your shelves. You can also consider using small pendant lights or recessed lighting.
And there you have it! With a little bit of time and effort, you can create a set of unique and functional floating shelves that perfectly complement your style and add a touch of personality to your home.
Monday, August 12, 2024
Wooden Home Decor Projects That Sell Fast

Wooden Home Decor Projects That Sell Fast
Are you looking for a creative outlet that can also bring in some extra cash? Woodworking is a fantastic choice, especially when it comes to crafting beautiful and functional home decor items. Not only is woodworking incredibly satisfying, but it also allows you to tap into a market that's always in demand.
The best part? You don't need to be a seasoned craftsman to create woodworking projects that sell like hotcakes. With a little practice, the right tools, and a sprinkle of creativity, you can start building beautiful and unique pieces that will wow your customers.
So, what are some woodworking projects that sell fast? Let's dive in!
Trending Wooden Home Decor Projects
Here's a rundown of some popular woodworking projects that are consistently in high demand:
1. Wooden Signs
Wooden signs are incredibly versatile and can be customized to suit any style or occasion. From simple welcome signs to inspirational quotes and personalized family names, the possibilities are endless! You can experiment with different wood types, finishes, and lettering styles to create unique designs that capture your customers' hearts.
Tips for Success:
- Offer a variety of sizes and shapes to cater to different needs.
- Keep your designs simple and easy to read.
- Use high-quality wood and durable paint or stain for long-lasting appeal.
2. Cutting Boards
Every kitchen needs a trusty cutting board, and handcrafted wooden cutting boards are a huge hit. You can create different sizes, shapes, and even add unique features like juice grooves or handles. Experiment with different wood types like maple, cherry, and walnut to create stunning visual contrasts.
Tips for Success:
- Use food-safe finishes like mineral oil or beeswax to protect the wood.
- Offer personalized engraving options for a special touch.
- Consider creating themed cutting boards for holidays or special occasions.
3. Wooden Coasters
Small but mighty, wooden coasters are a great way to add a touch of warmth and personality to any coffee table or nightstand. You can create sets of coasters in various shapes, sizes, and wood types, and even incorporate decorative elements like epoxy resin or burned designs.
Tips for Success:
- Use a non-slip backing material to prevent coasters from sliding.
- Offer unique designs that complement different interior styles.
- Create gift sets that include coasters and matching trays.
4. Wooden Wall Decor
Add a touch of rustic charm to any room with wooden wall decor. Think shelves, wall clocks, decorative boxes, and even framed pieces of wood with unique textures. You can create beautiful and functional pieces that enhance the ambiance of any space.
Tips for Success:
- Create versatile pieces that can be styled in different ways.
- Focus on quality craftsmanship and attention to detail.
- Offer a range of sizes and styles to suit different tastes.
5. Wooden Jewelry Boxes
For the fashion-forward, wooden jewelry boxes are a practical and elegant way to organize and display their beloved accessories. You can create beautiful and unique boxes using different wood types, finishes, and hardware.
Tips for Success:
- Use high-quality wood that's resistant to scratches and dents.
- Incorporate compartments and drawers for easy organization.
- Offer customization options like engraved initials or personalized designs.
6. Wooden Serving Trays
Wooden serving trays are an essential for entertaining and everyday use. You can create elegant trays in different shapes and sizes, with or without handles. Experiment with different wood types and finishes to create unique and stylish serving trays that will impress your customers.
Tips for Success:
- Use a durable and food-safe finish to protect the wood.
- Add handles for easy carrying and a touch of elegance.
- Offer personalized engraving options for special occasions.
Marketing Your Wooden Home Decor
Now that you've got some awesome woodworking ideas, it's time to think about how to market your creations. Here are some effective strategies to reach your target audience:
1. Online Marketplaces
Platforms like Etsy, Amazon Handmade, and Facebook Marketplace are fantastic for showcasing and selling your handcrafted items. Create a professional shop with high-quality photos and detailed product descriptions to attract buyers.
2. Social Media
Instagram and Pinterest are visual platforms where you can showcase your stunning woodworking creations. Share captivating photos, behind-the-scenes glimpses of your process, and engage with your followers to build a loyal customer base.
3. Local Craft Fairs and Markets
Connect directly with customers by participating in local craft fairs and markets. You'll have the opportunity to interact with potential buyers, showcase your unique creations, and gain valuable feedback.
4. Collaborations
Partnering with other businesses can help you expand your reach and tap into new customer segments. Collaborate with interior designers, home decor shops, or even other crafters to cross-promote each other's products.
Commonly Asked Questions
Here are some frequently asked questions about selling wooden home decor:
1. What type of wood should I use for my projects?
The best wood for your projects will depend on the specific design and your budget. Some popular options include pine, maple, cherry, walnut, and oak. Do your research and experiment to find the wood that works best for you.
2. What tools do I need to get started?
You don't need a massive workshop to get started. A basic set of woodworking tools like a saw, drill, sander, and measuring tools is sufficient for many projects. As you progress, you can invest in more specialized tools.
3. How do I price my wooden home decor items?
When pricing your items, consider your material costs, time spent, and the market value of similar products. Factor in your desired profit margin and research pricing strategies for handmade items.
4. How do I protect my wooden home decor?
Use a durable and food-safe finish for items that will come into contact with food. For other projects, consider using paint, stain, or a clear sealant to protect the wood from moisture, scratches, and fading.
By tapping into the ever-growing demand for handcrafted home decor, you can turn your woodworking skills into a rewarding and profitable business. Remember to focus on quality craftsmanship, unique designs, and effective marketing strategies to attract and retain customers. Happy woodworking!