Monday, November 18, 2024
The Best Woodworking Projects for Beginners to Build Their Skills

The Best Woodworking Projects for Beginners to Build Their Skills
Hey there, woodworking newbie! Ready to dive into the world of sawdust and create something awesome with your own hands? It’s an amazing feeling, I promise. But before you tackle that fancy coffee table or intricate birdhouse, it's smart to start with some beginner-friendly projects that'll help you build your skills and confidence.
Think of it like this: you wouldn't try running a marathon without training, right? Woodworking is the same â€" building your skills gradually is key to enjoying the journey and avoiding frustrating setbacks.
So, grab your hammer and let's get started with some fantastic beginner woodworking projects!
Simple and Satisfying Projects
You don't need to start with something complex! These easy projects will get you comfortable with basic tools and techniques.
1. Coasters
What's better than a cute coaster? A coaster you made yourself! They're perfect for practicing cutting, sanding, and finishing. Choose a simple design, maybe square or round, and use scrap wood.
Pro-tip: Don't forget to drill a drainage hole in the bottom to prevent water buildup.
2. Cutting Board
A cutting board is a must-have in any kitchen, and it's a great way to practice precise cuts and glue-ups. Choose a hard wood like maple or cherry for durability. Remember to seal the board with food-safe oil or finish for easy cleaning.
3. Picture Frame
A simple frame is a great way to showcase your favorite photos or artwork. Use basic joinery techniques like miter cuts and glue to create a sturdy frame. Don't forget to measure carefully for a perfect fit!
Level Up Your Skills
Now that you've got the basics down, let's move on to some projects that will challenge you a bit more.
1. Wooden Box
A wooden box is a versatile project that can be used for storing anything from jewelry to tools. You can use simple miter joints or try a more advanced technique like dovetails for a truly impressive finish.
Pro-tip: Use a router to add a decorative edge to your box for a professional touch.
2. Birdhouse
Building a birdhouse is a fun and rewarding project. You can get creative with the design and add details like a perch or a decorative roof. This project will help you practice measuring, cutting, and assembling small components.
3. Shelf
A shelf is a practical and functional addition to any room. You can build a simple floating shelf or a more complex bookcase. This project will help you practice using different fasteners, like screws and brackets.
The Tools You Need (But Not Too Many)
You don't need a workshop full of tools to get started. Here's a basic kit to get you going:
- Hand saw: A must-have for cutting wood. Choose a fine-toothed saw for accurate cuts.
- Hammer: For driving nails and other tasks.
- Screwdriver: Get a set with different sizes to fit various screws.
- Tape measure: Accurate measuring is essential!
- Level: Makes sure things are straight and avoids frustration.
- Safety glasses: Protect your eyes from flying debris.
- Clamps: For holding pieces together while you work.
- Sandpaper: For smoothing out rough surfaces and creating a beautiful finish.
As you progress, you might want to invest in power tools like a drill, circular saw, or sander. But don’t feel overwhelmed; start with the basics, and you can always add more tools as you need them.
Choosing the Right Wood
Different woods have different characteristics, so it's important to choose the right one for your project.
- Pine: Softwood, easy to work with, but not very strong.
- Oak: Hardwood, strong and durable, but can be difficult to work with.
- Maple: Hardwood, known for its beautiful grain and durability.
- Cherry: Hardwood, known for its rich color and beautiful grain.
Ask for advice at your local lumber yard; they'll be happy to help you choose the right wood for your project.
Safety First
Woodworking can be fun and rewarding, but it's essential to prioritize safety.
- Always wear safety glasses to protect your eyes from flying debris.
- Use hearing protection if you’re using loud power tools.
- Be mindful of your surroundings and keep your workspace clean and organized.
- Never work with power tools when tired or under the influence of alcohol or drugs.
A little bit of caution goes a long way, and you'll be able to enjoy woodworking for years to come.
Where to Find Inspiration and Guidance
The internet is your friend! There are countless resources available online to help you learn woodworking skills and find new project ideas.
- YouTube: Search for woodworking tutorials and watch experienced woodworkers share their tips and tricks.
- Blogs and websites: Many woodworking blogs and websites offer step-by-step instructions, project plans, and helpful advice.
- Local woodworking clubs and groups: Join a club or group to connect with other woodworkers, share ideas, and learn from each other.
And don't forget to embrace mistakes! They're part of the learning process. Just remember to work safely, have fun, and enjoy the journey of becoming a skilled woodworker!
Commonly Asked Questions
1. What kind of wood should I use for my first project?
For your first project, choose a softwood like pine. It's easier to work with and more forgiving if you make mistakes.
2. What are some basic woodworking tools I need to get started?
Start with a handsaw, hammer, screwdriver, tape measure, level, safety glasses, and clamps. You can gradually add more tools as you gain experience.
3. Where can I find free woodworking plans?
There are tons of free woodworking plans available online! Search on websites like Pinterest, Instructables, and Ana White.
4. What if I don't have a workshop?
You don't need a fancy workshop to get started! You can build small projects on your kitchen table or in your garage. As you progress, you can invest in a workbench and tools to make your woodworking experience more comfortable and productive.
Happy woodworking, everyone!

Friday, November 15, 2024
Profitable Wall Shelf Projects to Make and Sell
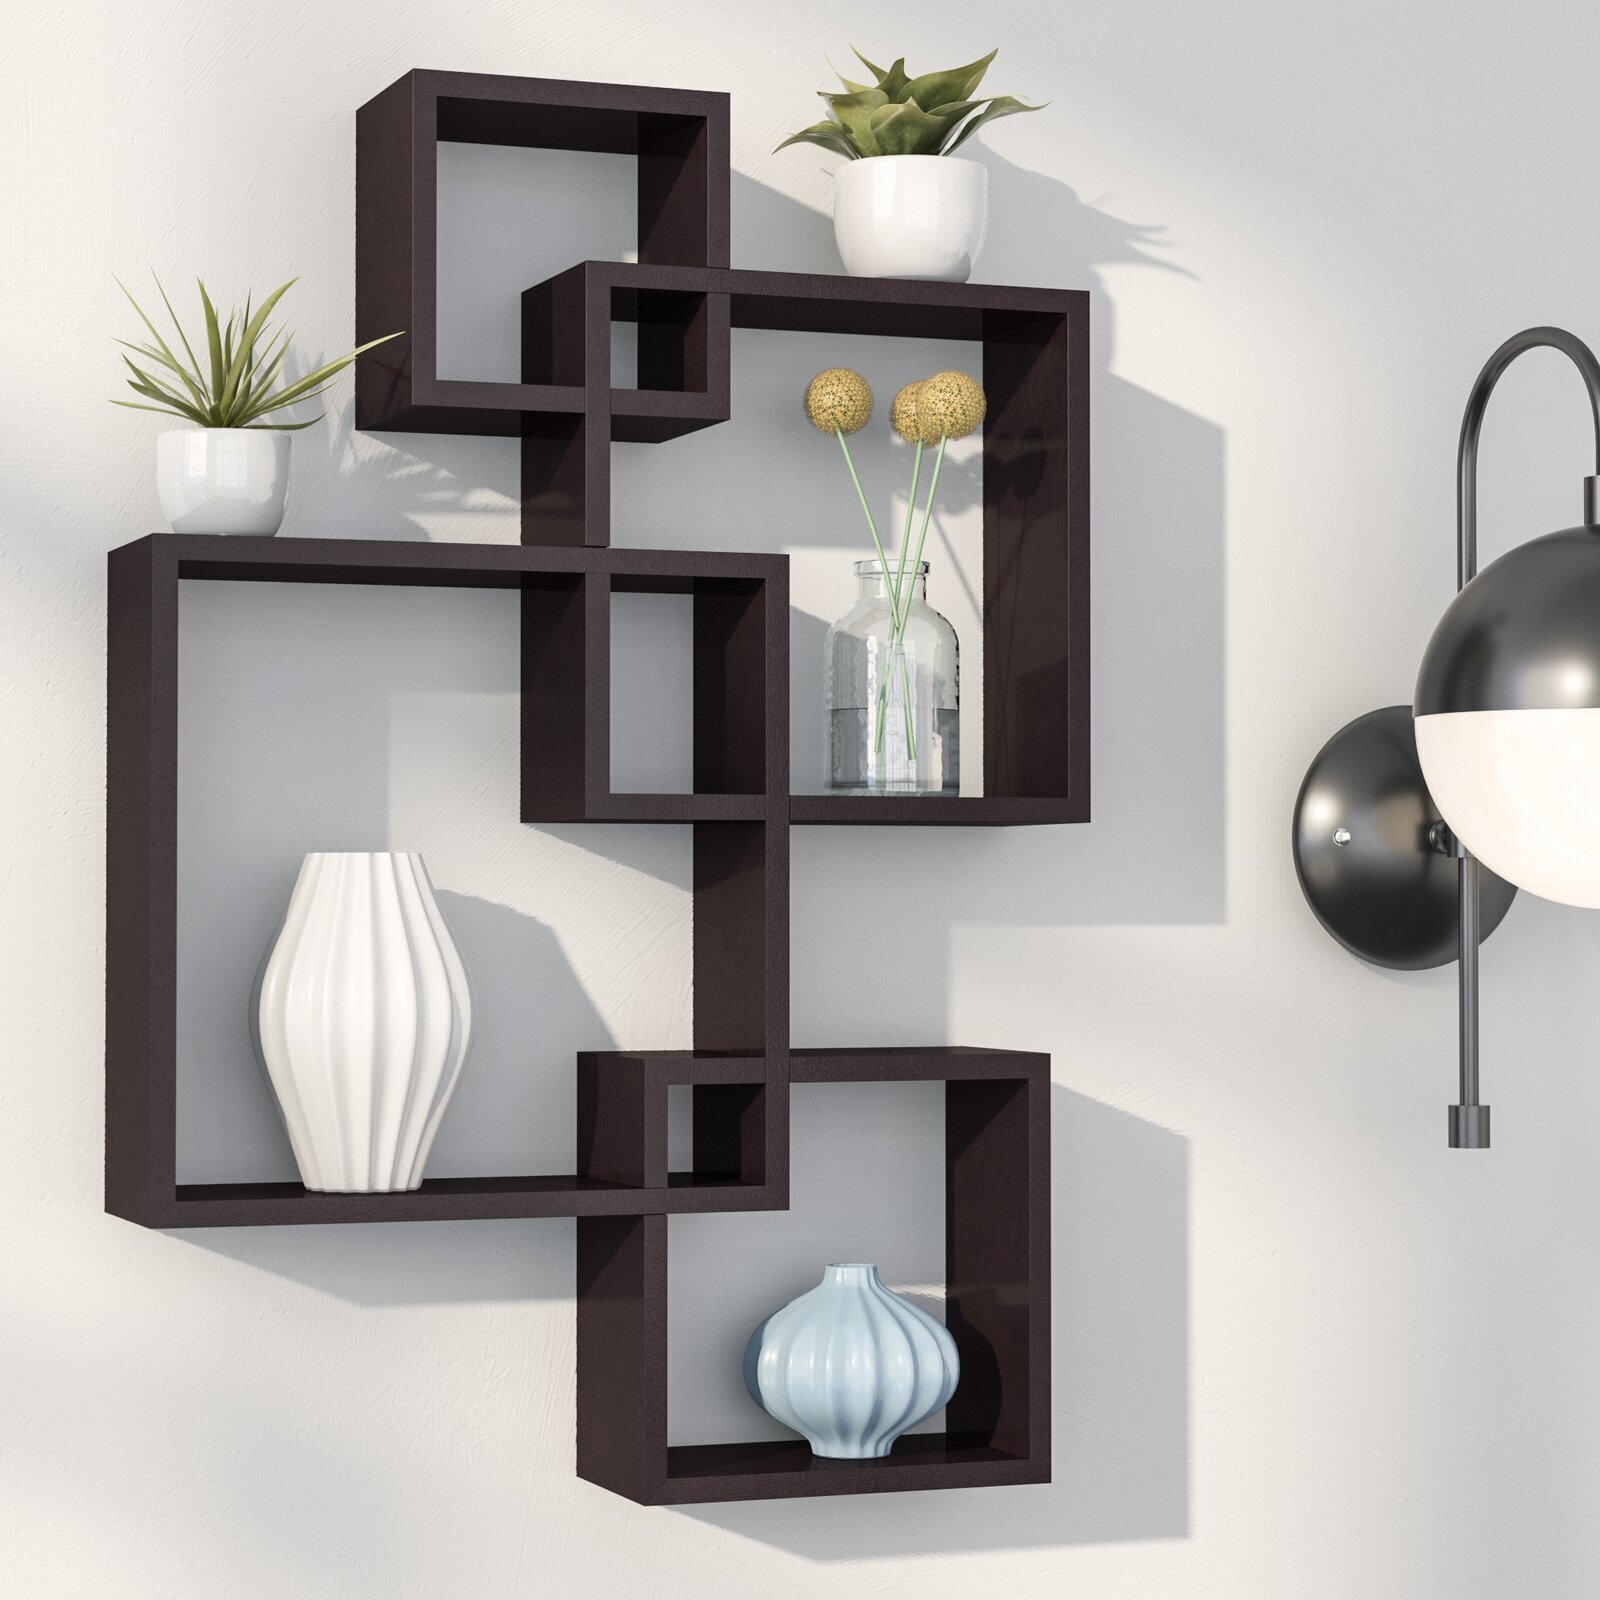
Profitable Wall Shelf Projects to Make and Sell
Wall shelves are a staple in any home, offering practical storage solutions and enhancing the aesthetic appeal of a space. For those seeking lucrative crafting ventures, building and selling wall shelves presents a profitable opportunity. This article delves into the realm of profitable wall shelf projects, exploring various designs, materials, and marketing strategies to guide aspiring crafters towards success.
Popular Wall Shelf Styles and Designs
The first step in creating profitable wall shelves is to understand the diverse styles and designs that resonate with customers. By offering a range of options, you can cater to a broader audience and increase your sales potential.
Floating Shelves
Floating shelves create a sleek and modern look by appearing to float on the wall. They are typically made from wood or metal and are often constructed with hidden brackets for a minimalist aesthetic. These shelves are popular in living rooms, bedrooms, and kitchens, adding a touch of sophistication to any space.
Rustic Shelves
Rustic shelves evoke a sense of warmth and character. They are often crafted from reclaimed wood, such as barn wood or pallet wood, and feature distressed finishes, knots, and uneven edges. These shelves are ideal for farmhouse, cottage, or industrial-style interiors, adding a touch of vintage charm.
Geometric Shelves
Geometric shelves add a contemporary touch to any room. They feature unique shapes, such as triangles, hexagons, or circles, and can be arranged in various configurations to create visually interesting displays. These shelves are perfect for showcasing decorative items, books, or plants.
Corner Shelves
Corner shelves make the most of often-unused space in a room. They are designed to fit seamlessly into corners, maximizing storage and adding visual interest. Corner shelves are particularly useful in small spaces, where every inch counts.
Materials and Finishes for Profitable Wall Shelves
The materials and finishes you choose for your wall shelves significantly influence their aesthetic appeal and cost. Here are some popular options:
Wood
- Pine: Affordable and readily available, pine is a versatile wood suitable for various styles.
- Oak: Strong and durable, oak offers a classic look and natural warmth.
- Maple: Known for its beautiful grain patterns, maple is ideal for rustic and contemporary designs.
- Reclaimed wood: Adds a unique touch and environmental sustainability to your shelves.
Metal
- Steel: Robust and modern, steel shelves offer a sleek and industrial look.
- Iron: Durable and often finished with rustic or antique accents, iron shelves add character and longevity.
- Brass: Adds a touch of elegance and warmth with its warm metallic tones.
Finishes
- Paint: Offers a wide range of colors and finishes, allowing you to customize your shelves to match any décor.
- Stains: Enhance the natural grain patterns of wood, creating warm and inviting hues.
- Waxes: Protect and add sheen to wood surfaces, creating a durable and elegant finish.
- Distressed finishes: Create a vintage and weathered look, adding character and charm.
Tips for Maximizing Profits
To ensure your wall shelf crafting business thrives, consider the following tips:
Target Niche Markets
Instead of trying to appeal to everyone, focus on specific niche markets. For example, you could specialize in farmhouse-style shelves, modern geometric shelves, or shelves designed for specific rooms, such as kitchens or bathrooms.
Offer Customization Options
Give customers the ability to personalize their shelves by offering a range of wood types, finishes, sizes, and hardware. This adds value and makes your products more appealing.
Set Competitive Pricing
Research your competitors' prices and ensure your pricing is competitive. Consider the cost of materials, labor, and overhead expenses when setting your prices.
Promote Your Business
Use social media platforms, online marketplaces, craft fairs, and local shops to promote your wall shelves. Showcase your work through high-quality photos and videos, and highlight the unique features and benefits of your products.
Provide Excellent Customer Service
Respond promptly to customer inquiries, address concerns effectively, and provide a positive experience for every customer. This will encourage repeat business and positive word-of-mouth referrals.
Marketing Strategies for Wall Shelf Businesses
Effective marketing is crucial for attracting customers and generating sales. Consider these strategies:
Social Media Marketing
Platforms like Instagram, Facebook, and Pinterest are ideal for showcasing your wall shelves. Use high-quality photos and videos to capture the beauty of your products and highlight their unique features. Run targeted ads to reach your ideal audience and engage followers with contests and promotions.
Online Marketplaces
Etsy, Amazon Handmade, and other online marketplaces provide a platform to reach a global audience. Create professional product listings with detailed descriptions, high-quality images, and competitive pricing.
Craft Fairs and Events
Attending craft fairs and events allows you to connect directly with customers and showcase your work in person. Prepare eye-catching displays and offer discounts to attract buyers. Network with other crafters and vendors to expand your reach.
Collaboration with Retailers
Partner with local home decor stores or boutiques to sell your wall shelves through their channels. This can provide access to a wider customer base and increase your sales volume.
Conclusion
Building and selling wall shelves can be a profitable and rewarding endeavor. By understanding popular styles and designs, sourcing high-quality materials, and implementing effective marketing strategies, aspiring crafters can establish a successful business. Remember to target niche markets, offer customization options, set competitive prices, and provide excellent customer service to ensure your wall shelf business thrives.
Custom Bath Trays to Make and Sell This Weekend

Make and Sell Custom Bath Trays This Weekend!
Hey there, DIY enthusiasts and aspiring entrepreneurs! Are you looking for a fun and profitable side hustle to tackle this weekend? Look no further than crafting and selling custom bath trays! These luxurious accessories are perfect for transforming a regular bath into a spa-like experience, and they're a hot commodity in today's market. Get ready to dive into the world of woodcraft and create something truly special that will pamper your customers.
The Allure of Bath Trays
Think about it – a warm bath, the scent of candles, a good book, and a glass of wine. What could be better? A bath tray elevates this experience to a whole new level. Imagine a beautifully crafted tray holding all your bath essentials within easy reach, keeping your book dry and your wine from spilling. That's the magic of a bath tray!
The beauty of bath trays lies in their versatility and personalizability. They come in various shapes, sizes, and styles to match any bathroom decor. From rustic farmhouse to sleek modern, there's a bath tray for every taste. This means you can offer unique and customized creations that cater to your customers' individual preferences, making each tray a truly special piece.
What You'll Need to Get Started
Don't be intimidated! Making bath trays is easier than you think. Here's a list of essential materials and tools to get you started:
Materials:
- Wood: Choose from a variety of wood types depending on your desired look and budget. Pine, cedar, and maple are popular choices for their affordability and durability.
- Stain or paint: Pick a color or finish that complements the wood and your customer's style.
- Epoxy resin: If you want to add a touch of elegance or create a unique design, epoxy resin is your friend. It allows you to create smooth, glossy finishes and embed objects like flowers or shells for a personalized touch.
- Hardware: This includes cup holders, wine glass holders, book rests, and other accessories to add functionality and personalization.
- Sandpaper: Essential for smoothing out the wood and creating a flawless finish.
- Wood glue: For securely joining the wood pieces.
- Finishing oil or wax: To protect the wood and enhance its natural beauty.
Tools:
- Saw: To cut the wood to your desired size and shape.
- Drill: For creating holes for cup holders, wine glass holders, and other hardware.
- Measuring tape and pencil: For accurate measuring and marking.
- Clamps: For securing the wood pieces while gluing.
- Brushes: For applying stain, paint, and finishing oil or wax.
Designing Your Custom Bath Trays
The fun part is designing your trays! Here are some ideas to spark your creativity:
Shape and Size:
- Classic rectangular shape: A versatile and timeless choice that fits most bathtubs.
- Curved or rounded shape: Adds a touch of sophistication and complements modern bathroom designs.
- Unique designs: Get creative with different shapes, like a crescent moon or a leaf.
- Adjustable tray size: Consider creating trays with adjustable compartments to accommodate various items.
Functionality:
- Cup holders: Essential for keeping your beverage within reach.
- Wine glass holders: A perfect addition for a relaxing bath with a glass of wine.
- Book rests: For those who love to read in the bath.
- Candle holders: Create a spa-like atmosphere with candles.
- Phone or tablet holder: Stay connected or enjoy entertainment while you soak.
Style and Personalization:
- Natural wood finish: Highlights the beauty of the grain pattern and creates a rustic look.
- Stained wood: Choose from a wide range of colors to match your customers' preferences.
- Painted wood: Add a pop of color with vibrant hues.
- Epoxy resin designs: Create unique patterns, swirls, or embed objects like flowers, shells, or even small photos.
- Engraving: Add personalized messages or designs for a special touch.
Marketing and Selling Your Bath Trays
Once you've created your beautiful bath trays, it's time to get them in front of potential customers. Here are some marketing and sales strategies:
Online Platforms:
- Etsy: A popular marketplace for handmade and vintage goods.
- Facebook Marketplace: A great way to reach local buyers.
- Instagram: Showcase your stunning bath trays with high-quality photos and videos.
- Your own website: Create a professional website to sell your products directly.
Local Events and Markets:
- Craft fairs and farmers markets: Connect with potential customers in person and show off your creations.
- Local gift shops: Approach stores that sell home decor and gifts to see if they're interested in carrying your bath trays.
Pricing and Profit:
- Research your competition: See what other bath tray sellers are charging to get an idea of pricing.
- Factor in your costs: Calculate the cost of materials, tools, and labor to ensure profitability.
- Set competitive prices: Offer attractive prices while still making a profit.
- Consider offering discounts: For example, offer a discount for bulk orders or to customers who follow your social media pages.
Frequently Asked Questions
What kind of wood is best for bath trays?
Pine, cedar, and maple are good choices for their affordability and durability. You can also use hardwoods like oak or walnut for a more luxurious look.
How do I seal a bath tray for water resistance?
Apply a water-resistant sealant like polyurethane or epoxy resin to protect the wood from water damage.
How much should I charge for my bath trays?
Pricing varies based on the materials, size, complexity, and your desired profit margin. Research your competition and factor in your costs.
How do I promote my bath trays online?
Use high-quality photos and videos to showcase your products on platforms like Etsy, Instagram, and your own website.
Where can I find ideas for designing bath trays?
Browse online platforms like Pinterest and Etsy for inspiration. Look at magazines and home decor websites for trendy designs.
Now you're equipped with the knowledge and inspiration to create and sell custom bath trays! Don't be afraid to experiment, personalize, and let your creativity shine. You'll be surprised by the joy of crafting and the potential for a successful side hustle. Happy crafting!
Wine Rack Ideas to Make and Sell for a Quick Profit

Wine Rack Ideas to Make and Sell for a Quick Profit
Are you looking for a fun and profitable side hustle? Look no further than crafting unique and stylish wine racks! Wine racks are always in demand, and with a little creativity and elbow grease, you can turn your woodworking skills into a lucrative business. This article will explore some popular wine rack ideas that are sure to appeal to a wide range of customers.
Popular Wine Rack Styles
There are countless ways to design and build wine racks, but certain styles consistently remain popular.
Wall-Mounted Wine Racks
Wall-mounted racks are a great option for maximizing space, especially in smaller kitchens or dining rooms. These racks are easy to install and come in various shapes and sizes. Consider incorporating decorative elements like metal accents or rustic wood finishes to enhance their appeal.
Freestanding Wine Racks
For those who prefer a more substantial display, freestanding wine racks offer a stylish and functional storage solution. These racks can be designed as a simple table-top unit or a towering structure with multiple shelves. Choose sturdy materials like metal or wood to create a durable and eye-catching piece.
Under-Counter Wine Racks
For those who prioritize space-saving solutions, under-counter wine racks are a perfect fit. These racks are designed to be installed beneath kitchen countertops, allowing for convenient wine storage without sacrificing valuable countertop space. Use compact materials like metal or acrylic to create a sleek and efficient design.
Unique Wine Rack Ideas to Stand Out
To attract customers and make a statement, consider crafting wine racks with unconventional features and designs.
Wine Racks with Built-in Bottle Openers
Make life easier for wine enthusiasts by integrating a bottle opener directly into the wine rack design. This feature adds practicality and makes the rack a truly unique offering. Consider adding a drip tray to prevent messes.
Wine Racks with Glass Storage
Add an extra touch of elegance to your wine rack designs by incorporating glass storage. Glass shelves can provide a modern and clear display of your client's wine collection. Ensure the glass shelves are securely mounted for safety and durability.
Wine Racks with Decorative Elements
Elevate your wine rack designs by incorporating decorative elements like etched glass panels, laser-cut wood accents, or metal scrollwork. These elements add a touch of sophistication and can be customized to suit specific tastes.
Tips for Making and Selling Wine Racks for a Quick Profit
Now that you have some inspiring wine rack ideas, here are some practical tips to ensure you're on track for a successful business venture.
Focus on High-Quality Materials
Using high-quality materials is essential for creating durable and aesthetically pleasing wine racks. Opt for sturdy woods, robust metals, or thick acrylics to ensure your products are built to last. This commitment to quality will attract discerning customers and help you command higher prices.
Utilize Affordable Production Methods
While you should invest in quality materials, strive to find cost-effective production methods to maximize your profit margins. Explore using readily available tools and techniques, and consider sourcing materials from wholesale suppliers.
Target Specific Market Niches
Instead of trying to cater to everyone, focus on specific market niches with unique needs. For example, you could target customers looking for rustic wine racks, modern wine racks, or eco-friendly wine racks. Understanding your target market will help you tailor your designs and marketing efforts.
Offer Customization Options
Make your wine rack designs stand out by offering customization options. Allow customers to choose from a variety of wood finishes, metal accents, or decorative elements. This customization allows you to create unique and personalized pieces, increasing customer satisfaction and loyalty.
Leverage Online Marketplaces
The internet provides a vast and accessible platform for selling your handcrafted wine racks. Utilize online marketplaces like Etsy, Amazon Handmade, or your own website to reach a wider audience. Invest in high-quality product photography and compelling descriptions to showcase your unique designs.
Conclusion
Making and selling wine racks can be a rewarding and profitable endeavor. By focusing on quality materials, unique designs, and effective marketing strategies, you can carve a niche in the ever-growing market for handcrafted home decor. Embrace your creativity, get started with your crafting journey, and watch your wine rack business flourish.
Thursday, November 14, 2024
How to Craft Personalized Serving Trays for Extra Income

Turn Your Creative Flair Into Extra Income: Crafting Personalized Serving Trays
Hey there, crafty folks! Are you looking for a fun and rewarding way to earn some extra cash? Well, let me tell you, crafting personalized serving trays is a fantastic option! It combines your creative skills with the ever-growing demand for unique and thoughtful gifts. Imagine creating beautiful trays that become cherished keepsakes, bringing smiles to faces and filling homes with warmth. This guide will walk you through everything you need to know, from choosing the right materials to marketing your creations. So grab your favorite crafting tools and let's dive in!Why Personalized Serving Trays Are a Hot Commodity
Personalized gifts are always a hit because they show you put thought and effort into the present. Serving trays are particularly appealing because they’re practical and versatile. They can be used for everything from serving snacks and drinks to displaying decorative items. And when you add a personal touch, you create something truly special.
Materials You'll Need
Before you get started, let's gather the essential materials. Don't worry, you don't need to spend a fortune. Most of these items can be found at your local craft store or online.
The Tray Base
- Wooden Trays: These are sturdy and come in various sizes and styles. You can even find unfinished wooden trays, giving you the flexibility to customize the look.
- Metal Trays: For a more modern vibe, try metal trays. They come in different finishes like silver, copper, or even black.
- Ceramic Tiles: Get creative by using ceramic tiles as the base. You can paint them or use decoupage techniques to add your designs.
Decorative Elements
- Paints: Choose acrylic paints, which are great for wood and ceramics. Explore different colors, textures, and finishes to suit your style.
- Stencils: Stencils allow you to easily create intricate designs. You can find them at craft stores or even make your own using adhesive paper.
- Vinyl Stickers: Want to add quotes, names, or patterns? Vinyl stickers are perfect for this and come in various sizes and colors.
- Decoupage Paper: This thin paper, often featuring beautiful patterns, is perfect for adding a decorative touch to your trays.
- Embellishments: Get creative with embellishments like buttons, beads, ribbons, or even dried flowers to add texture and personality to your trays.
Essential Tools
- Paintbrushes: Choose brushes of various sizes depending on your designs.
- Sandpaper: Sand down any rough edges on wooden trays and smooth out surfaces before painting.
- Scissors: For cutting stencils, decoupage paper, and vinyl stickers.
- Mod Podge: This multi-purpose adhesive is perfect for decoupage and sealing your designs.
- Protective Coating: A clear varnish or polyurethane will protect your tray from scratches and moisture.
Crafting Your Personalized Serving Trays
Now for the fun part! Let's get crafting! Here's a step-by-step guide to help you create your personalized serving trays:
Step 1: Choose Your Tray Base
Think about the size, style, and material that will best suit your design ideas. A rustic wooden tray might be perfect for a farmhouse aesthetic, while a sleek metal tray might fit a modern home better.
Step 2: Prepare the Tray
Clean your chosen tray base thoroughly. If you're working with wood, sand it smooth for a nice finish. For metal, use a cleaner to remove any residue.
Step 3: Brainstorm Your Design
Get your creative juices flowing! What theme or message do you want to convey with your tray? Consider the recipient's interests and personality. A food-themed tray could feature a favorite quote or recipe. A travel-themed tray could have a map or vintage luggage tags. The possibilities are endless!
Step 4: Create Your Design
- Paint: Paint the tray with your chosen base color, and then use stencils or freehand painting to add your design. Let the paint dry completely before moving on.
- Vinyl Stickers: Apply vinyl stickers carefully to your tray. Use a squeegee to smooth out any air bubbles.
- Decoupage: Cut out pieces of decoupage paper and apply them to your tray using Mod Podge. Brush on additional Mod Podge to seal the paper and create a smooth finish.
Step 5: Add Embellishments (Optional)
Embellishments can really make your tray stand out! Use buttons, beads, ribbons, or dried flowers to add texture and dimension. Be sure to secure them with glue or Mod Podge.
Step 6: Seal Your Design
Apply a protective coating like clear varnish or polyurethane to seal your design and protect it from wear and tear. This will also give your tray a beautiful shine.
Marketing Your Personalized Serving Trays
Now that you've created some stunning trays, it's time to share your work with the world! Here are some ways to market your creations:
- Online Marketplaces: Platforms like Etsy, Amazon Handmade, and Shopify allow you to sell your handmade items directly to customers.
- Social Media: Use platforms like Instagram and Facebook to showcase your trays, build a following, and engage with potential buyers.
- Local Craft Fairs: Participate in craft fairs and markets to meet customers face-to-face and sell your trays directly.
- Word-of-Mouth: Don't underestimate the power of word-of-mouth. Tell your friends, family, and neighbors about your business. You can even offer discounts for referrals.
Pricing Your Trays
Pricing your trays can be tricky. Consider your materials, time, and the uniqueness of your design. Research similar products to get an idea of what other sellers charge. Don't be afraid to charge what your work is worth!
Tips for Success
- High-Quality Materials: Use quality materials to ensure your trays are durable and long-lasting. This will also reflect well on your brand.
- Attention to Detail: Take your time with each step. A well-crafted, personalized tray is worth the extra effort.
- Offer Gift Wrapping: Make your trays even more appealing by offering gift wrapping options.
- Excellent Customer Service: Respond to inquiries promptly, be friendly, and go the extra mile to satisfy your customers. Happy customers are your best advertisement!
Commonly Asked Questions
What kind of paint is best for serving trays?
Acrylic paint is generally the best choice for serving trays. It's durable, dries quickly, and comes in a wide variety of colors.
How do I protect my designs from scratches and water?
Seal your designs with a clear varnish or polyurethane. This will create a protective barrier that will help prevent scratches and water damage.
How do I get started selling my personalized serving trays?
Start by creating a small collection of trays. Then, choose a few online marketplaces or social media platforms to promote your work. Don't be afraid to reach out to local shops or boutiques to see if they're interested in carrying your trays.
Crafting personalized serving trays can be a fun and profitable side hustle. With a little creativity, patience, and the right marketing strategy, you can turn your passion into a successful business!
Wednesday, November 13, 2024
Wine Racks for Every Space: Woodworking Projects to Sell

Wine Racks for Every Space: Woodworking Projects to Sell
Are you a woodworking enthusiast looking for profitable projects to sell? Look no further than wine racks! With their timeless appeal and practical functionality, wine racks are always in demand. From sleek modern designs to rustic farmhouse styles, there's a wine rack out there for every taste and budget. Not only can you create beautiful pieces for your own home, but you can also tap into a lucrative market by crafting and selling these versatile storage solutions.
The Appeal of Wine Racks
Wine racks offer several advantages that make them a great woodworking project for both personal use and sale. Here are a few reasons why wine racks are always in demand:
- Functionality: Wine racks provide a dedicated space to store and display wine bottles, keeping them organized and protected from dust and damage.
- Style: Wine racks come in a wide range of styles, from minimalist to ornate, allowing you to cater to different tastes and décor.
- Versatility: Wine racks can be customized to fit any space, from small apartments to spacious wine cellars.
- Giftability: Wine racks make thoughtful and practical gifts for wine enthusiasts and home décor lovers.
Woodworking Projects for Wine Racks
The possibilities for wine rack designs are endless. Here are some popular and profitable wine rack projects that you can consider:
Wall-Mounted Wine Racks
Wall-mounted wine racks are a space-saving and stylish option, perfect for smaller spaces. These racks can be designed with various configurations, such as vertical, horizontal, or angled shelves. They can be made from a variety of woods, including pine, oak, walnut, or even reclaimed wood, offering a rustic charm.
Freestanding Wine Racks
Freestanding wine racks provide more storage capacity and can serve as a focal point in a room. You can create elaborate designs with multiple tiers, drawers, or even built-in bottle openers. This project allows for creative freedom and can be a great way to showcase your woodworking skills.
Wine Rack with Storage
Combining wine storage with other features like shelving, drawers, or even a small bar top can create a multi-functional piece of furniture. This design is ideal for those who want to maximize space and create a dedicated wine corner in their home.
Marketing Your Wine Racks
Once you've created your wine racks, it's time to showcase your work and attract customers. Here are some effective marketing strategies:
- Online Marketplaces: Platforms like Etsy, Shopify, or Amazon Handmade offer excellent opportunities to reach a broad audience.
- Social Media: Instagram, Facebook, and Pinterest are ideal for showcasing your wine racks and connecting with potential buyers.
- Local Craft Fairs: Participating in craft fairs and farmers markets allows you to interact directly with customers and promote your products.
- Word-of-Mouth: Encourage satisfied customers to spread the word about your work and refer their friends and family.
With a little creativity and effort, you can turn your woodworking passion into a successful business by crafting and selling wine racks. The demand for these functional and stylish pieces is always strong, and by offering unique designs and high-quality craftsmanship, you can create a thriving woodworking venture.
Monday, November 11, 2024
Wooden Storage Bins for Organizing Small Tools and Accessories
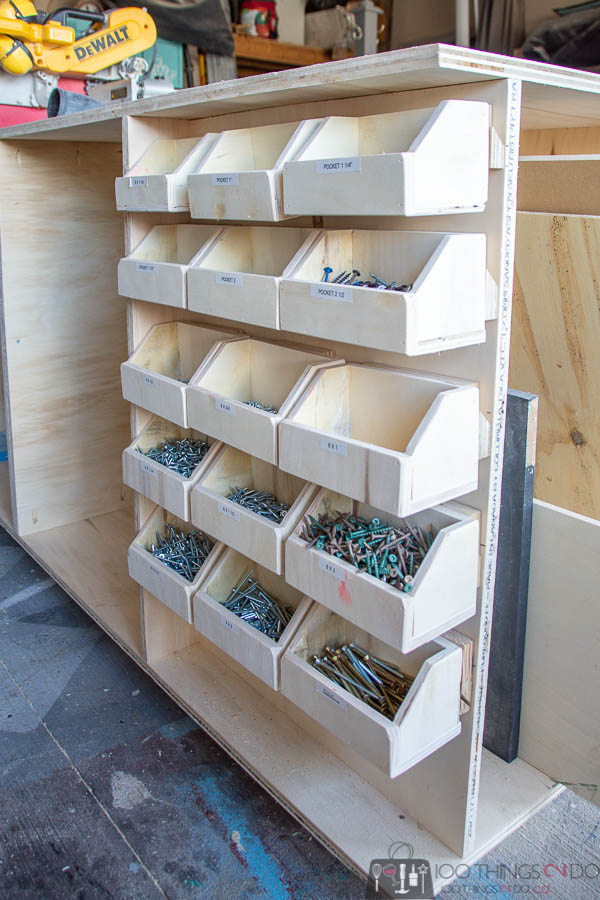
Wooden Storage Bins: The Perfect Solution for Organizing Your Small Tools and Accessories
Let's face it, small tools and accessories can be a real pain to keep organized. They're always getting lost in the clutter, and finding the right one when you need it can feel like a treasure hunt. But fear not, my friend! There's a simple and stylish solution: wooden storage bins. These handy little boxes are the perfect way to tame your tool chaos and create a workspace that's both functional and aesthetically pleasing.
Imagine a world where your screwdrivers, pliers, and other essential tools are neatly arranged, readily accessible, and looking good while doing it. That's the magic of wooden storage bins. They bring a touch of rustic charm to any space, while providing a practical and efficient way to keep your small tools and accessories organized.
Why Wooden Storage Bins are Awesome
You might be thinking, "Wooden bins? That's a bit old-fashioned, isn't it?" But hold on! Wooden storage bins are anything but old-fashioned. In fact, they offer a unique combination of benefits that make them a top choice for tool organization:
- Durable and Long-Lasting: Made from solid wood, these bins are built to last. They can withstand the wear and tear of everyday use, ensuring your tools are protected and your investment lasts.
- Natural and Eco-Friendly: Opting for wooden storage bins aligns with a more sustainable lifestyle. They are made from renewable resources and offer a natural, timeless aesthetic.
- Versatile and Customizable: Wooden bins come in various sizes and styles, making it easy to find the perfect fit for your specific needs. You can even personalize them with paint, stain, or decoupage to match your workspace.
- Adds a Touch of Warmth and Charm: The natural grain and texture of wood bring a touch of warmth and character to any room, creating a welcoming atmosphere that contrasts with the cold, sterile feel of plastic containers.
- Easy to Clean: A quick wipe down with a damp cloth is all it takes to keep your wooden bins looking their best.
Choosing the Right Wooden Storage Bins
Now that you're convinced of the benefits, let's talk about choosing the right wooden storage bins. Here's a breakdown of important factors to consider:
Size and Shape
The size and shape of your wooden storage bins should match the tools and accessories you'll be storing. Consider these questions:
- What are the dimensions of the items you'll be organizing?
- Do you need tall, narrow bins or short, wide ones?
- Will the bins fit comfortably on your shelves or workbench?
Material and Construction
Wood types and construction techniques can influence both the aesthetics and durability of your storage bins. Here are some popular options:
- Pine: Known for its affordability and light color, pine is a good choice for bins that will be painted or stained.
- Oak: A strong and durable hardwood with a beautiful grain pattern, oak is a classic option for storage bins. It can be left natural or stained to highlight its rich tones.
- Cedar: Cedar's aromatic scent and natural insect-repelling properties make it ideal for storing tools or delicate items.
- Plywood: A cost-effective option, plywood is lightweight and offers good strength. It's often used for crafting bins with intricate designs.
Features
Look for features that enhance organization and functionality:
- Dividers or Partitions: These help create smaller compartments within the bin, keeping similar items together and preventing them from getting mixed up.
- Handles or Lids: Handles make it easy to lift and carry the bins, while lids protect the contents from dust and debris.
- Labels: Clearly label your bins to identify the contents at a glance. You can use adhesive labels, chalkboards, or even write directly on the wood with a permanent marker.
Creative Ideas for Organizing with Wooden Storage Bins
Once you've chosen your wooden storage bins, it's time to get creative! Here are some ideas for organizing your small tools and accessories:
- Sort by Tool Type: Dedicate separate bins for screwdrivers, wrenches, pliers, hammers, and other common tool categories.
- Group by Project: If you work on a variety of projects, create bins for each project type. For example, you could have a bin for electrical work, another for plumbing repairs, and another for woodworking tasks.
- Organize by Size: Keep small tools and accessories in separate bins from larger tools. This helps you quickly find what you need without having to sift through a large pile.
- Use Inserts and Trays: Add inserts or trays inside your bins to further divide and organize your tools. You can find ready-made options or create your own using foam, felt, or even cardboard.
- Stack and Label: Stack your wooden storage bins on shelves or workbenches to maximize space. Label each bin clearly to identify its contents.
- Mount on a Wall: Mount your wooden storage bins on a wall to free up valuable counter space. This is especially helpful in smaller workspaces.
- Create a Mobile Workstation: Combine your wooden storage bins with a rolling cart to create a mobile workstation that can be moved around easily.
Where to Buy Wooden Storage Bins
Wooden storage bins are widely available at various retailers, both online and in-store. Here are some popular options:
- Home Improvement Stores: Stores like Home Depot, Lowe's, and Menards often carry a selection of wooden storage bins in various sizes and styles.
- Craft Stores: Michaels, Hobby Lobby, and Joann Fabrics offer a variety of wooden storage bins, including those designed for organizing craft supplies.
- Online Marketplaces: Amazon, Etsy, and eBay offer a vast selection of wooden storage bins, from simple and affordable to handcrafted and unique.
- Local Artisan Shops: Consider supporting local artisans by purchasing handmade wooden storage bins. They may offer custom designs and finishes tailored to your specific needs.
Conclusion
Wooden storage bins are a practical and stylish way to organize your small tools and accessories. They offer a combination of durability, eco-friendliness, versatility, and charm that's hard to beat. By choosing the right size, shape, material, and features, you can create a system that keeps your tools organized, accessible, and protected.
So, say goodbye to cluttered workspaces and embrace the power of wooden storage bins! You'll be amazed at how much easier it is to find the right tool for the job when everything has its place.
Commonly Asked Questions
Are Wooden Storage Bins Durable?
Yes, wooden storage bins are quite durable, especially if they're made from solid hardwoods like oak or cedar. However, it's important to choose bins from reputable manufacturers and handle them with care to avoid damage.
How Do I Clean Wooden Storage Bins?
Cleaning wooden storage bins is simple. Just wipe them down with a damp cloth and mild soap. Avoid using harsh cleaners or abrasives that could damage the wood.
Can I Customize My Wooden Storage Bins?
Absolutely! Wooden storage bins are highly customizable. You can paint, stain, or decoupage them to match your workspace or personal style. You can also add labels, handles, or dividers to enhance their functionality.
Where Can I Find Unique Wooden Storage Bins?
For unique wooden storage bins, try browsing local artisan shops or online marketplaces like Etsy. These platforms often feature handcrafted bins with unique designs and finishes.