Friday, August 30, 2024
Easy Handmade Wood Gifts for Craft Markets

Easy Handmade Wood Gifts for Craft Markets
Craft markets are a fantastic way to connect with customers, showcase your skills, and earn some extra income. If you're looking for easy-to-make and popular wood gifts, you've come to the right place. This article will guide you through several simple yet beautiful wood projects that will entice buyers at your next market.
Simple Wood Ornaments
Ornaments are a classic choice for craft markets, offering a variety of designs and personalization options. Begin by sourcing affordable wooden blanks from your local craft store. These blanks come in various shapes, including circles, stars, hearts, and even animal silhouettes.
Crafting Your Ornaments
Once you have your blanks, you can unleash your creativity! Here are a few simple techniques for embellishing your ornaments:
- Paint them: Choose vibrant acrylic paints or metallics for a festive look. Add details like dots, stripes, or geometric patterns for a unique touch.
- Decorate with decoupage: Cut out interesting images from magazines, newspapers, or even fabric scraps. Adhere them to your wooden blank with decoupage glue or Mod Podge, adding a layer of varnish for a protective seal.
- Engrave them: If you have a woodburning tool, you can create intricate designs, initials, or even heartfelt messages on your ornaments.
Personalized Wooden Coasters
Everyone needs coasters, and personalized ones make a thoughtful and practical gift. You can use scrap wood to create simple square or circular coasters. For a touch of elegance, use wood slices for a rustic charm.
Finishing Touches for Coasters
After sanding your coaster blanks, you can personalize them in various ways:
- Paint them: Choose a color palette that matches your target audience's taste. You can create solid color coasters or use stencils for geometric patterns.
- Burn them: Using a woodburning tool, you can create unique designs or personalize them with initials or meaningful words.
- Add epoxy resin: For a modern and eye-catching look, pour a thin layer of epoxy resin over your coaster blank. You can incorporate dried flowers, glitter, or even small shells for added dimension.
Rustic Wooden Keychains
Keychains are always in demand, and wooden ones offer a unique and handcrafted touch. You can use small wood scraps, wooden beads, or even leftover pieces from other projects to create these charming accessories.
Creating Your Keychains
To assemble your keychains, you'll need a few essential tools:
- Drill: Create a hole at the top of your wooden piece for attaching the keychain ring.
- Keychain rings: These are readily available at most craft stores.
- Sandpaper: Smooth the edges of your wooden pieces and create a polished finish.
- Optional: Consider adding a decorative element, such as a small metal tag or a painted detail to enhance your design.
Tips for Success at Craft Markets
To ensure a successful craft market experience, consider the following tips:
- Pricing: Determine your costs for materials and labor, and set prices that are competitive but also reflect the value of your handcrafted creations.
- Presentation: Display your products attractively and neatly. Use eye-catching signage and lighting to highlight your wares.
- Marketing: Share your event participation on social media and promote your booth through local flyers or online platforms.
- Customer interaction: Be friendly and engaging with customers. Answer their questions, offer personalized recommendations, and create a memorable experience.
By embracing these easy-to-make wood projects and following the tips for success at craft markets, you're well on your way to a rewarding and profitable experience. Remember to have fun, showcase your creativity, and connect with your customers!
Monday, August 26, 2024
Wooden Project Ideas for Organizing and Decluttering Your Space

Transform Your Space with Wooden Organizing Projects
Tired of clutter taking over your home? Embrace the warmth and functionality of wood to create unique and personalized storage solutions. From stylish shelving units to clever drawer organizers, these DIY projects will help you reclaim your space and bring order to your belongings.
Reclaimed Wood Shelves: Rustic Charm Meets Practicality
Give old wood a new lease on life by turning it into beautiful and functional shelves. Search for salvaged planks, repurposed pallets, or even old furniture pieces to create a one-of-a-kind shelving unit that adds a rustic touch to any room. You can use simple brackets or build your own custom supports from reclaimed wood. Paint or stain the shelves to match your decor, and arrange your books, plants, or decorative items for a curated look.
Tips for Creating Reclaimed Wood Shelves:
- Sand the wood thoroughly to remove any rough edges or splinters.
- Apply a wood sealant or finish to protect the wood and enhance its natural beauty.
- Use heavy-duty brackets for supporting heavier items on the shelves.
- Mix and match different wood textures and colors for a unique and eclectic look.
DIY Wooden Drawer Organizers: Taming the Chaos Within
Small drawers often become dumping grounds for miscellaneous items. Take control by crafting your own wooden drawer organizers! Choose a wood type that complements your existing furniture, and use a jigsaw or table saw to cut the wood into desired sizes. You can create compartments for socks, underwear, jewelry, or any other small items that need a designated space.
Personalize Your Drawer Organizers:
- Divide the drawer into sections using wooden dividers or partitions.
- Add labels to the compartments for easy identification of stored items.
- Line the drawer with felt or fabric to create a soft and luxurious feel.
- Use small containers, boxes, or trays within the compartments for further organization.
Wooden Crate Storage: Versatile and Stylish
Wooden crates offer a versatile and charming storage solution for various spaces. Stack them to create a unique bookshelf, use them as decorative containers for blankets or toys, or even convert them into a cozy plant stand. Paint or stain the crates to match your existing decor, and personalize them with stencils, decals, or handles for a unique touch.
Creative Uses for Wooden Crates:
- Create a tiered display stand for plants by stacking crates of varying sizes.
- Build a sturdy coffee table by attaching four crates to a tabletop.
- Utilize crates as storage bins for tools, crafting supplies, or seasonal items.
- Transform a crate into a decorative magazine rack by adding a simple shelf on the front.
Wooden Wall Storage: Maximizing Vertical Space
Maximize wall space and keep your belongings off the floor with stylish wooden wall storage solutions. Build a simple pegboard system using reclaimed wood, or craft individual shelves, hooks, and cubbies for different needs. You can create dedicated storage for tools, jewelry, kitchen utensils, or any other items you want to keep organized and within easy reach.
Ideas for Wooden Wall Storage:
- Install a wooden coat rack with hooks for hanging jackets, hats, and bags.
- Create a floating shelf system for displaying books, photos, or decorative items.
- Use wooden baskets or boxes hung on the wall for storing yarn, crafting supplies, or toys.
- Install a wooden spice rack on the wall to keep your kitchen spices organized.
These are just a few ideas to get you started on your wooden organizing journey. Remember, the possibilities are endless with a little creativity and the warmth of wood. Get inspired, gather your materials, and start creating your own personalized storage solutions that will help you reclaim your space and live a more organized life.
Sunday, August 25, 2024
Make a DIY Rustic Wine Rack for Your Kitchen
:max_bytes(150000):strip_icc()/GettyImages-1151134767-2e127add415d4a95beedf3d3604e8cb6.jpg)
A Comprehensive Guide to Constructing a Rustic Wine Rack for Your Kitchen
This document provides a detailed, step-by-step guide for crafting a rustic wine rack suitable for home use. The project is designed to be achievable for individuals with moderate DIY skills, emphasizing the use of readily available materials and straightforward techniques to achieve a visually appealing and functional result.
I. Planning and Material Selection
Before commencing construction, careful planning is crucial to ensure a successful outcome. This phase involves determining the desired dimensions of the wine rack, selecting appropriate materials, and acquiring the necessary tools.
A. Determining Dimensions and Capacity
The dimensions of your wine rack will be primarily determined by the available space in your kitchen and the number of wine bottles you intend to store. Consider measuring the area where you plan to place the rack to ensure a proper fit. A practical approach is to begin by estimating the number of bottles you wish to accommodate. This will directly influence the rack's length and width. Standard wine bottles typically occupy approximately 3.5 inches of horizontal space. Therefore, a rack designed for 12 bottles would require approximately 42 inches of length (12 bottles x 3.5 inches/bottle). The depth of the rack should allow for the comfortable placement of the bottles without overcrowding.
B. Material Selection: Embracing Rustic Aesthetics
The choice of materials is vital in achieving the desired rustic aesthetic. Popular options include reclaimed wood, cedar, or pine. Reclaimed wood offers a unique character and contributes to a sustainable approach to construction. Cedar provides natural insect and decay resistance, enhancing the longevity of your wine rack. Pine, while less durable, is readily available and relatively inexpensive, making it a suitable option for beginners. Regardless of your chosen wood type, ensure it is properly seasoned and free from significant cracks or knots that could compromise structural integrity.
C. Essential Tools and Equipment
Gathering the necessary tools beforehand streamlines the construction process. You will require:
- Measuring tape
- Pencil
- Circular saw or hand saw
- Drill with various drill bits
- Screwdriver (Phillips head recommended)
- Wood glue
- Clamps
- Sandpaper (various grits)
- Safety glasses
- Wood stain or paint (optional)
- Level
- Wood screws (appropriate size and length for chosen wood)
II. Construction: A Step-by-Step Guide
This section details the step-by-step construction process, emphasizing precision and attention to detail. The specific dimensions and techniques can be adapted based on your design preferences and the chosen materials.
A. Cutting the Wood
Begin by accurately cutting the wood according to your pre-determined dimensions. For a simple rack design, you will likely require several vertical supports and horizontal shelves. Ensure the cuts are precise and perpendicular to maintain structural integrity. Use a circular saw for cleaner cuts, especially for longer lengths. For hand sawing, utilize a fine-toothed saw and a guide to maintain straightness.
B. Assembling the Frame
The frame of the wine rack serves as the foundation for the shelving. For a robust structure, consider using wood glue in conjunction with screws. Apply a thin bead of wood glue to the joining surfaces and securely clamp the pieces together while the glue sets. Once the glue has sufficiently dried (refer to the manufacturer's instructions), carefully drill pilot holes to prevent wood splitting during screw insertion. Then, drive the screws into place to create a strong and stable frame.
C. Installing the Shelves
Once the frame is assembled, install the shelves. Position the shelves evenly spaced to accommodate your wine bottles. Use wood glue and screws to attach the shelves to the frame, ensuring they are level and securely fastened. Take care to maintain consistent spacing between shelves for uniform bottle placement.
D. Sanding and Finishing
After assembling the wine rack, thoroughly sand all surfaces using progressively finer grits of sandpaper. This process removes any splinters or rough edges, creating a smooth, polished finish. Begin with a coarser grit to remove significant imperfections and gradually transition to finer grits for a flawless surface. Clean away all sawdust before proceeding to the finishing stage.
E. Staining or Painting (Optional)
Applying a stain or paint is an optional step that enhances the visual appeal of your wine rack. A wood stain accentuates the natural grain of the wood, while paint provides a more uniform color. Follow the manufacturer's instructions for application. Allow sufficient drying time before handling or placing wine bottles on the rack.
III. Installation and Maintenance
Proper installation and regular maintenance are crucial for the longevity of your wine rack.
A. Secure Mounting
Securely mount the wine rack to the wall using appropriate hardware. The choice of mounting hardware depends on your wall type (drywall, plaster, brick, etc.) and the weight of the assembled rack. Consult a hardware specialist if unsure about the best mounting options for your situation. Ensure the rack is properly leveled before permanently securing it.
B. Regular Cleaning
Regular cleaning helps prevent the accumulation of dust and spills. Wipe down the surfaces of the wine rack with a damp cloth and mild detergent as needed. Avoid using abrasive cleaners or excessive moisture, as these can damage the wood.
C. Addressing Potential Issues
Periodically inspect the wine rack for any signs of damage or loose screws. Tighten any loose screws and address any minor damage promptly to prevent further deterioration. If significant damage occurs, consult a carpenter or furniture repair specialist.
By meticulously following these instructions, you can successfully construct a functional and aesthetically pleasing rustic wine rack, adding a touch of charm and practicality to your kitchen.
Saturday, August 24, 2024
Quick and Easy Wood Project Ideas for Busy Crafters

Quick and Easy Wood Project Ideas for Busy Crafters
Are you looking for some fun and creative wood projects that won't take up too much of your precious time? You've come to the right place! Whether you're a seasoned woodworker or just starting out, these simple projects are perfect for busy crafters who want to unleash their creativity without spending hours in the workshop.
Simple & Stylish Coasters
Start with a basic, yet essential project: coasters! Choose your favorite wood species, cut squares or circles, sand them smooth, and apply a protective finish. Get creative with stain colors or add a personal touch with laser engraving. You'll have beautiful and functional coasters in no time.
Tips for Making Coasters
- Use a jigsaw or scroll saw to cut out intricate shapes.
- Experiment with different wood species to create unique textures and colors.
- Add a layer of cork to the bottom for extra protection and grip.
Charming Wooden Signs
Wooden signs are a versatile and delightful way to add personality to your home or give a thoughtful gift. Simply cut a piece of wood into the desired shape, sand it down, and paint or stain it. Add a personal message, a funny quote, or a beautiful design using stencils, freehand painting, or even woodburning.
Ideas for Wooden Signs
- Create a welcome sign for your front door.
- Make a motivational quote sign for your home office.
- Design a personalized sign for a friend's birthday or housewarming.
Rustic & Functional Shelves
Put your woodworking skills to use by crafting simple shelves! Choose wood boards that match your decor and cut them to the desired size. Attach them to brackets or create your own brackets from scrap wood. These shelves are ideal for displaying books, plants, or decorative items.
Enhance Your Shelves
- Use reclaimed wood for an eco-friendly and unique touch.
- Add a touch of color with paint or stain.
- Create floating shelves for a minimalist and modern look.
Personalized Photo Frames
Capture those precious memories in beautiful wooden photo frames! Cut out rectangles or squares from plywood or scrap wood, sand them smooth, and add a decorative touch with paint, stain, or woodburning. Attach a backing board and a glass or acrylic panel to complete your frames.
Make Your Frames Unique
- Use reclaimed wood for a vintage vibe.
- Incorporate contrasting wood species for visual interest.
- Add a personal touch with laser-engraved designs or family initials.
Enjoy Your Woodworking Journey
These quick and easy wood projects are just a starting point! Let your creativity flow and experiment with different techniques and designs. You'll find endless possibilities for crafting unique and functional pieces that you'll love for years to come. Happy woodworking!
How to Start Woodworking as a Beginner: Tips and Easy Projects
Embarking on the Journey of Woodworking: A Beginner's Guide
Woodworking, the art and craft of shaping wood to create functional or decorative objects, offers a rewarding path for individuals seeking creative expression and tangible results. While the craft may seem daunting to newcomers, with careful planning and a methodical approach, beginners can quickly achieve satisfying outcomes. This comprehensive guide provides a structured approach to initiating a woodworking journey, covering essential tools, safety precautions, and a curated selection of simple projects ideal for novice woodworkers.
Essential Tools and Equipment for the Aspiring Woodworker
Commencing a woodworking endeavor necessitates a carefully considered collection of tools. While an exhaustive arsenal isn't necessary initially, investing in high-quality, foundational tools will significantly enhance both safety and the quality of your projects. Avoid purchasing cheap, poorly made tools; they often lead to frustration and safety risks.
Fundamental Hand Tools
A basic selection of hand tools forms the bedrock of any woodworking workshop. These are invaluable for both small-scale projects and for refining details in larger undertakings. Essential hand tools include:
- Measuring Tape: Accurate measurements are paramount in woodworking. A reliable tape measure is indispensable.
- Pencil: Use a sharp pencil for precise marking on your wood.
- Combination Square: This tool facilitates accurate marking of right angles and measurements.
- Hand Saw: A good quality hand saw is crucial for cutting wood to size; consider a tenon saw for finer work.
- Chisels: A set of chisels in various sizes aids in shaping and cleaning up cuts.
- Mallet: Used for striking chisels and other tools without damaging their handles.
- Clamp(s): Essential for securely holding pieces together during assembly and gluing.
- Safety Glasses: Always protect your eyes.
Power Tools: A Gradual Introduction
Power tools significantly expand the capabilities of a woodworker. However, it's advisable to start with a limited selection and to prioritize safety training before using them. Consider the following:
- Jigsaw: Excellent for cutting curves and intricate shapes.
- Random Orbital Sander: For smoothing surfaces and achieving a fine finish.
- Drill: Essential for creating holes of various sizes for dowels, screws, or other fasteners. A cordless drill offers greater maneuverability.
It's crucial to research each tool thoroughly, understanding its functionality and safety protocols before use. Consider taking a woodworking class or watching instructional videos to familiarize yourself with the proper techniques and safety measures.
Prioritizing Safety in Your Woodworking Endeavors
Safety should always be the paramount consideration when working with wood and tools. Even seemingly innocuous tasks can pose risks if proper safety precautions are not taken.
Essential Safety Practices
- Eye Protection: Always wear safety glasses or a face shield. Wood chips, sawdust, and tool fragments can cause serious eye injuries.
- Hearing Protection: Power tools can generate considerable noise. Ear protection is crucial to prevent hearing damage.
- Dust Collection: Woodworking produces dust, some of which can be hazardous to your health. Employ dust collection systems whenever possible.
- Proper Tool Use: Always use tools according to their intended purpose and manufacturer's instructions. Avoid using tools you are unfamiliar with.
- Work Area Organization: Maintain a clean and organized workspace. Clutter can lead to accidents.
- Sharp Tools: Sharp tools are safer tools. Dull tools require more force, increasing the risk of injury.
- First Aid Kit: Maintain a readily accessible first aid kit for minor injuries.
Beginner-Friendly Woodworking Projects
Starting with simple projects builds confidence and familiarity with woodworking techniques. These projects require minimal tools and materials, making them ideal for beginners.
The Simple Shelf
A straightforward shelf is an excellent introductory project. This project teaches basic measuring, cutting, and assembly techniques. Choose a readily available wood like pine, and use simple joinery methods like butt joints reinforced with wood glue and screws.
A Wooden Coasters Set
Crafting a set of coasters involves cutting small squares or circles from wood. Sanding and finishing are important aspects of this project, providing an opportunity to practice these techniques. Consider using various wood types or adding decorative elements for a personalized touch.
Basic Wooden Box
Constructing a small wooden box introduces techniques like miter cuts and basic joinery. This project teaches the importance of accurate measuring and precise cutting. Simple rabbet joints or dowel joints can be used for assembly.
Keychain
A small keychain is a quick and simple project that is perfect for testing out different finishing techniques and practicing precise cuts. This can be a good project to practice inlay techniques as well.
Expanding Your Woodworking Skills
As your skills and confidence grow, consider branching out into more complex projects. Explore different wood types, joinery techniques, and finishing methods. Online resources, books, and woodworking classes offer invaluable learning opportunities.
Advanced Techniques
Once you've mastered the basics, you can explore more advanced techniques such as:
- Dovetail Joints: A strong and aesthetically pleasing joinery method.
- Mortise and Tenon Joints: Another strong and versatile joinery technique.
- Wood Turning: Shaping wood on a lathe to create round objects.
- Wood Carving: Sculpting wood using chisels and other carving tools.
Remember that patience and perseverance are key to success in woodworking. Don't be discouraged by initial challenges. Embrace the learning process, and enjoy the satisfaction of creating something beautiful and functional with your own hands.
Thursday, August 22, 2024
How to Add Storage Features to Wooden Plant Stands for Extra Value

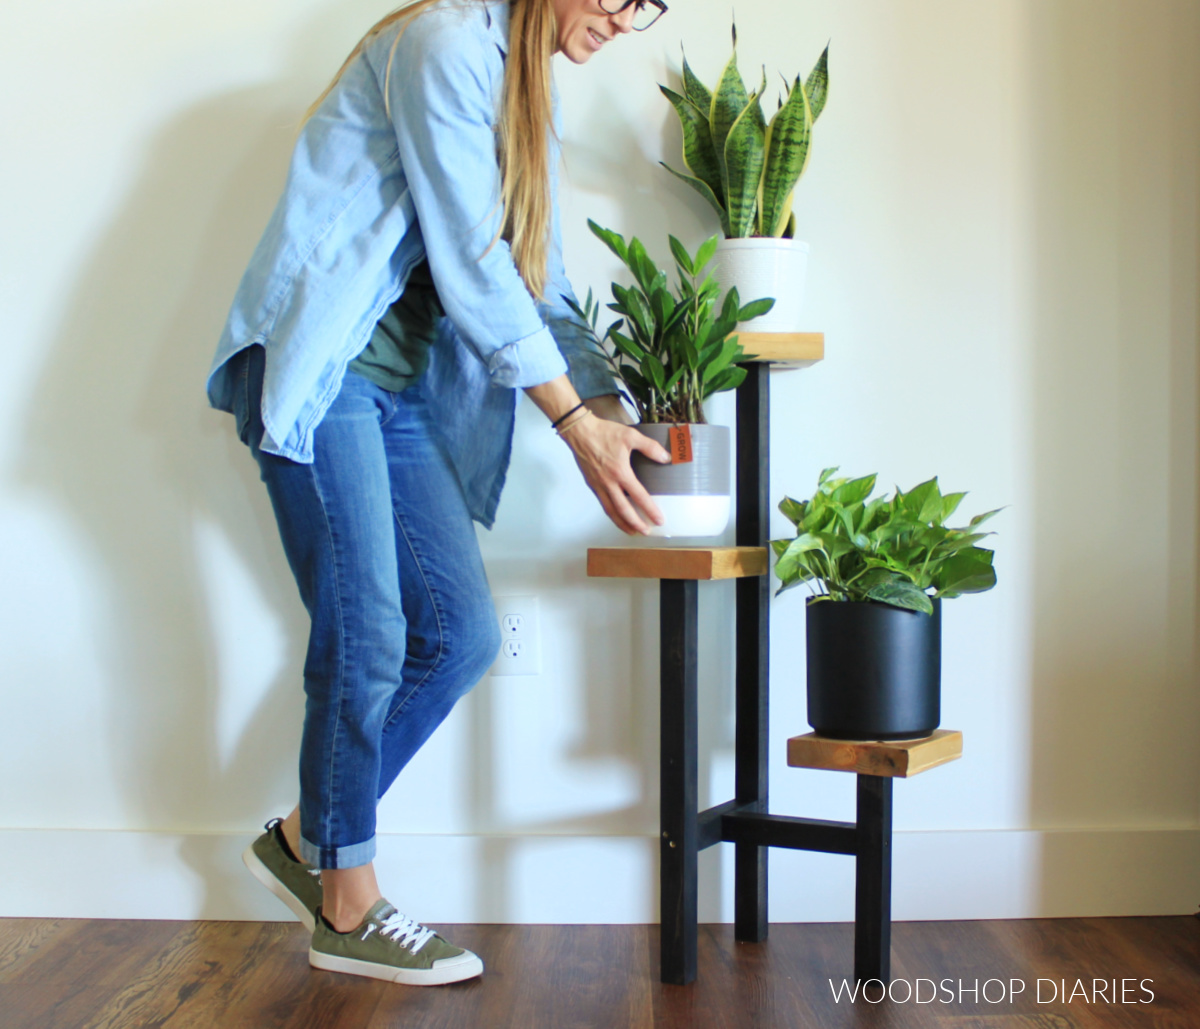
Add Storage Features to Wooden Plant Stands for Extra Value
Transforming basic wooden plant stands into versatile storage solutions adds significant value and functionality. By incorporating clever storage features, you can create pieces that not only display plants but also provide practical storage for various items, enhancing their appeal to a wider audience.
Incorporate Drawers
Adding drawers to your plant stands provides a concealed storage space for tools, gardening gloves, seed packets, or even small potted plants. You can integrate shallow drawers into the base of the stand for easy access or utilize the space beneath the plant shelf for deeper drawers.
Drawer Types and Considerations
- Sliding Drawers: These offer smooth and convenient access to stored items. Consider using soft-close drawer slides for a premium feel.
- Pull-Out Drawers: Perfect for wider spaces, pull-out drawers provide maximum storage capacity and allow for easy retrieval of larger items.
- Drawer Material: Opt for wood that complements the plant stand's design, ensuring durability and a cohesive aesthetic.
Utilize Open Shelves
Open shelves provide a stylish and functional way to display smaller plants, gardening books, decorative items, or even tools. These shelves can be positioned below the plant shelf or incorporated into the stand's structure as a tiered design.
Shelf Design Considerations
- Shelf Depth: Consider the size of the items you plan to store on the shelves and choose a suitable depth accordingly.
- Shelf Material: Select wood that matches the plant stand's style and ensure it is sturdy enough to support the items you intend to place on it.
- Shelf Height: Vary shelf heights to create visual interest and accommodate items of different sizes.
Incorporate a Basket or Bin
Attaching a basket or bin to the plant stand adds instant storage and a rustic charm. These can be made from natural materials like wicker or woven seagrass, creating a farmhouse aesthetic.
Basket or Bin Placement and Considerations
- Placement: Place the basket or bin underneath the plant shelf for easy access and a clean, organized look.
- Size and Material: Choose a size that complements the plant stand and a material that matches your desired style.
- Functionality: Consider the items you intend to store in the basket or bin and select one that provides adequate space and accessibility.
Create a Hidden Compartment
For a touch of secrecy and practicality, design a hidden compartment within the plant stand. This can be accessed through a discreet door or a lift-up panel. Perfect for storing valuable items or tools that you prefer to keep out of sight.
Compartment Considerations
- Placement: Choose a location that is both easily accessible and discreet, such as the base of the stand or behind a decorative panel.
- Size: Determine the size of the compartment based on the items you intend to store and ensure it is large enough to comfortably accommodate them.
- Security: Consider adding a lock or latch to the compartment if you are storing valuable items.
By incorporating these storage features, you can transform ordinary wooden plant stands into extraordinary pieces that offer both style and functionality. This added value will enhance their appeal to customers and create a more desirable product that caters to a wider range of needs.
Sunday, August 18, 2024
How to Create a Wooden Advent Calendar for Christmas

Craft a Magical Christmas with a DIY Wooden Advent Calendar
Unleash your inner craftsman and create a heartwarming, personalized Advent calendar that will become a cherished family tradition for years to come. Building a wooden Advent calendar allows you to express your creativity, choose the perfect size and design, and personalize it with special touches that make it truly unique. It's a wonderful project to embark on with family or friends, spreading holiday cheer while enjoying the process.
Planning Your Advent Calendar
Before diving into the construction, take some time to visualize your dream Advent calendar. Consider the following factors:
Size and Shape
Will it be a compact countertop design, a grand wall-mounted piece, or something in between? Consider the space you have and the overall aesthetic you're aiming for. Popular shapes include traditional houses, Christmas trees, snowflakes, or even a whimsical Santa's sleigh.
Number of Doors
The classic Advent calendar has 24 doors, one for each day leading up to Christmas. You can adapt this to suit your needs, creating a shorter countdown or incorporating special events into the calendar.
Materials
Wooden planks, plywood, or even reclaimed wood offer versatility and charm. Choose materials that complement your design and align with your budget.
Design Elements
Think about details that will bring your vision to life. Will you add decorative trim, paint it in festive colors, or incorporate personalized touches like family names or initials?
Gathering Your Supplies
With your design in mind, gather the essential materials and tools to bring your wooden Advent calendar to life:
- Wood of your choice (planks, plywood, or reclaimed wood)
- Saw (circular, jigsaw, or hand saw)
- Measuring tape
- Pencil or marker
- Drill with appropriate drill bits
- Screws or nails
- Sandpaper (various grits)
- Paint or stain (optional)
- Brushes or paint rollers
- Small hinges (24 for a traditional calendar)
- Small boxes, bags, or envelopes for treats
- Decorative elements (trim, buttons, ribbons, etc.)
Building Your Advent Calendar
Now, let's build that magical calendar! Here's a step-by-step guide:
1. Cut the Base and Doors
Using your chosen wood and design plans, cut out the base of the calendar. Next, carefully measure and cut out the individual doors. Aim for consistent size and shape for a polished look.
2. Shape and Sand
Smooth the edges and corners of your base and doors using sandpaper. This ensures a safe and comfortable finish. You can also use a router to create decorative edges if desired.
3. Mark and Drill Door Holes
On the back of the base, mark where you want your doors to be positioned. Using your drill, create holes for attaching the hinges. Be sure to make the holes slightly smaller than the screw size for a snug fit.
4. Attach Hinges
Attach the hinges to both the base and the doors. Ensure they are positioned evenly and securely. Use a screwdriver to tighten the screws.
5. Assemble the Calendar
Now, carefully position the doors on the base, attaching them to the hinges. Ensure they open and close smoothly.
6. Paint or Stain (Optional)
This is your chance to add a personal touch! Paint or stain your calendar in colors that reflect your style and the holiday spirit. Let it dry completely before proceeding.
7. Add Decorative Touches
Embellish your calendar with trim, buttons, ribbon, or other decorative elements. Let your creativity guide you!
8. Create Number Labels
Using numbers, letters, or even small images, create labels for each door, representing the days of December leading up to Christmas. Attach them to the doors in a way that suits your design.
Filling Your Advent Calendar
With your wooden masterpiece complete, it's time to fill it with holiday cheer! Choose small treats, toys, activities, or personalized notes to put behind each door. Let your imagination run wild as you create a countdown to Christmas that will spark joy and anticipation.
Cherishing Your Creation
Your handmade wooden Advent calendar is more than just a countdown to Christmas; it's a symbol of love, creativity, and cherished family traditions. Year after year, it will evoke warm memories of the holiday season and the joy of crafting together. So, gather your loved ones, unleash your creativity, and create a magical Christmas with a DIY wooden Advent calendar that will be treasured for years to come.
Saturday, August 17, 2024
How to Make Floating Shelves with Customizable Features

How to Make Floating Shelves with Customizable Features
Hey there, DIY enthusiasts! Floating shelves are all the rage these days, and for good reason. They look sleek and modern, and they're a great way to add storage and personality to any room. But let's be honest, buying pre-made floating shelves can get expensive, and they might not always fit your exact needs. That's where the magic of DIY comes in!
In this guide, we'll walk you through the process of making your own customizable floating shelves. You'll learn how to choose the right materials, cut them to size, and assemble your masterpiece. Plus, we'll explore some fun and functional features you can incorporate to make your shelves truly unique.
Choosing the Right Materials
The first step in building any project is selecting the right materials. For floating shelves, you'll need:
Shelf Boards
- Wood: This is the most popular choice for floating shelves, offering a variety of options like pine, oak, maple, or even reclaimed wood.
- MDF (Medium-density fiberboard): A budget-friendly option that's smooth and easy to work with. However, it's not as durable as wood.
- Plywood: Strong and stable, plywood is a great choice for heavier items.
- Metal: For a modern look, consider using metal sheets like aluminum or steel.
When choosing your shelf board material, think about the style you're going for and the weight of the items you'll be storing.
Brackets
- Metal Brackets: These are the most common type of bracket used for floating shelves. They come in a wide variety of styles, colors, and finishes.
- Wooden Brackets: For a rustic or minimalist look, you can use wooden brackets.
- Invisible Brackets: If you want a truly minimalist look, you can opt for invisible brackets that are hidden behind the shelf board.
Choose brackets that are strong enough to support the weight of your shelves and the items you'll be storing.
Additional Materials
- Wood Glue: Used for attaching the brackets to the shelf board.
- Wood Screws: For securing the brackets to the wall and the shelf board to the brackets.
- Sandpaper: For smoothing out any rough edges on your shelf board.
- Wood Stain or Paint: To give your shelves a desired finish.
- Level: To ensure your shelves are straight.
- Measuring Tape: For accurately measuring your shelf board and bracket placement.
- Pencil: For marking where to cut your shelf board and where to drill pilot holes.
Designing Your Customizable Features
Now it's time to get creative! Here are some ideas for adding customizable features to your floating shelves:
Built-in Storage
- Hidden Compartments: Create secret storage areas within your shelves using a smaller piece of wood as a divider.
- Open Shelving: If you want easy access to your belongings, build a multi-tiered shelving system with multiple open shelves.
- Drawers: Add drawers to the bottom of your shelves for storing smaller items.
Unique Shapes and Sizes
- Curved Shelves: Give your shelves a more organic feel by using a template to create curved edges.
- Asymmetrical Shelves: Play with different widths and depths to create interesting visual effects.
- Geometric Shelves: For a modern look, consider using triangular or hexagonal shapes.
Lighting
- LED Strip Lights: Add a touch of ambiance by embedding LED strip lights beneath your shelves.
- Pendant Lights: For a statement piece, hang pendant lights above your shelves.
Finishing Touches
- Decorative Hardware: Use unique knobs, pulls, or brackets to add personality.
- Custom Stencils: Create personalized designs using stencils and paint.
- Wallpaper: Cover the back of your shelves with wallpaper for a fun and unexpected accent.
Building Your Floating Shelves
Let's get down to the nitty-gritty of building your shelves. Here's a step-by-step guide:
1. Measure and Cut
- Decide on the dimensions of your shelves: Consider the space you have available and the size of the items you'll be storing.
- Measure your shelf board: Use a measuring tape to determine the length and width of your shelves.
- Mark your cuts: Use a pencil to mark where you'll need to cut your shelf board.
- Cut your shelf board: Use a saw to carefully cut your shelf board according to your measurements.
- Sand the edges: Use sandpaper to smooth out any rough edges on your shelf board.
2. Attach the Brackets
- Determine the placement of your brackets: Consider the weight of the items you'll be storing and how far apart you want your shelves to be.
- Mark the bracket positions: Use a pencil to mark where you'll attach your brackets to the shelf board.
- Apply wood glue: Apply a thin layer of wood glue to the back of the brackets.
- Secure the brackets: Use screws to attach the brackets to the shelf board.
3. Mount the Shelves
- Find studs: Locate the studs in your wall using a stud finder.
- Mark the bracket positions: Use a pencil to mark where you'll attach the brackets to the wall.
- Pre-drill pilot holes: Use a drill bit to pre-drill pilot holes in the wall where you'll be attaching the brackets. This will help prevent the wood from splitting.
- Secure the brackets: Use screws to attach the brackets to the wall. Make sure the brackets are level.
- Attach the shelves: Carefully lift your shelves and hang them on the brackets.
4. Finishing Touches
- Apply a finish: Stain or paint your shelves to your desired color.
- Add decorative hardware: Attach any knobs, pulls, or brackets to complete the look.
- Decorate your shelves: Arrange your belongings and add any decorative elements to personalize your shelves.
Commonly Asked Questions
How much weight can floating shelves hold?
The weight capacity of your floating shelves depends on the materials you use, the type of brackets you choose, and how they are installed. It's always best to err on the side of caution and choose brackets and materials that are rated for the weight you'll be putting on them. Consult the manufacturer's specifications for specific weight capacities.
What if my walls aren't studs?
If you don't have studs in the area where you want to install your shelves, you can use drywall anchors. These anchors expand inside the drywall, providing a secure hold for your screws. Make sure to choose anchors that are appropriate for the weight of your shelves.
How can I make sure my shelves are level?
A level is an essential tool for ensuring that your shelves are straight. Use a level to check the horizontal and vertical alignment of the brackets before you attach them to the wall. If you're attaching multiple shelves, make sure they are all level with each other.
What if I want to add lights to my shelves?
There are a few ways to add lights to your shelves. One popular option is to use LED strip lights. These lights are flexible and can be easily adhered to the underside of your shelves. You can also consider using small pendant lights or recessed lighting.
And there you have it! With a little bit of time and effort, you can create a set of unique and functional floating shelves that perfectly complement your style and add a touch of personality to your home.
Wednesday, August 14, 2024
Popular Wood Toolbox Organizer Ideas for Craft Fairs

Crafting Success: Popular Wood Toolbox Organizers for Craft Fairs
Craft fairs are a fantastic opportunity to showcase your handmade treasures and connect with fellow creatives. To make your booth stand out, consider incorporating functional and visually appealing wood toolbox organizers. These versatile pieces can be customized to hold a wide range of crafting supplies, making them a practical and attractive addition to any craft lover's workspace.
The Allure of Wood Toolbox Organizers
Wood toolbox organizers bring a touch of rustic charm and handcrafted elegance to your craft fair booth. They exude a sense of durability and practicality, appealing to both seasoned crafters and beginners. The natural beauty of wood complements a wide array of crafting styles, making it a versatile material for any organizer.
Versatility for Different Needs
The beauty of wood toolbox organizers lies in their adaptability. You can design them to accommodate various crafting needs, from intricate jewelry making to detailed woodworking projects. Here are a few popular variations to inspire you:
- Jewelry Organizer: A compact toolbox with designated compartments for beads, findings, and tools, keeping your jewelry supplies organized and easily accessible.
- Sewing Organizer: A larger toolbox with pull-out drawers or shelves to store fabric scraps, needles, thread, and other sewing essentials.
- Painting Organizer: A toolbox equipped with removable trays for storing paints, brushes, palettes, and canvases, making your painting setup more manageable.
Crafting Your Success: Tips for Design and Sales
When crafting your wood toolbox organizers for craft fairs, keep these tips in mind:
- Choose the Right Wood: Opt for durable and aesthetically pleasing woods like pine, oak, or maple. Consider using reclaimed wood for a sustainable and unique touch.
- Focus on Functionality: Design compartments, drawers, and shelves that cater to specific crafting needs. Consider adding features like magnetic strips for holding tools or dividers for separating different materials.
- Add Personal Touches: Customize your organizers with laser engraving, hand-painted designs, or stained finishes. Enhance the rustic feel with metal accents or vintage hardware.
- Attract Attention: Display your organizers thoughtfully in your booth. Use clear signage to highlight their functionality and showcase the variety of crafting supplies they can hold. Encourage customers to interact with the organizers by placing sample crafting materials within them.
Boosting Your Sales: Marketing Your Wood Toolbox Organizers
To captivate your target audience at the craft fair, consider these marketing strategies:
- Social Media Buzz: Share photos and videos of your organizers on social media platforms, highlighting their features and showcasing their use in different crafting scenarios.
- Engaging Displays: Create eye-catching displays that demonstrate the versatility of your organizers. Showcase them filled with attractive craft supplies and offer a glimpse into the organized crafting experience they provide.
- Customer Engagement: Offer demonstrations of your organizers in action, showcasing how they can streamline crafting workflows and enhance creativity. Engage customers in conversations about their crafting needs and personalize your recommendations.
By crafting high-quality and visually appealing wood toolbox organizers, you can transform your craft fair booth into a haven for organized crafting enthusiasts. With a little creativity and strategic marketing, you can capture the attention of fellow crafters and make your organizers a sought-after addition to their crafting spaces.
Monday, August 12, 2024
Wooden Home Decor Projects That Sell Fast

Wooden Home Decor Projects That Sell Fast
Are you looking for a creative outlet that can also bring in some extra cash? Woodworking is a fantastic choice, especially when it comes to crafting beautiful and functional home decor items. Not only is woodworking incredibly satisfying, but it also allows you to tap into a market that's always in demand.
The best part? You don't need to be a seasoned craftsman to create woodworking projects that sell like hotcakes. With a little practice, the right tools, and a sprinkle of creativity, you can start building beautiful and unique pieces that will wow your customers.
So, what are some woodworking projects that sell fast? Let's dive in!
Trending Wooden Home Decor Projects
Here's a rundown of some popular woodworking projects that are consistently in high demand:
1. Wooden Signs
Wooden signs are incredibly versatile and can be customized to suit any style or occasion. From simple welcome signs to inspirational quotes and personalized family names, the possibilities are endless! You can experiment with different wood types, finishes, and lettering styles to create unique designs that capture your customers' hearts.
Tips for Success:
- Offer a variety of sizes and shapes to cater to different needs.
- Keep your designs simple and easy to read.
- Use high-quality wood and durable paint or stain for long-lasting appeal.
2. Cutting Boards
Every kitchen needs a trusty cutting board, and handcrafted wooden cutting boards are a huge hit. You can create different sizes, shapes, and even add unique features like juice grooves or handles. Experiment with different wood types like maple, cherry, and walnut to create stunning visual contrasts.
Tips for Success:
- Use food-safe finishes like mineral oil or beeswax to protect the wood.
- Offer personalized engraving options for a special touch.
- Consider creating themed cutting boards for holidays or special occasions.
3. Wooden Coasters
Small but mighty, wooden coasters are a great way to add a touch of warmth and personality to any coffee table or nightstand. You can create sets of coasters in various shapes, sizes, and wood types, and even incorporate decorative elements like epoxy resin or burned designs.
Tips for Success:
- Use a non-slip backing material to prevent coasters from sliding.
- Offer unique designs that complement different interior styles.
- Create gift sets that include coasters and matching trays.
4. Wooden Wall Decor
Add a touch of rustic charm to any room with wooden wall decor. Think shelves, wall clocks, decorative boxes, and even framed pieces of wood with unique textures. You can create beautiful and functional pieces that enhance the ambiance of any space.
Tips for Success:
- Create versatile pieces that can be styled in different ways.
- Focus on quality craftsmanship and attention to detail.
- Offer a range of sizes and styles to suit different tastes.
5. Wooden Jewelry Boxes
For the fashion-forward, wooden jewelry boxes are a practical and elegant way to organize and display their beloved accessories. You can create beautiful and unique boxes using different wood types, finishes, and hardware.
Tips for Success:
- Use high-quality wood that's resistant to scratches and dents.
- Incorporate compartments and drawers for easy organization.
- Offer customization options like engraved initials or personalized designs.
6. Wooden Serving Trays
Wooden serving trays are an essential for entertaining and everyday use. You can create elegant trays in different shapes and sizes, with or without handles. Experiment with different wood types and finishes to create unique and stylish serving trays that will impress your customers.
Tips for Success:
- Use a durable and food-safe finish to protect the wood.
- Add handles for easy carrying and a touch of elegance.
- Offer personalized engraving options for special occasions.
Marketing Your Wooden Home Decor
Now that you've got some awesome woodworking ideas, it's time to think about how to market your creations. Here are some effective strategies to reach your target audience:
1. Online Marketplaces
Platforms like Etsy, Amazon Handmade, and Facebook Marketplace are fantastic for showcasing and selling your handcrafted items. Create a professional shop with high-quality photos and detailed product descriptions to attract buyers.
2. Social Media
Instagram and Pinterest are visual platforms where you can showcase your stunning woodworking creations. Share captivating photos, behind-the-scenes glimpses of your process, and engage with your followers to build a loyal customer base.
3. Local Craft Fairs and Markets
Connect directly with customers by participating in local craft fairs and markets. You'll have the opportunity to interact with potential buyers, showcase your unique creations, and gain valuable feedback.
4. Collaborations
Partnering with other businesses can help you expand your reach and tap into new customer segments. Collaborate with interior designers, home decor shops, or even other crafters to cross-promote each other's products.
Commonly Asked Questions
Here are some frequently asked questions about selling wooden home decor:
1. What type of wood should I use for my projects?
The best wood for your projects will depend on the specific design and your budget. Some popular options include pine, maple, cherry, walnut, and oak. Do your research and experiment to find the wood that works best for you.
2. What tools do I need to get started?
You don't need a massive workshop to get started. A basic set of woodworking tools like a saw, drill, sander, and measuring tools is sufficient for many projects. As you progress, you can invest in more specialized tools.
3. How do I price my wooden home decor items?
When pricing your items, consider your material costs, time spent, and the market value of similar products. Factor in your desired profit margin and research pricing strategies for handmade items.
4. How do I protect my wooden home decor?
Use a durable and food-safe finish for items that will come into contact with food. For other projects, consider using paint, stain, or a clear sealant to protect the wood from moisture, scratches, and fading.
By tapping into the ever-growing demand for handcrafted home decor, you can turn your woodworking skills into a rewarding and profitable business. Remember to focus on quality craftsmanship, unique designs, and effective marketing strategies to attract and retain customers. Happy woodworking!
Saturday, August 10, 2024
How to Create a Vertical Wine Rack for Compact Storage

Transform Your Tiny Space into a Wine Lover's Paradise: Building a Vertical Wine Rack
Craving a stylish and efficient way to store your beloved wine collection but facing limited space? Look no further than a vertical wine rack! This space-saving marvel transforms your unused wall space into a stunning display for your bottles. Plus, building one yourself is easier than you think, even if you're a DIY novice. Let's dive into the steps to create a vertical wine rack that's both practical and aesthetically pleasing.
Planning Your Vertical Wine Rack
Before wielding your tools, spend a little time planning. This ensures your rack fits perfectly in your space and accommodates your collection.
Determine Your Space and Needs
Measure the available wall space you'll dedicate to your wine rack. Consider the width, height, and depth you can comfortably accommodate. Also, assess how many bottles you'll store to choose the right size and number of shelves for your needs.
Choose Your Materials
The beauty of a vertical wine rack lies in its versatility. You can construct it from various materials, each offering a unique look and feel.
- Wood: Offers a classic and warm aesthetic. Consider sturdy hardwoods like oak or maple for durability.
- Metal: Creates a modern and industrial vibe. Opt for materials like steel or wrought iron for a strong and sleek design.
- Acrylic: Provides a contemporary and transparent look, allowing your wine collection to shine.
Consider Your Storage Needs
Think about the types of bottles you'll store. If you have larger bottles, ensure your shelves are wide enough to accommodate them. Also, decide if you want your rack to be fully enclosed or open, based on your preference for displaying your collection.
Gather Your Tools and Materials
Once you've planned your wine rack, assemble the necessary tools and materials.
Essential Tools
- Measuring tape
- Level
- Saw (circular or hand saw)
- Drill
- Screwdriver
- Clamps (for holding pieces together)
- Sandpaper
- Safety glasses and gloves
Materials
- Chosen material (wood, metal, acrylic, etc.)
- Screws or nails
- Wood glue (if using wood)
- Finishing materials (paint, stain, varnish)
- Optional: Wine bottle dividers or supports
Building Your Vertical Wine Rack: Step-by-Step Guide
Now, let's get hands-on and build your vertical wine rack. This guide will focus on a simple wooden rack as an example, but the principles can be adapted to any material you choose.
Step 1: Cutting the Wood
Start by cutting your wood to the desired dimensions. Use a saw and a measuring tape to create precise cuts for the sides, shelves, and base. Ensure all pieces are square and level.
Step 2: Assembling the Sides and Base
Connect the sides of the rack using screws or nails, creating a sturdy frame. Attach the base to the frame at the bottom. Use clamps for extra stability during assembly.
Step 3: Adding the Shelves
Attach the shelves to the sides of the rack using screws or nails. Ensure they are level and spaced according to your desired design. You can choose to create a continuous rack or have a few open spaces for variation.
Step 4: Optional Bottle Dividers
If you want to prevent bottles from rolling, install bottle dividers. These can be made from wood or metal and can be fixed to the shelves. Measure carefully to ensure the dividers are wide enough to secure your bottles.
Step 5: Finishing Touches
Once the construction is complete, sand the rack to smooth out any rough edges. Apply your chosen finish, like paint, stain, or varnish, to enhance the look and protect the wood.
Step 6: Mount the Rack
Use appropriate mounting hardware (screws, anchors) to attach your wine rack to the wall. Choose a sturdy location that can hold the weight of the rack and your wine bottles. Make sure to level the rack before fully securing it.
Adding a Personal Touch to Your Wine Rack
Now that your vertical wine rack is built, personalize it to reflect your style and taste.
- Lighting: Add LED lights to illuminate your wine collection and create an inviting atmosphere.
- Labels: Organize your bottles by vintage, varietal, or region using labels or small chalkboards.
- Decorative Accents: Enhance the look with decorative elements like wine corks, grapevine wreaths, or vintage wine glasses.
Enjoying Your New Wine Rack
Congratulations! You've successfully built a vertical wine rack that's both functional and stylish. Now, sit back, relax, and savor your favorite wine in your newly organized and beautiful space.
Remember, building a wine rack is a personal project. Don't hesitate to adapt these steps to your needs and preferences. Have fun and let your creativity flow while transforming your home into a haven for wine enthusiasts!
Friday, August 9, 2024
Profitable Woodworking Projects You Can Finish Fast
Profitable Woodworking Projects You Can Finish Fast
Hey there, woodworking enthusiasts! Let's talk about projects that are both profitable and quick to complete. Who doesn't love the satisfaction of a finished project, especially when it brings in some extra cash? And if you can do it quickly, well, that's just icing on the cake, right?
We're not talking about mass-producing furniture here, but rather focusing on projects that are manageable, sellable, and won't leave you staring at a half-finished project for weeks on end.
Small & Simple: Easy Wins
Think of things that people need or want, but might not have the time or skills to create themselves. These projects are perfect for beginners and seasoned woodworkers alike.
Cutting Boards
Cutting boards are a classic for a reason: they're practical, versatile, and easy to make. You can go for simple rectangular shapes or get creative with unique designs. Choose beautiful hardwoods like maple, cherry, or walnut to boost their appeal.
Serving Trays
These are fantastic for entertaining or everyday use. A well-made serving tray can be customized with handles, decorative inlays, or even a natural edge finish.
Coasters
Who doesn't love a set of stylish coasters? Coasters can be made from scraps of wood, making them an excellent way to use up leftovers. Get playful with shapes, sizes, and even incorporate different wood types to create unique sets.
Keychains
Keychains are small but mighty when it comes to profit margins. You can use simple shapes, incorporate wood burning designs, or even add small decorative elements like metal rings or charms.
Functional & Fancy: Projects with a Purpose
Think beyond the basics and explore projects that blend practicality with style. These items offer a greater perceived value, which translates into better sales.
Wooden Wall Clocks
Wall clocks are a fantastic way to showcase your woodworking skills. Choose simple designs for beginners or create a statement piece with intricate carvings or unique wood combinations.
Wine Racks
Wine lovers are always looking for stylish ways to store their collections. Wine racks can be simple or elaborate, depending on your skill level. Experiment with different wood species, finishes, and even add bottle stoppers for an extra selling point.
Jewelry Boxes
Handmade jewelry boxes are a cherished gift that people are willing to pay for. Think about incorporating decorative elements like hinges, latches, or even a secret compartment. Use delicate woods like cherry or walnut to enhance the elegance.
Beyond the Basics: Stepping Up Your Game
Ready for more challenging projects that promise higher returns? These ventures require a bit more time and skill, but the payoff is worth the effort.
Small Tables
Coffee tables, end tables, and even small accent tables are popular and profitable projects. Explore various designs, from sleek minimalist styles to rustic farmhouse pieces. Utilize different joinery techniques to showcase your expertise.
Outdoor Furniture
Outdoor furniture is in high demand during warmer months. From simple benches to stylish chairs and tables, the options are endless. Choose durable hardwoods like cedar or teak for longevity and weather resistance.
Custom Wooden Signs
Personalized wooden signs are a popular choice for gifts, home decor, and even business promotions. You can create rustic farmhouse signs, whimsical designs, or even intricate engraved pieces.
Key Strategies for Success
Now that you have a few project ideas in mind, let's talk about strategies to make your woodworking ventures even more profitable:
Pricing for Profit
Accurate pricing is crucial. Factor in the cost of materials, your time, and a reasonable profit margin. Don't be afraid to price your work competitively. Remember, you're selling a handcrafted product, not just the materials.
Marketing & Sales
Don't just build it and hope they come! Get your projects out there! Here are a few ideas:
Consistency & Quality
Maintaining consistent quality is key to building a strong reputation. Use high-quality materials, pay attention to details, and deliver projects that meet or exceed expectations. Positive feedback from satisfied customers will go a long way.
Commonly Asked Questions
Let's address some common questions about woodworking for profit:
How do I find customers?
Start by tapping into your network of friends, family, and colleagues. Attend local craft fairs and markets. Create a strong online presence with engaging photos and descriptions of your work.
What tools do I need to start?
Begin with a basic set of hand tools, such as a saw, hammer, chisels, and a measuring tape. As your projects become more complex, you can gradually invest in power tools like a drill, sander, and table saw. There are many affordable options available online and at local hardware stores.
How do I learn woodworking?
There are countless resources available! Start with online tutorials, books, and woodworking blogs. Consider taking classes at a local community college or woodworking shop. Practice, practice, practice is key!
Where can I get inspiration for projects?
Browse woodworking magazines, online platforms like Pinterest, and even visit local furniture stores and craft shops for ideas. Don't be afraid to put your own creative spin on popular designs.
Remember, woodworking is a skill that takes time and effort to develop. Be patient, persistent, and most importantly, have fun! With a little creativity and hard work, you can turn your passion for woodworking into a rewarding and profitable endeavor.
Wednesday, August 7, 2024
Easy-to-Build Wooden Storage Bins That Are Perfect for Selling

Easy-to-Build Wooden Storage Bins That Are Perfect for Selling
Are you looking for a woodworking project that's both practical and profitable? Look no further than building wooden storage bins! These versatile containers are perfect for organizing just about anything, and they're always in demand. With their simple design and construction, you can craft these bins in your workshop and sell them at local craft fairs, online marketplaces, or even your own shop.
Choosing the Right Wood
The first step to creating quality storage bins is selecting the right wood. You can choose from a variety of options, each offering unique characteristics and pricing.
Pine:
Pine is a softwood, making it easy to work with and affordable. Its natural color adds a touch of warmth to the bins, and it accepts paint and stain well.
Cedar:
Cedar is known for its natural insect-repellent properties and its rich aroma. It's a bit more expensive than pine, but the added benefits make it worth considering, especially for bins intended for storing clothing or other delicate items.
Plywood:
Plywood is a more durable and stable option than solid wood. It's also readily available in various thicknesses, making it ideal for creating sturdy bins.
Essential Tools and Materials
Once you've chosen your wood, gather the following tools and materials:
- Circular saw or table saw
- Measuring tape
- Pencil
- Wood glue
- Clamps
- Sandpaper (various grits)
- Finishing nails or screws
- Wood stain or paint (optional)
- Handles (optional)
Simple Storage Bin Design
For beginners, a basic rectangular bin is a great place to start. Here's a straightforward construction method:
Cutting the Pieces:
1. Cut four pieces of wood for the sides of the bin, ensuring they are all the same length. 2. Cut two pieces for the bottom of the bin, ensuring they are equal in length to the width of the sides.
Assembling the Bin:
1. Apply wood glue to the edges of the side pieces that will form the corners of the bin. 2. Clamp the side pieces together, ensuring they are square. 3. Add wood glue to the edges of the bottom pieces and place them inside the bin, aligning them with the bottom edges of the side pieces. 4. Clamp the bottom pieces in place. 5. Secure the pieces with finishing nails or screws, making sure to countersink them so they are flush with the wood surface.
Finishing Touches:
1. Sand the bin to remove any rough edges or imperfections. 2. Apply wood stain or paint as desired. 3. Attach handles to the sides of the bin if desired.
Variations and Upgrades
Once you've mastered the basic bin, explore these variations:
- Add Dividers: Create separate compartments within the bin by adding vertical pieces of wood. This is useful for organizing small items.
- Make Lidded Bins: Construct a simple lid by cutting a piece of wood to fit the top of the bin. Use hinges to create a hinged lid for added functionality.
- Incorporate Decorative Elements: Get creative with decorative accents like routered edges, wood burning designs, or inlay work to add unique charm and increase your selling price.
- Use Different Shapes: Experiment with different shapes like hexagonal or octagonal bins for a unique visual appeal.
Selling Your Wooden Storage Bins
You've crafted beautiful wooden storage bins; now it's time to market them! Here are some effective ways to sell your creations:
- Local Craft Fairs: Attend local craft fairs and markets to showcase your work directly to potential customers.
- Online Marketplaces: List your bins on online platforms like Etsy, Amazon Handmade, or Facebook Marketplace.
- Your Own Website: Build a website or online shop to showcase your work and sell directly to customers.
- Consignment Shops: Partner with consignment shops that sell handmade goods.
Building and selling wooden storage bins is a rewarding endeavor that allows you to showcase your creativity and earn income. With a little practice and effort, you can craft beautiful and practical storage solutions that will be a hit with customers.
Plant Stand Designs That Will Enhance Any Room and Sell Well
Plant Stand Designs That Will Enhance Any Room and Sell Well
In the world of interior design, plants have become a staple, adding life, color, and a touch of nature to our living spaces. But to truly showcase these leafy beauties, you need the perfect plant stand. A well-designed plant stand isn't just functional; it's an opportunity to elevate your home décor and create a statement piece. To tap into this growing market and capture the attention of plant enthusiasts, it's crucial to offer plant stand designs that are both aesthetically pleasing and practical. This article explores innovative and captivating designs that will enhance any room and sell well.
Embrace the Charm of Rustic Elegance
Rustic plant stands exude warmth and timeless appeal. Think reclaimed wood, salvaged barnwood, and distressed finishes. This look blends seamlessly with farmhouse, bohemian, and industrial aesthetics. To create a stand that sells, consider these details:
Unique Shapes and Silhouettes
- Opt for unconventional shapes like hexagonal or octagonal stands.
- Explore tiered designs with multiple levels to accommodate a variety of plant sizes.
- Incorporate rustic elements like tree branches or repurposed metal pipes to add a natural and industrial touch.
Personalized Touches
Craft plant stands that tell a story. Add custom engravings, painted accents, or distressed finishes to create one-of-a-kind pieces that customers will cherish.
Embrace the Minimalist Aesthetic
Minimalism continues to be a popular design trend. Sleek and modern plant stands are perfect for contemporary and Scandinavian interiors. These stands emphasize clean lines, geometric shapes, and a streamlined approach.
Metal and Glass Combinations
Metal frames in black, brass, or chrome pair beautifully with glass shelves. This creates a light and airy look that complements minimalist décor.
Integrated Lighting
Enhance the functionality and visual impact of minimalist stands by incorporating LED lighting. This adds a modern touch and provides optimal light for your plants.
Embrace the Industrial Chic Movement
Industrial style is all about embracing raw materials and showcasing their natural beauty. This look is characterized by exposed metal, concrete, and reclaimed wood. Industrial plant stands can add a touch of urban edge to any space.
Metal Pipes and Gears
Repurposed metal pipes and gears add a unique industrial flair to your plant stand designs. Combine these elements with concrete bases or metal shelves for a truly distinctive look.
Rustic Wood Accents
Incorporate salvaged wood elements to soften the industrial look. Think reclaimed pallets, rough-hewn beams, or distressed wood shelves.
Beyond the Ordinary: Explore Unique Materials and Textures
To truly stand out, consider venturing beyond traditional materials. Explore the possibilities of:
- Ceramic: Hand-crafted ceramic plant stands offer a touch of artistry and unique character.
- Macrame: Woven macrame plant hangers provide a boho vibe and a delicate, airy feel.
- Bamboo: This sustainable material offers a natural and eco-friendly option that complements tropical or minimalist themes.
Key Considerations for Plant Stand Design and Sales
To design plant stands that sell, consider these key factors:
Durability and Stability
Plant stands must be sturdy enough to support the weight of plants and pots. Use high-quality materials and prioritize stability in your designs.
Versatility and Adaptability
Offer plant stands in a variety of sizes and configurations to cater to different plant types and room dimensions. Consider adjustable shelves or removable planters for greater flexibility.
Ease of Maintenance
Choose materials that are easy to clean and maintain. Consider using water-resistant finishes or coatings for outdoor stands.
Focus on High-Quality Photography
Stunning visuals are essential for attracting customers online. Use professional photography to showcase your plant stands in beautiful settings and highlight their unique features.
In conclusion, designing plant stands that sell well involves understanding current design trends, exploring unique materials, and prioritizing functionality and aesthetics. By incorporating these key elements, you can create captivating and profitable plant stand designs that bring life and beauty to every home.
Tuesday, August 6, 2024
Wooden Candle Holders: DIY Gift Ideas for Loved Ones

Wooden Candle Holders: DIY Gift Ideas for Loved Ones
In the realm of thoughtful and personalized gifts, handcrafted creations hold a special place. Among these, wooden candle holders stand out as a versatile and endearing option, capable of radiating both warmth and elegance. This article delves into the world of DIY wooden candle holders, offering a comprehensive guide to crafting unique and memorable gifts for your cherished loved ones.
Choosing the Perfect Wood
The foundation of any successful wooden candle holder lies in the selection of the right wood. Consider the following factors when making your choice:
Type of Wood
Various wood species offer distinct characteristics that impact both aesthetics and functionality. Here are some popular options:
- Pine: Known for its affordability, pine offers a soft texture and light color. It's ideal for beginner woodworkers, but its softness may lead to scratches.
- Oak: Strong, durable, and possessing a beautiful grain pattern, oak is a classic choice for candle holders. Its rich color adds a touch of sophistication.
- Maple: Boasting a tight grain and a variety of colors, maple is a versatile choice for candle holders. Its smooth surface is ideal for intricate designs.
- Cherry: Renowned for its warm, reddish-brown hue and fine grain, cherry lends a touch of elegance to any candle holder.
Wood Size and Shape
The size and shape of your chosen wood piece will determine the overall design of the candle holder. For small, delicate candles, thin pieces of wood will suffice. Larger, heavier candles require a more robust base.
Wood Condition
Opt for well-seasoned wood that has been properly dried. This minimizes warping, cracking, and shrinkage, ensuring a stable and long-lasting candle holder.
Designing Your Wooden Candle Holder
Once you've selected your wood, it's time to unleash your creativity and design the perfect candle holder. Here are some inspiring ideas:
Simple and Elegant
For a minimalist aesthetic, consider creating a simple, cylindrical holder. Cut a piece of wood into a circular shape and drill a hole in the center for the candle. You can add a touch of elegance by sanding the edges smooth and applying a clear varnish.
Rustic and Natural
Embrace the beauty of raw wood by creating a rustic candle holder. Use a branch or piece of driftwood as your base. You can either leave the wood in its natural state or add a few coats of stain or paint to enhance its natural beauty.
Geometric Patterns
Add a touch of modern flair with geometric patterns. Cut your wood into geometric shapes like squares, triangles, or hexagons, and arrange them to create a unique and eye-catching design.
Personalized Touches
Make your candle holder truly unique by adding personalized touches. You can carve names, dates, or initials into the wood. Consider adding a decorative element like a small piece of metal, leather, or fabric to enhance the design.
Crafting Your Wooden Candle Holder
With your design in mind, it's time to bring your vision to life. Here's a step-by-step guide:
1. Cut and Shape the Wood
Use a saw to cut your wood to the desired size and shape. Be sure to wear safety glasses and gloves when working with power tools.
2. Drill a Hole for the Candle
Use a drill bit that is slightly smaller than the diameter of your candle to create a snug fit. Drill the hole straight down to avoid tilting the candle.
3. Sand the Wood
Use sandpaper to smooth out any rough edges and create a polished finish. Start with coarse grit sandpaper and gradually move to finer grits for a smoother surface.
4. Stain or Paint (Optional)
Enhance the natural beauty of the wood by applying a stain or paint. Choose colors and finishes that complement the design and your loved one's style.
5. Apply a Protective Finish
To protect the wood and ensure its longevity, apply a clear finish like varnish, polyurethane, or wax. This will create a barrier against moisture, dirt, and scratches.
Adding Finishing Touches
Once your wooden candle holder is crafted, you can add finishing touches to make it even more special:
Embellishments
Consider adding decorative elements like beads, stones, or shells to create a unique look. You can also use rope, ribbon, or fabric to wrap around the base of the holder for a touch of texture.
Personalized Notes
Attach a small tag or card with a handwritten message to your loved one. This adds a personal touch and makes the gift even more meaningful.
Safety Precautions
When crafting and using wooden candle holders, safety is paramount. Keep the following tips in mind:
- Always use a candle holder that is larger than the candle base to prevent wax spills and fires.
- Never leave burning candles unattended. Make sure to extinguish the candle before leaving the room or going to sleep.
- Keep candles away from flammable materials. Place candle holders on a stable, heat-resistant surface, and keep them away from curtains, furniture, and other flammable objects.
- Always use unscented candles to avoid the risk of allergies or irritation.
Conclusion
Wooden candle holders are a thoughtful and versatile DIY gift that can be customized to suit any occasion. By following the tips and ideas outlined in this article, you can create unique and cherished gifts for your loved ones. Remember, the most important element is the love and care you put into crafting your gifts. Each wooden candle holder will be a testament to your thoughtfulness and creativity.
Step-by-Step Guide to Crafting Wooden Wall Clocks with Personality

Step-by-Step Guide to Crafting Wooden Wall Clocks with Personality
Hey there, fellow crafters! Ever looked at a plain wall clock and thought, "This just needs a little something extra?" Well, you're in the right place. We're about to dive into the world of crafting wooden wall clocks with personality, and let me tell you, it's a lot more fun than you might think!
Think about it. A clock isn't just a timekeeper; it's a little piece of art that hangs in your home. It's a chance to express yourself, show off your style, and add a unique touch to your space. So, let's get those creative juices flowing and make some clocks that scream "me!"
Gathering Your Supplies
Before we jump into the exciting part (building!), we need our toolbox ready. Here's what you'll need:
- Wood: This is the heart of your clock! You can use plywood, reclaimed wood, or even beautiful pieces of driftwood. Get creative and choose a wood that speaks to you!
- Clock Movement Kit: This includes the hands, the mechanism, and usually a mounting nut. You can find these at craft stores or online.
- Saw: You'll need something to cut your wood into the shape you want. A jigsaw or a hand saw will do the trick.
- Sandpaper: Smooth out any rough edges and get a nice, clean finish. Don't be afraid to use different grits for a smooth transition.
- Wood Glue: If you're working with multiple pieces of wood, you'll need this to hold it all together.
- Paint or Stain: This is where you add your personality! Choose colors, patterns, or even stencils to bring your vision to life.
- Brushes or Paint Sprayer: Apply your paint or stain evenly and with precision. This will make your clock look professional.
- Drill: You'll need this to make the hole for your clock movement.
- Screws or Nails: To secure the clock movement and the hands.
- Measuring Tape and Pencil: For planning and precision!
Designing Your Clock
Okay, now for the fun part - the design! Think about what you want your clock to look like. Here are a few ideas to get those wheels turning:
Shape It Up
- Circular Classic: A timeless choice that's always in style. You can make it extra special with a unique wood grain, a pop of color, or even some intricate carvings.
- Square or Rectangular Modern: These shapes bring a clean, contemporary feel. Add some geometric patterns or bold colors to really make it pop.
- Whimsical Shapes: Let your inner child run wild! Create a clock shaped like a heart, a flower, or even an animal. The possibilities are endless!
- Layered Design: This creates depth and interest. Try layering different woods, shapes, or textures. You could even use a contrasting wood for the clock hands.
Adding Detail
- Inlay: Add pieces of contrasting wood or other materials like mother of pearl or metal to create stunning designs.
- Carving: If you're feeling ambitious, create intricate patterns or even small figures in the wood.
- Painting: From simple stripes to elaborate landscapes, paint your clock to match your style. Use stencils for intricate designs or let your inner artist shine!
- Decoupage: Add texture and personality by applying colorful paper, fabric, or even old book pages.
- Embellishments: Add buttons, beads, or other small trinkets for a playful touch.
Putting It All Together
Time to get crafty! Here's a step-by-step guide to building your wooden wall clock:
- Cut your wood: Using your saw, carefully cut the wood into the shape you desire. Take your time and make sure your cuts are clean and precise.
- Sand it smooth: Once you have your shape, use sandpaper to smooth out any rough edges. Start with a coarser grit and gradually move to finer grits for a smooth finish.
- Assemble your design (if needed): If your design requires multiple pieces of wood, use wood glue to securely connect them. Clamp the pieces together until the glue dries completely.
- Paint or stain: Apply your paint or stain evenly, following the manufacturer's instructions. If you're using a paint sprayer, make sure you work in a well-ventilated area.
- Drill a hole for the clock movement: Using your drill, carefully drill a hole in the center of your clock face that's the size of your clock movement's mounting nut.
- Install the clock movement: Place the clock movement in the hole and secure it with the mounting nut. Make sure the movement is centered and sits flush with the clock face.
- Attach the hands: Align the hands on the movement according to the instructions that came with your clock movement kit. Secure them with the screws or nails provided.
- Hang your masterpiece: You did it! Your personalized wooden wall clock is ready to adorn your wall and tell time in style. If your clock is heavy, consider using a sturdy hanger or mounting it directly to a stud for extra support.
Tips and Tricks
- Use a wood conditioner: This will help the paint or stain adhere better to the wood.
- Think about the weight: If you're using heavy materials like metal or glass, make sure your clock movement is strong enough to support them.
- Don't be afraid to experiment: Play around with different techniques and materials to find what works best for you.
- Have fun! Crafting is a creative outlet, so enjoy the process and let your imagination soar.
Commonly Asked Questions
Q: What type of wood is best for a clock?
A: Any wood you like! For a classic look, choose a hardwood like cherry, walnut, or maple. For a more rustic feel, consider reclaimed wood, driftwood, or even pine. It's up to your personal taste.
Q: How do I choose a clock movement?
A: The most common types are quartz movements, which are quiet and accurate. Consider the size of your clock and the look you're going for. There are also battery-powered and wind-up movements available.
Q: Can I customize the hands?
A: Absolutely! You can find clock hands in a variety of styles, shapes, and materials. You can even make your own using metal or wood.
Q: How do I clean my wooden clock?
A: Dust your clock regularly with a soft cloth. If it's painted, use a damp cloth with mild soap. Avoid using harsh chemicals or abrasive cleaners.
There you have it! Armed with these tips and tricks, you're ready to create a beautiful wooden wall clock that reflects your unique style. Get out there, be creative, and let your imagination run wild!
Monday, August 5, 2024
How to Build a Wooden Magazine Rack for Entryways and Living Rooms
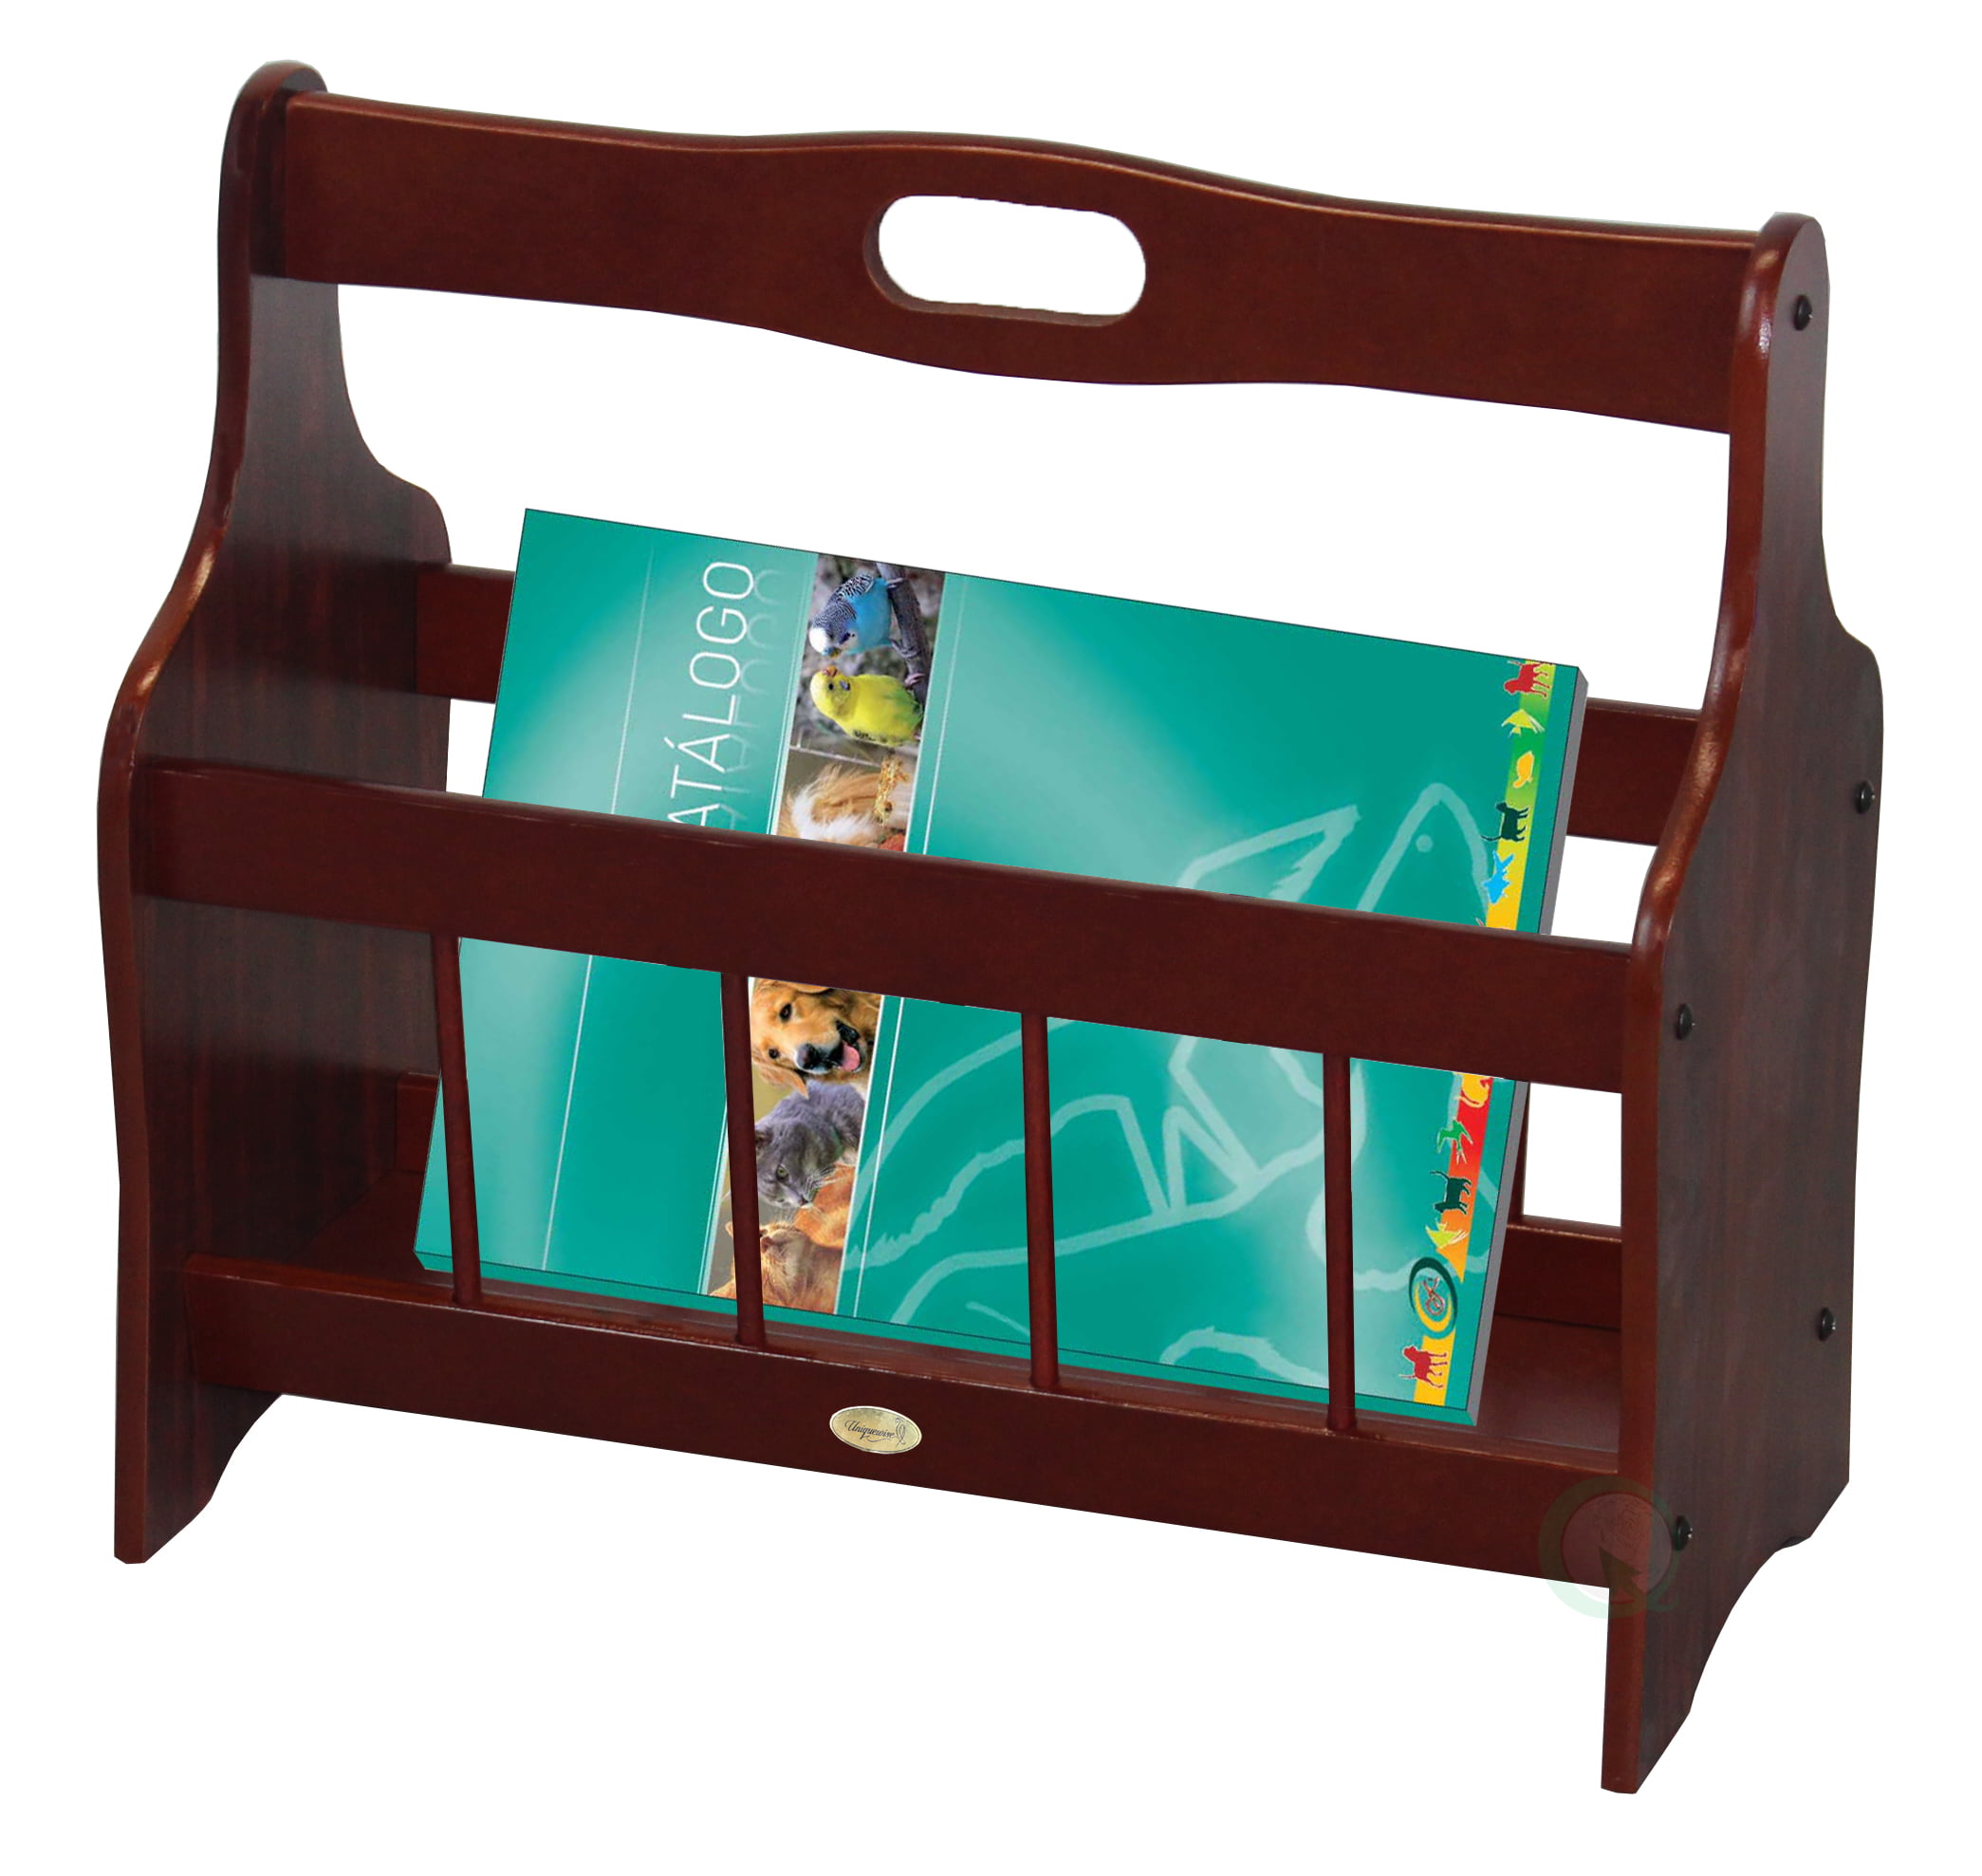
Building a Wooden Magazine Rack for Entryways and Living Rooms
Looking for a stylish and practical way to organize your magazines, newspapers, and other reading materials? Building a wooden magazine rack is a great project for any DIY enthusiast. Not only will it add a touch of charm to your entryway or living room, but it will also help you keep your space tidy and organized. In this guide, we'll walk you through the process of crafting a sturdy and attractive magazine rack that you can proudly display in your home.
Materials You'll Need
Before you start, gather the necessary materials. This project calls for basic woodworking tools and supplies that are readily available at most hardware stores. You'll need:
- Wood boards (1x6 or 1x8) - You'll need enough to create the base, sides, and shelves of your magazine rack.
- Wood glue
- Wood screws
- Wood stain or paint (optional)
- Sandpaper (various grits)
- Measuring tape
- Pencil
- Saw (circular saw or hand saw)
- Drill
- Clamps
- Safety glasses
- Dust mask
Planning Your Design
The first step is to design your magazine rack. Consider the following:
- Size: Determine the dimensions of your magazine rack based on the space you have available and the amount of reading material you need to store.
- Shape: Choose a basic shape for your magazine rack. Common options include rectangular, square, or angled.
- Number of Shelves: Decide how many shelves you want based on the height of your magazine rack and the amount of storage you require.
- Style: Think about the overall style you want to achieve. You can choose from a simple, rustic, or more modern design.
Building the Base and Sides
Once you have your design in place, it's time to start building. Here's how to create the base and sides of your magazine rack:
- Cut the Base: Measure and cut two pieces of wood for the base, ensuring they are the desired length and width.
- Cut the Sides: Measure and cut two side pieces of wood, ensuring they are the desired height. Make sure they are the same length as the base pieces.
- Assemble the Base and Sides: Use wood glue and screws to attach the sides to the base pieces.
Adding the Shelves
Next, let's create the shelves to hold your magazines. Follow these steps:
- Measure and Cut Shelves: Measure and cut your shelf boards to the desired length and width.
- Position Shelves: Determine the spacing between shelves. Use a pencil to mark the positions of the shelves on the inside of the side pieces.
- Attach Shelves: Apply wood glue to the shelf edges and attach them to the sides using screws. Make sure the shelves are level.
Finishing Touches
Now that the main structure is complete, it's time to give your magazine rack that finishing touch:
- Sand: Sand all surfaces of your magazine rack, starting with coarse sandpaper and gradually moving to finer grits for a smooth finish.
- Stain or Paint (Optional): If you want to add a touch of color or protect the wood, apply a stain or paint of your choice. Let it dry completely.
- Apply Polyurethane (Optional): For extra protection and a durable finish, apply a clear polyurethane sealant.
Enjoy Your New Magazine Rack!
You've now successfully built a stylish and functional magazine rack! Place it in your entryway or living room to add organization and personality to your space. Remember to be creative and customize your design to reflect your personal style. Your new magazine rack will not only provide a home for your reading materials, but it will also serve as a testament to your DIY skills.
Saturday, August 3, 2024
Wine Rack Woodworking Projects That Shoppers Love
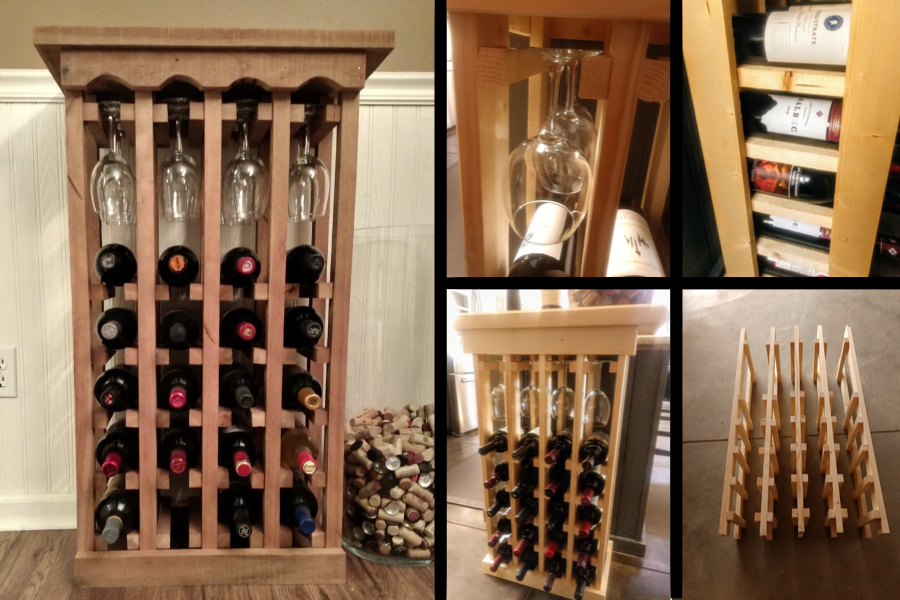
Wine Rack Woodworking Projects That Shoppers Love
If you're a woodworking enthusiast looking to create functional and stylish pieces for your home or to sell, then wine racks are an excellent project option. Wine racks offer a unique blend of practicality and design appeal, making them popular among both home decorators and wine lovers. With a little creativity and woodworking skills, you can craft beautiful and functional wine racks that will impress your customers or enhance your own home décor.
Why Wine Racks are a Hot Commodity
Wine racks are a popular choice for several reasons:
- Functionality: Wine racks provide a dedicated space for storing wine bottles, preventing them from rolling around and getting damaged.
- Organization: They help organize wine collections, making it easy to find the desired bottle.
- Aesthetics: Wine racks can enhance the ambiance of a dining room, kitchen, or bar area, adding a touch of sophistication and charm.
- Customization: They can be tailored to specific needs and tastes, from simple designs to elaborate works of art.
- Gifting: Wine racks make thoughtful and unique gifts for wine enthusiasts.
Popular Wine Rack Woodworking Projects
Let's delve into some popular wine rack woodworking projects that shoppers love:
Wall-Mounted Wine Racks
Wall-mounted wine racks are a space-saving and visually appealing option. They come in various styles, from simple shelves to intricate designs.
Freestanding Wine Racks
For those with more space, freestanding wine racks provide a statement piece. They can be crafted from different wood types and feature multiple tiers for ample storage.
Wine Bottle Holders
Small wine bottle holders are perfect for adding a touch of charm to a countertop or bar cart. They can be shaped like animals, wine glasses, or other creative designs.
Wine Rack with Storage
Combine functionality and storage with wine racks that include drawers or cabinets. This allows you to store wine glasses, bottle openers, or other wine accessories along with the bottles.
Tips for Crafting Successful Wine Racks
Here are some tips to ensure your wine rack woodworking projects are a hit:
- Choose the Right Wood: Opt for sturdy wood types like oak, maple, cherry, or walnut. They are durable and have a beautiful grain pattern.
- Pay Attention to Detail: Precise cuts and finishes create a professional and high-quality product.
- Consider Safety: Ensure the rack is stable and can hold the weight of the wine bottles.
- Think Outside the Box: Explore unique designs and incorporate decorative elements to make your wine racks stand out.
- Promote Your Work: Showcase your wine racks online or at craft fairs to reach a wider audience.
By incorporating these tips and exploring different design possibilities, you can create wine racks that are both functional and eye-catching, attracting the attention of shoppers and enhancing your woodworking portfolio.
Friday, August 2, 2024
DIY Chess Tables That Sell Like Hotcakes
DIY Chess Tables That Sell Like Hotcakes: Crafting a Winning Strategy
Want to turn your woodworking passion into a profitable venture? Look no further than crafting stunning, functional chess tables. These timeless pieces are not just for game enthusiasts, but also stylish additions to homes and offices. By combining your skills with a strategic approach to design and marketing, you can create chess tables that sell like hotcakes.
Why Chess Tables Are a Hot Commodity
The appeal of chess tables goes beyond their practical function. They represent a symbol of intellect, strategy, and timeless elegance. As a result, these tables are sought after by:
- Chess enthusiasts: Dedicated players crave a dedicated space for their beloved game, elevating their experience with a quality table.
- Home decorators: Chess tables add a touch of sophistication and conversation-starting flair to living rooms, studies, and even bedrooms.
- Gift-givers: These tables make unique and memorable presents for birthdays, holidays, and special occasions.
By tapping into these diverse markets, you can build a loyal customer base eager to own your handcrafted masterpieces.
Crafting Chess Tables That Stand Out
The key to success lies in creating chess tables that are not just functional but also visually appealing and unique. Here are some ideas to inspire your creations:
Material Magic
Experiment with different wood species to create distinct aesthetics and textures. Consider:
- Hardwoods: Cherry, walnut, maple, and oak for a classic and elegant look.
- Softwoods: Pine or cedar for a rustic and warm feel.
- Exotic woods: Rosewood, ebony, or mahogany for a touch of luxury.
You can also explore other materials like reclaimed wood, metal, or glass for a more contemporary design.
Design Diversity
Don't limit yourself to traditional square tables. Explore different shapes and sizes:
- Round tables: Offer a more intimate and conversational setting.
- Oval tables: Provide a sleek and modern aesthetic.
- Folding tables: Offer convenience for storage and portability.
You can even incorporate storage compartments, drawers, or hidden compartments to enhance functionality and appeal.
Adding a Personal Touch
Make your chess tables truly unique by incorporating personal touches:
- Intricate carvings: Add intricate designs or chess-related motifs.
- Inlays: Create beautiful patterns using contrasting wood species or other materials.
- Custom finishes: Apply various stains, paints, or varnishes to achieve the desired color and sheen.
These details will elevate your creations from ordinary to extraordinary, capturing the attention of discerning buyers.
Marketing Your Masterpieces
Once you've crafted stunning chess tables, it's time to showcase them to the world. Here's how to market your creations effectively:
Online Platforms
Utilize online marketplaces like Etsy, eBay, or specialized woodworking platforms to reach a wider audience. Optimize your listings with high-quality photos, detailed descriptions, and attractive titles.
Social Media Strategies
Engage with your target audience on platforms like Instagram, Facebook, and Pinterest. Share captivating photos and videos of your crafting process and finished products. Highlight the unique features and stories behind each chess table.
Local Events and Craft Fairs
Participate in local craft fairs, art festivals, or even chess tournaments to connect directly with potential buyers. This allows you to showcase your craftsmanship firsthand and generate excitement around your brand.
Word-of-Mouth Marketing
Leverage the power of positive word-of-mouth by providing excellent customer service and creating high-quality products. Satisfied customers become your best brand ambassadors, spreading the word about your talent.
A Winning Formula
Crafting DIY chess tables that sell like hotcakes requires a combination of skill, creativity, and strategic marketing. By focusing on quality, uniqueness, and customer satisfaction, you can turn your woodworking passion into a profitable business. So, pick up your tools, unleash your creativity, and start crafting your own chess table success story!